Laundry Room Makeover Full Cost Breakdown
I recently shared that I madeover my friend [Sara] Diff’s small, BORING laundry room with four beginner-friendly DIYs. The first DIY is this Wall Mounted Laundry Drying Rack that saves space in a small Laundry room. I’ll also be sharing the next two in blogs posts soon: how to install Peel & Stick wallpaper and build simple shelves. The last is painting and installing a pre-assembled cabinet that I share in Part 4, here!
The project took up minimal time and was relatively inexpensive to complete. I did some pre-work and building before spending a few days doing install and finishing touches but it’s easily completed in a weekend. Here’s the full breakdown of all the steps I took to makeover this small laundry room with all the links to items so that you can do it too!
To jump to the total cost, click HERE.
Before:

After:

Diff built her house in 2019 and while she’s done a great job decorating most of the home, her laundry closet remained builder basic. This “closet” is actually pretty large and more like a small room with only a single wire shelf for storage. There is room to walk around and put a laundry hamper but no space to put a drying rack- something she really needed.
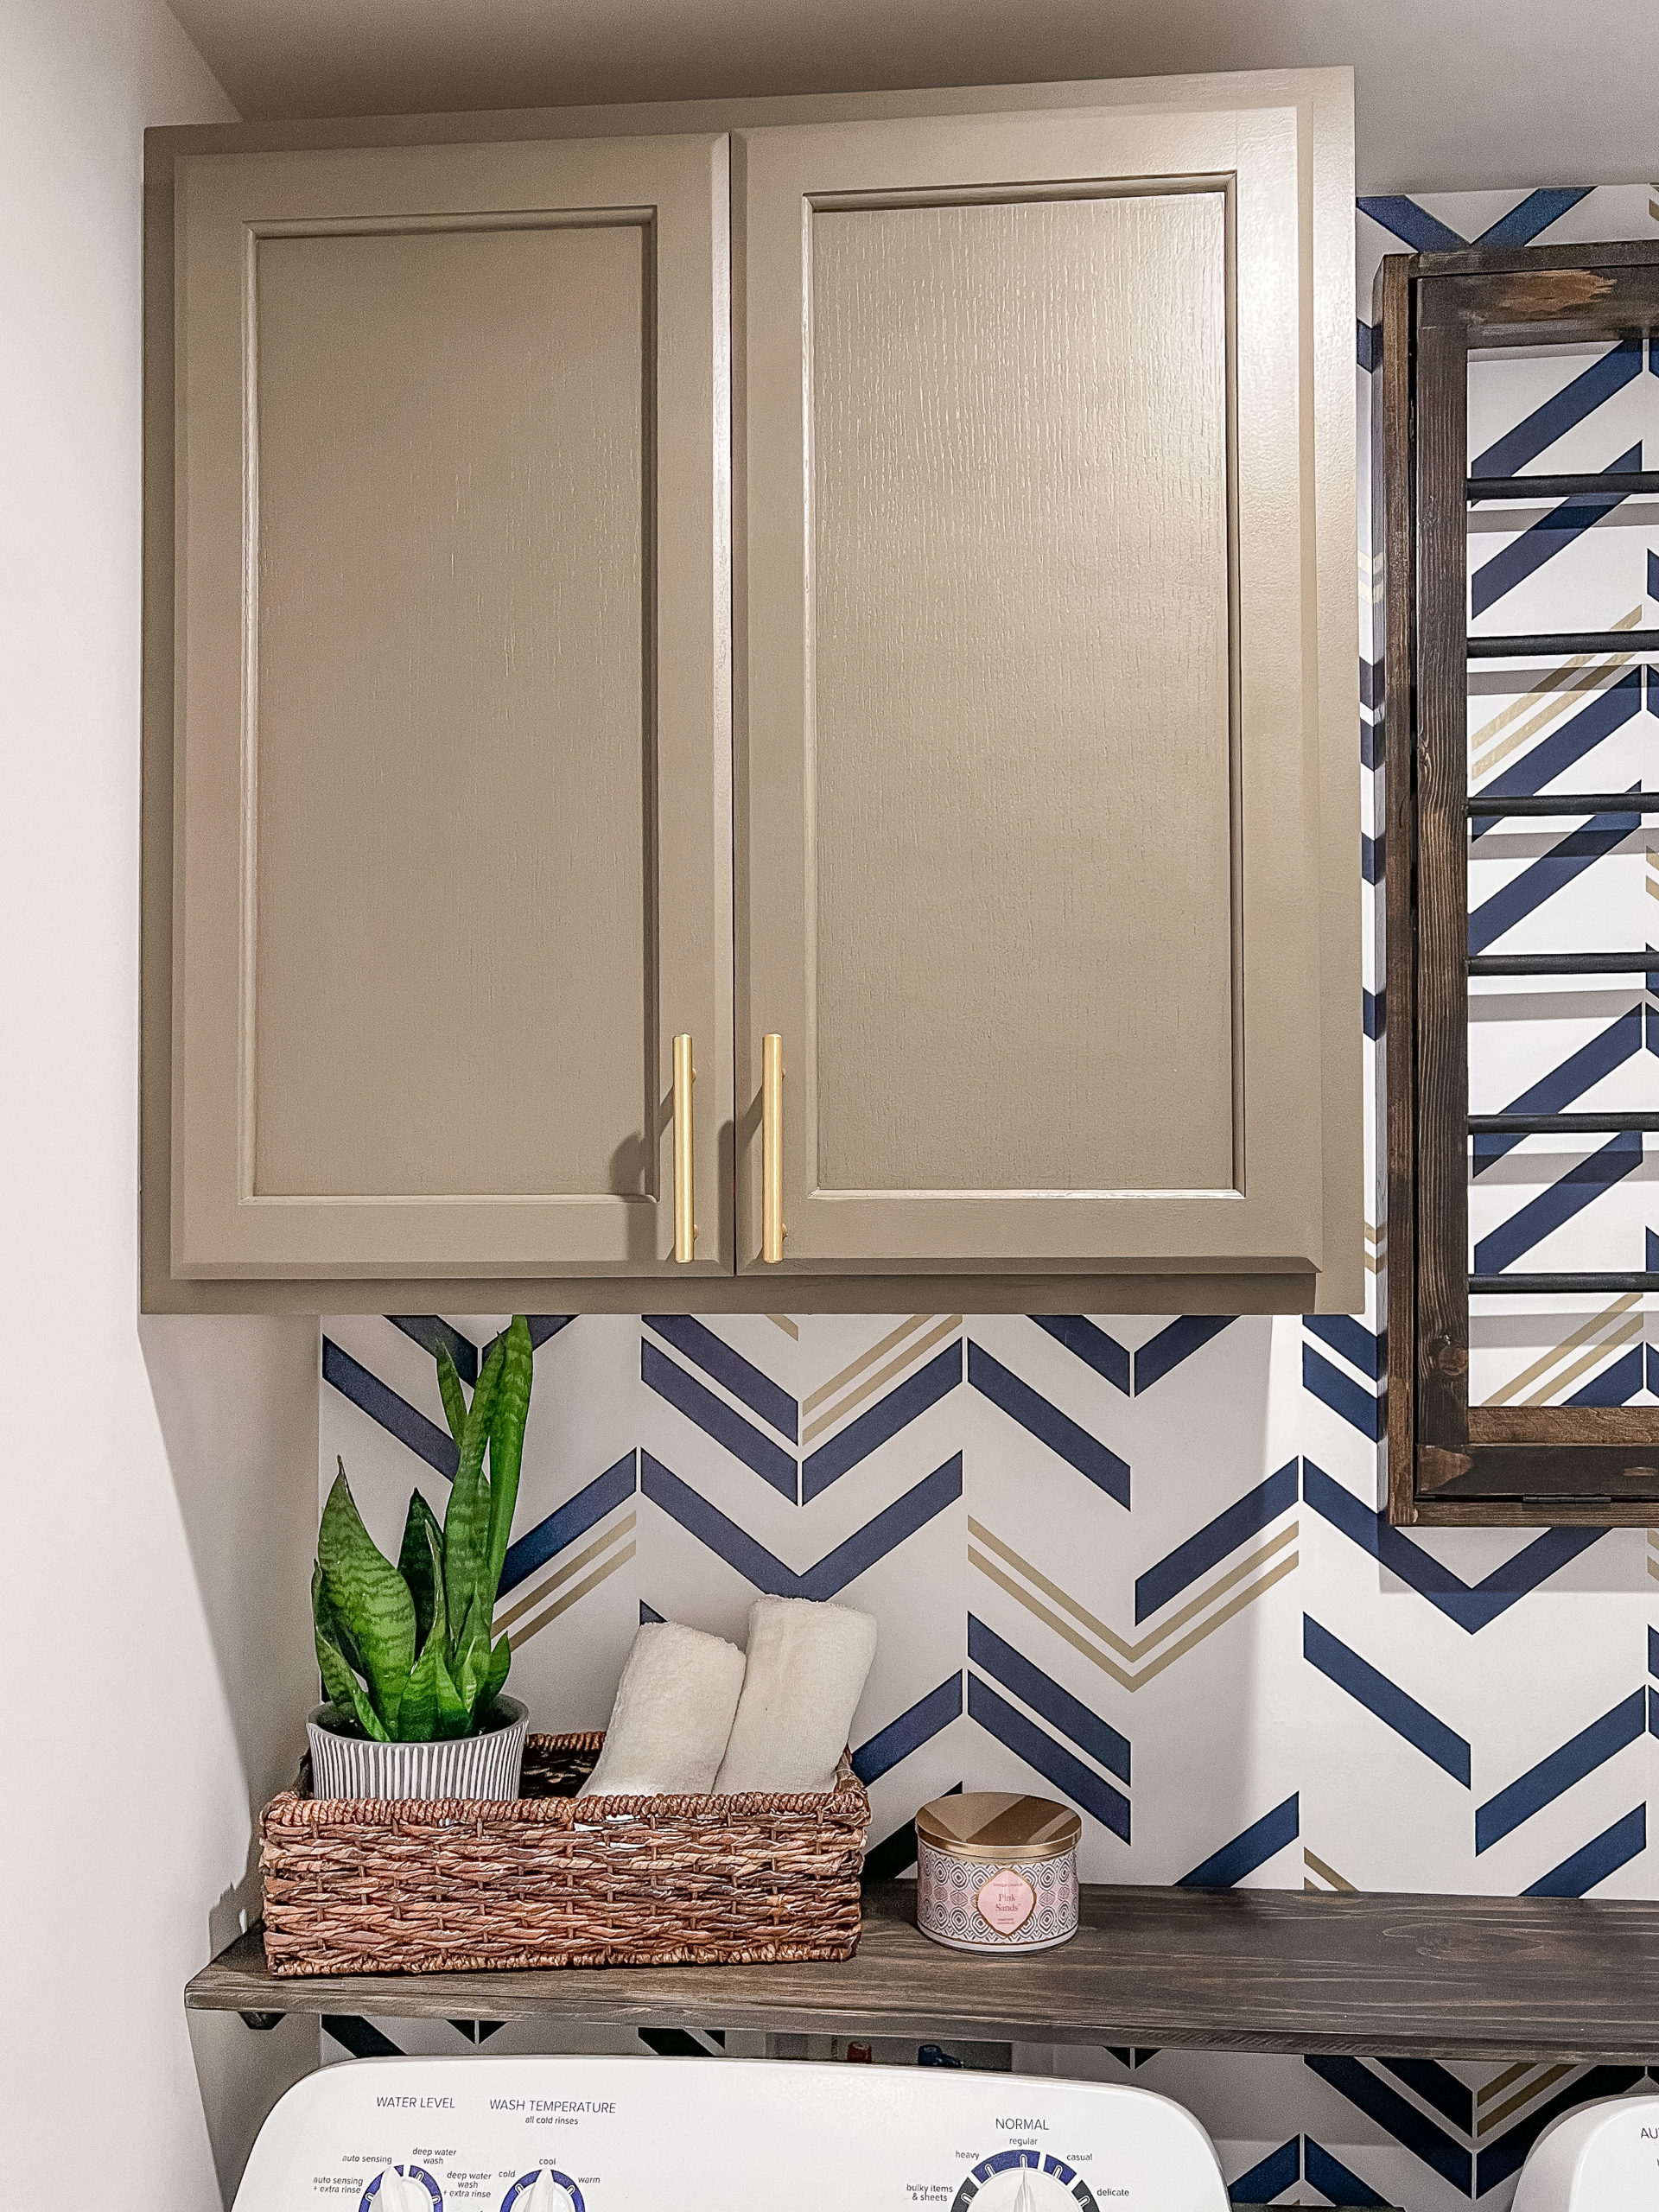
We decided on some must haves for the space before getting started on the creative design. Diff needed out-of-sight storage since the Tide Pods and bottle of bleach on display really weren’t cutting it. We landed on a cabinet but still wanted to incorporate some shelving because a shelf is such a great solution to filling that weird gap between the w/d and the wall.

She also needed a space for air drying clothes. Diff is always either on her Peloton or at a Burn Bootcamp class. She has a collection of nice work out clothes that she can’t put in the dryer so we found a DIY wall-mounted rack that would be a fun little project and a great solution for her.
(This post contains affiliate links which means I receive a small compensation at no cost to you. As an Amazon Associate I earn from qualifying purchases. You can read more about it here. Thank you for supporting my blog!)
Part 1: Create Mood Boards and Choose Design
To give an idea of what I was able to do for the laundry room, I built some mood boards. I started with the w/d and the must haves to the mock up, then I searched for wallpaper, paint and hardware/decor. I wanted to hang peel and stick wallpaper so I found options on Wayfair and she went with this geometric navy and gold print. Such an energetic and spunky feel for a small room!
Next up, we chose the neutral Virtual Taupe for the cabinet to complement instead of compete with the wallpaper. Lastly, she picked out these brushed brass cabinet handles to tie it all together. I picked decor to round out the final look but we ended up only grabbing a new basket and some towels from Target.

Part 2: Add Peel & Stick Wallpaper
Wallpaper is making a huge comeback but not just our grandmother’s wallpaper! There’s so many new innovative wallpapers that make it easier to apply and easier to remove! I was specifically interested in trying out peel & stick wallpaper for this project so that if I couldn’t get it to apply nice then I could just take it right down. Luckily it was pretty easy to apply and ended up looking really good.


I only wallpapered one wall in the room as an accent for a total of 44 sq ft. It was my first time ever attempting to apply wallpaper and it took just over 3 hours to complete! This navy and gold geometric wallpaper is from Wayfair but I’ve since discovered NuWallpaper on Amazon that I’ll definitely be trying out!
I watched a few tutorials on applying peel and stick wallpaper and found that traditional “scrapers” that you might see online are actually not great for installing wallpaper. I found a trick to use a dry erase- eraser to get the wallpaper adhered to the wall which worked really well- just make sure it’s new!
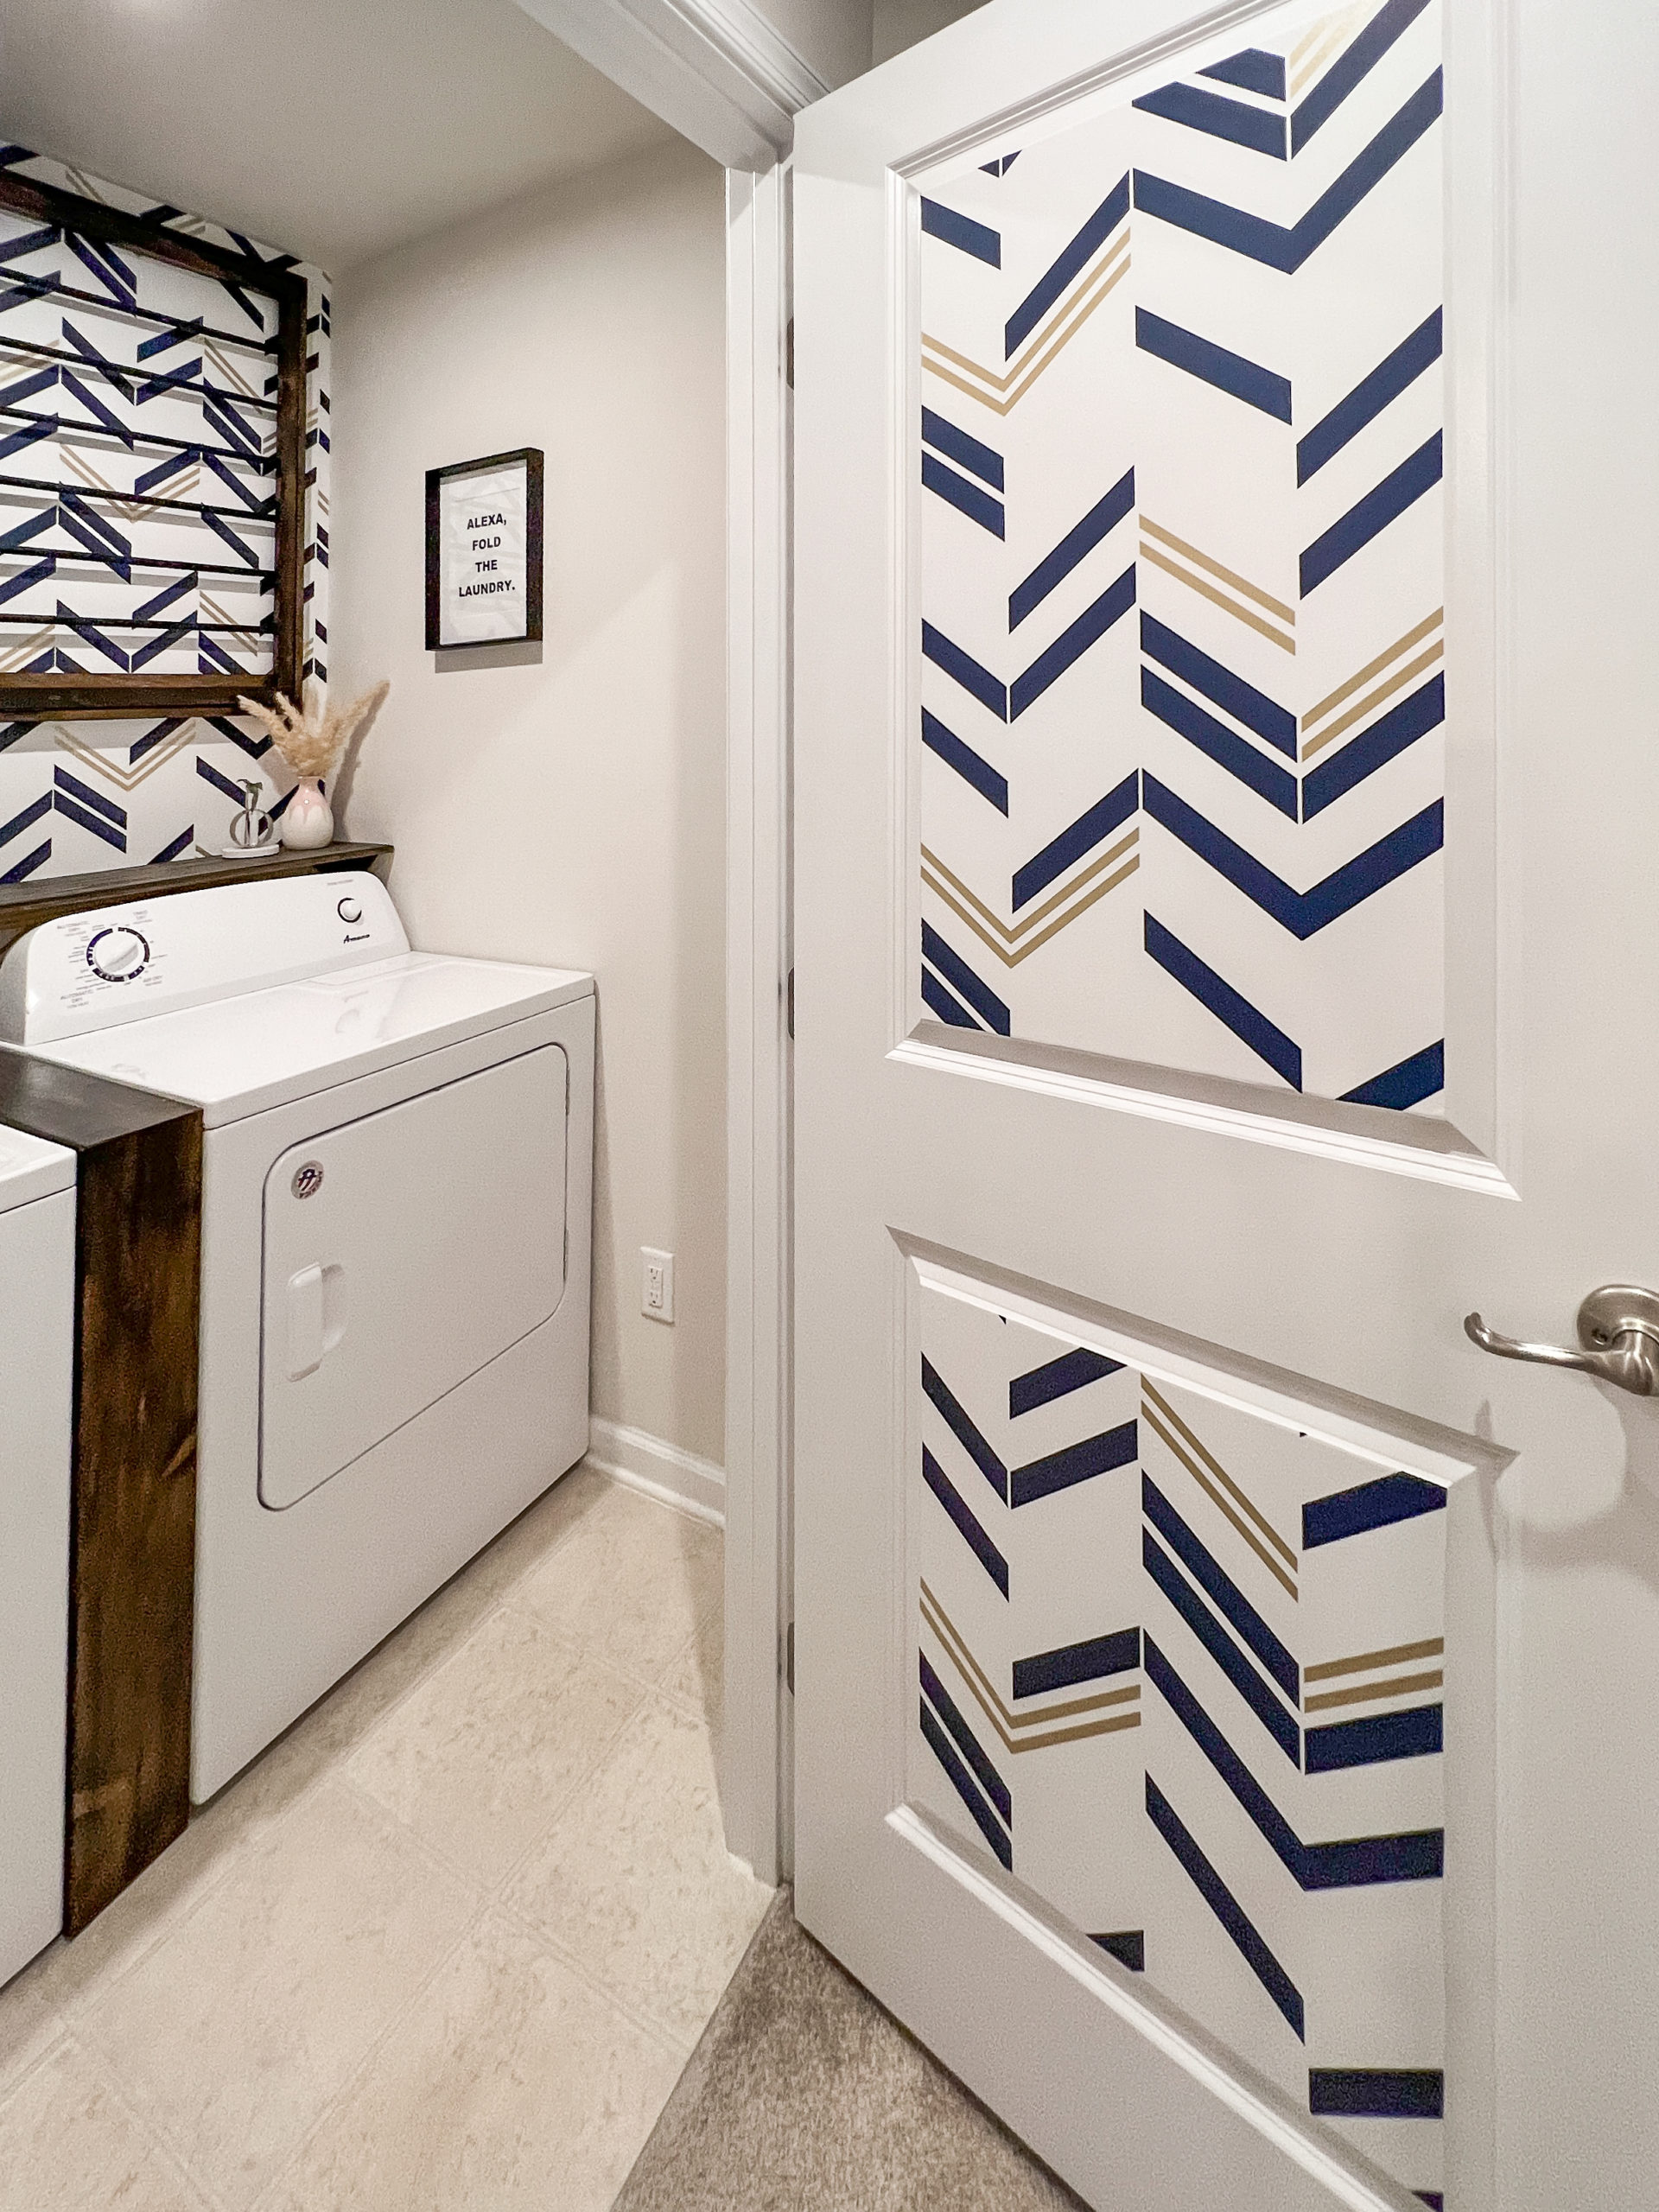
If you have some extra wallpaper at the end (we had quite a bit) try to think of some other fun way to use it! I added it to the interior of the door going into the laundry room. It felt a little bit kiddish at first but ended up feeling really intentional once fully applied and with the context of the rest of the room!
Part 3: Build Wall-Mounted Drying Rack
My main mood board technique is to scour Pinterest for inspirational designs that I can adopt into my own projects. Early on, I discovered that you could save space by building a drying rack right into the wall!
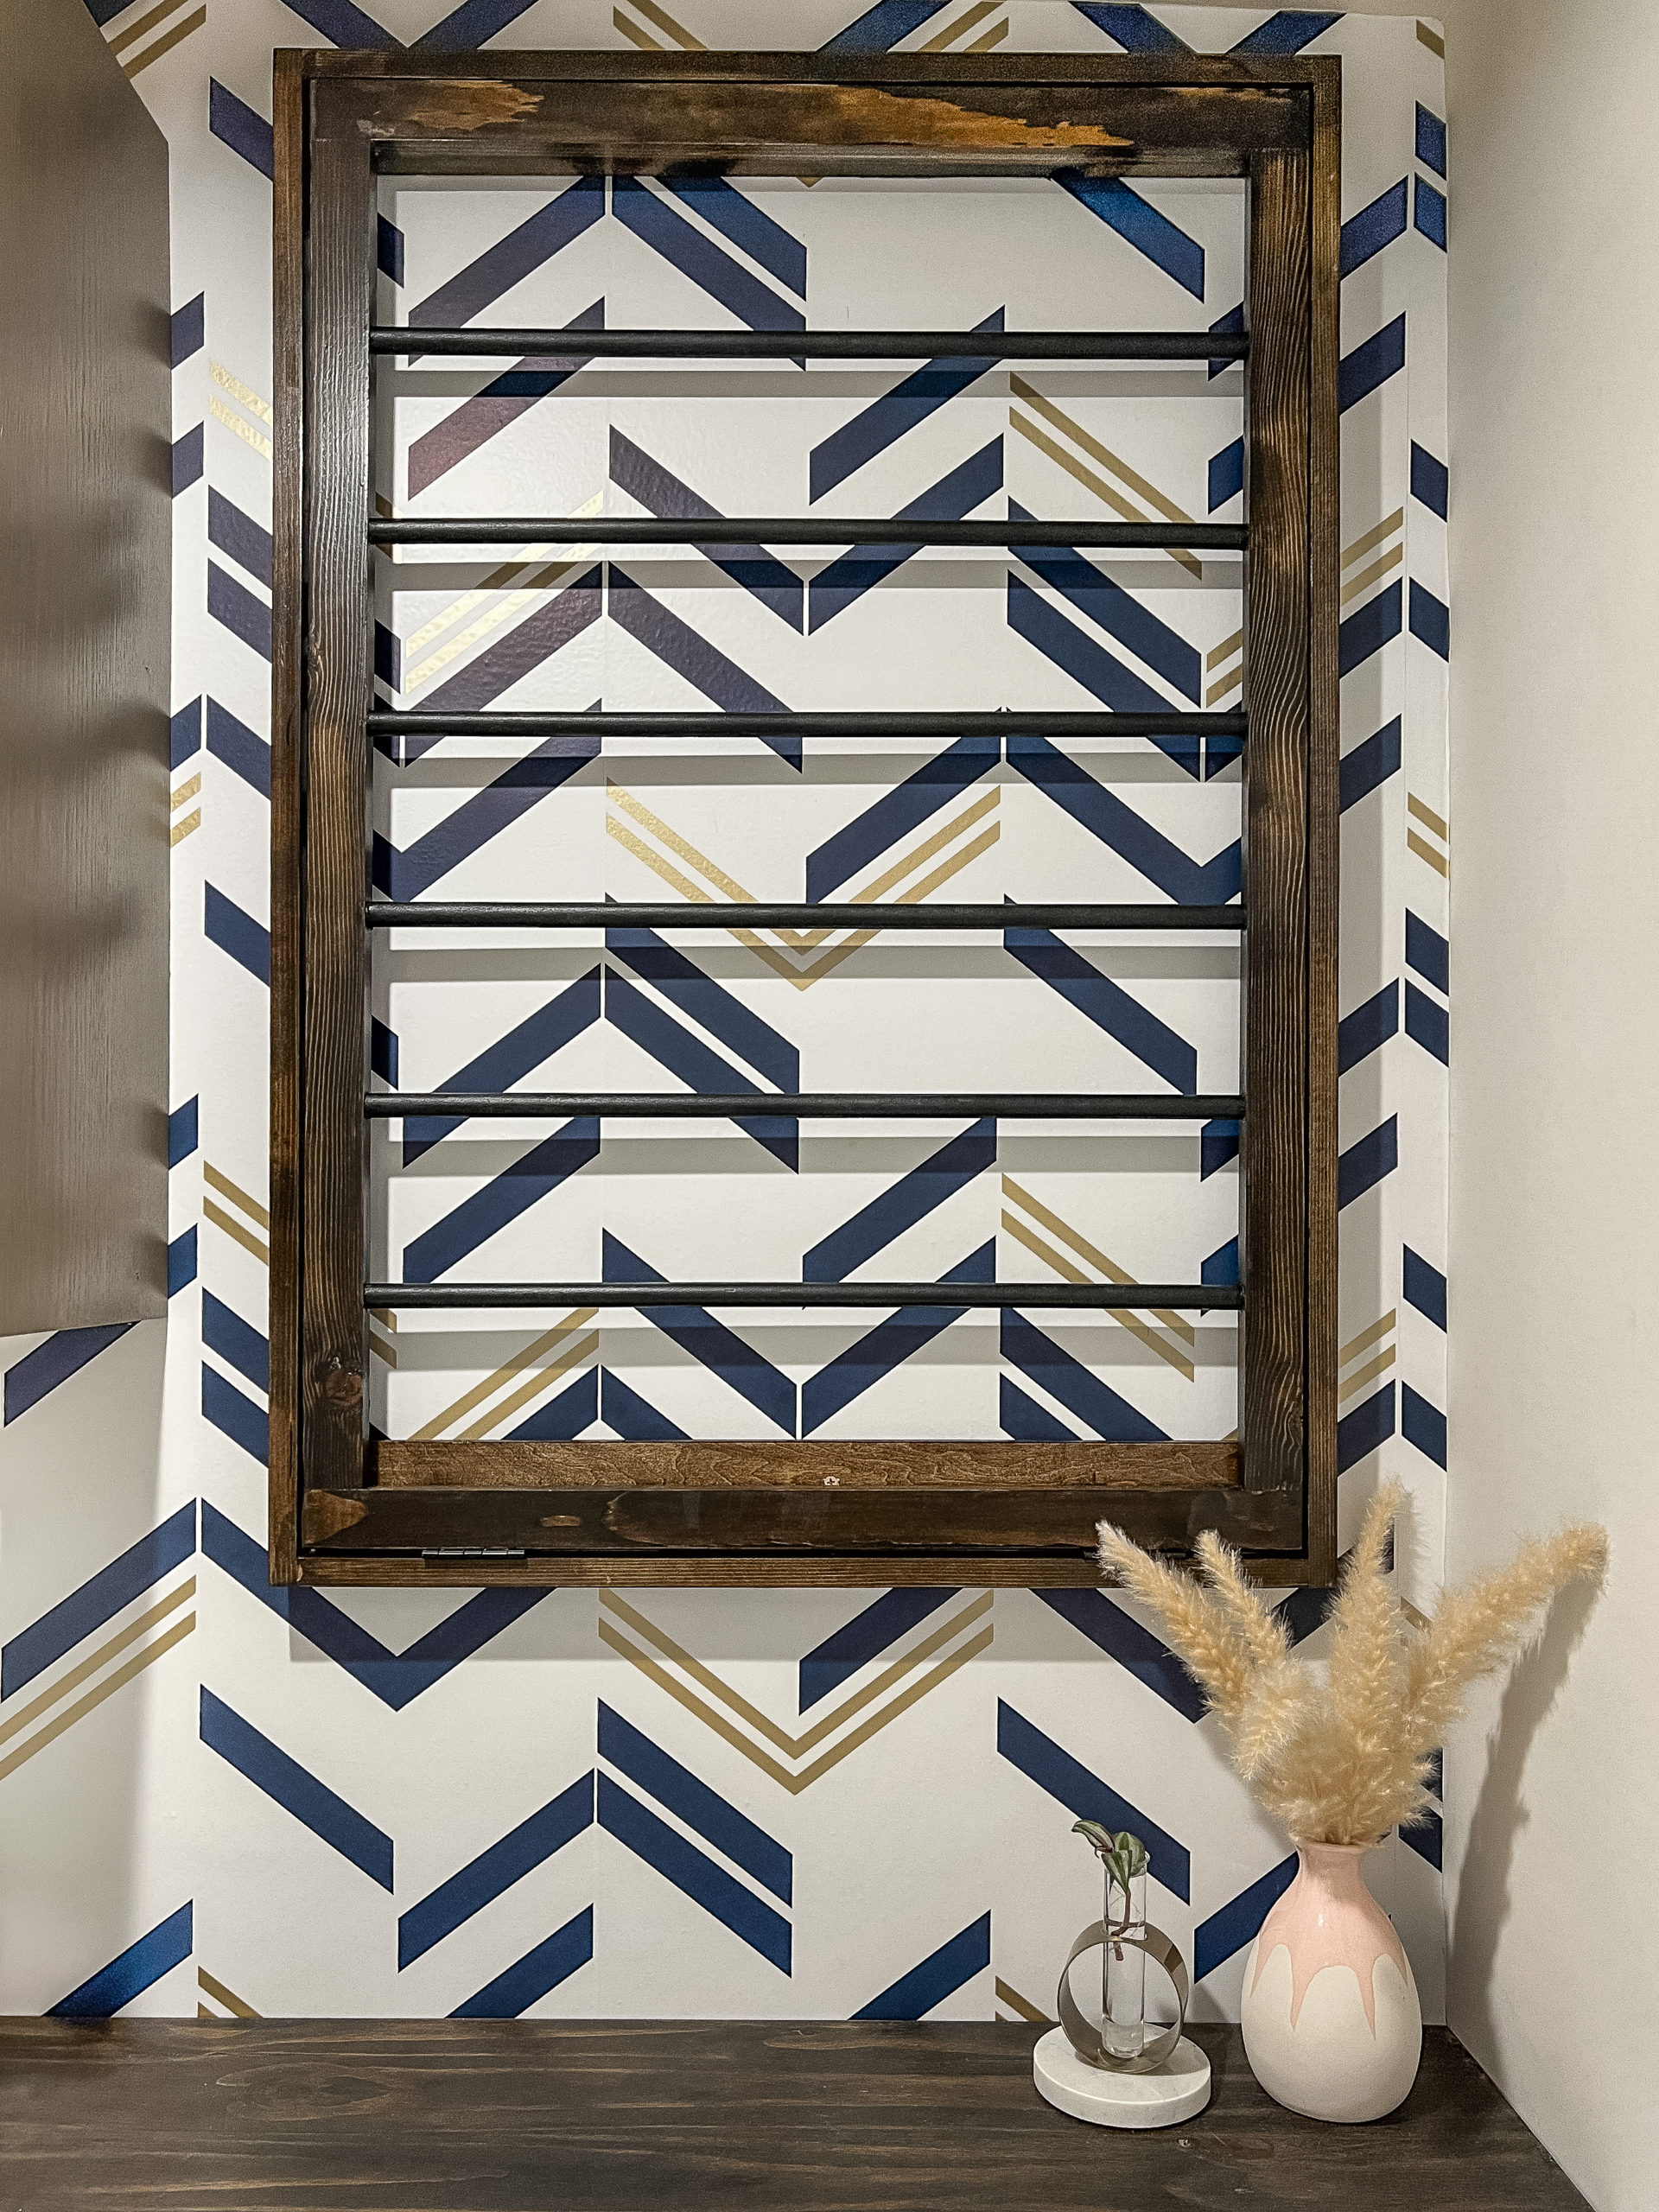

I saw a compact drying rack in Philip or Flop‘s laundry room makeover and knew it was perfect since the drying rack folds into itself and takes up almost no room when it’s not in use! It was also a pretty simple DIY that’s very beginner friendly and came out really well! My favorite part is that you can embed a magnet inside the frames so it doesn’t need a latch to stay closed.
Part 4: Paint and Install Cabinet
For the out-of-sight storage, I recommend a pre-assembled, stock cabinet. I painted this one Virtual Taupe to complement the wallpaper pattern. Pre-assembled cabinets are easy to use in projects because they come ready to paint (or are already finished) and you don’t have to worry about building doors and adding hinges (without screwing up the alignment)! The only scary part is drilling into the fresh cabinets to install handle hardware. I used a piece of painters tape to map out how farthe holes were spaced on the handle then placing that same tape on the cabinet to mark my spots to drill.


Installing cabinet’s is way easier than you would think, you just need to attach them to the studs in the wall with 3″ screws. I like to make at least 6 connections between the structural parts of the cabinet (not just the back panel) and the studs. It’s probably overkill, but it’s worked for all the cabinets I’ve ever installed so far (three total!).
When you buy a pre-assembled cabinet, the doors may not be perfectly aligned (these ones weren’t) so you can watch this quick YouTube video on how to adjust the hinge hardware to get those doors to line up perfectly. All you need is a screwdriver!
Part 5: Build Shelving (on a budget!)
There’s a few different styles of horizontal shelving you can build. They’re all pretty easy to make but they take different amounts of wood to build. Below are the two main types I’ve built before but with the current cost of wood a single board is the most cost effective and easiest to construct.

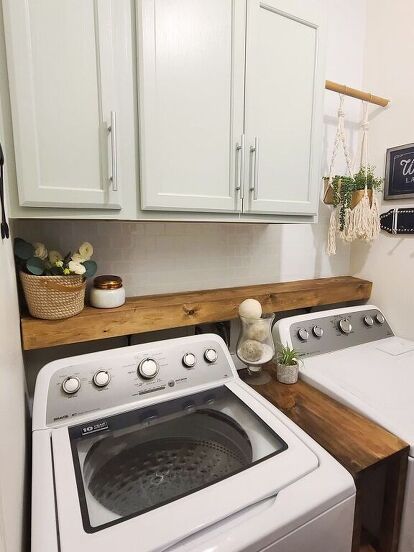
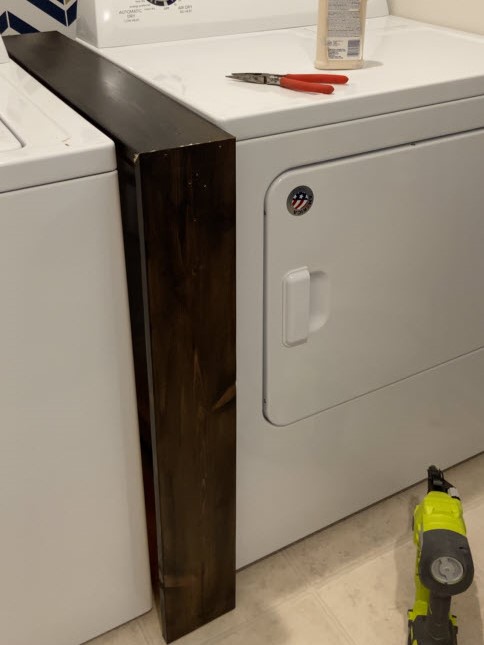
The shelf in between the w/d is also made from a single piece of wood (well, two if you count the frame). The frame is made from 2″x4″‘s then there’s a 30″ top piece and a 31″ front piece made from a single 1″x6″. I mitered the end of both 1″x6″ pieces for a really professional joint on the front. I sanded the corner down slightly and restained/sealed the shelf before calling it complete.

Finishing Touches
I pulled a bunch of different baskets, artwork and decor pieces for the mood board but just because you makeover a room doesn’t mean you need to go buy all new decor! We “shopped” the existing decor at Diff’s house and found some really cute pieces that worked perfectly in the space. The best part is that she didn’t spend a cent on them (well aside from buying them the first time)!

The one new item she did get is this funny word art that I made, printed and framed. It’s perfect for the design and also hilarious (imo). If you want to add this “artwork” to your laundry room, I made the file downloadable, here:

The Laundry room took a little bit of planning and prep work. I made the drying rack, painted the cabinet and cut the wood for shelving the week leading up to install. It took one day to install wallpaper, one day to add the cabinet and shelving and a final day for touch up stain, add decor and take photos. All in, the total prep/build time was about 10 hours and install around 6. Definitely a good (and simple) weekend project!
Laundry Room Makeover Cost:
Wallpaper (I used 3 rolls)- $135
Cabinet Enamel Paint (tinted SW Virtual Taupe)- $31
DIY Drying Rack– $98
Gold Handles– $11
Wood for Shelving- $42
Misc (Stain, Poly, Screws, nails etc.)- $25
Total Laundry Room Makeover Cost- $502
Friend who trusts you to tear up their house?- $Priceless
If you have any additional questions about the Laundry Room Makeover, leave a comment below!
Want to keep up with my newest projects? Come hang out on my social media accounts, below!
Hi,
Do you have a pic of how the shelf between the units looks when pulled out or is it just a frame or box? Thanks 😊
Hi Richard,
This is just two 1×4’s attached to a 2×4 frame. I tried to buy a rolling cart to go in between the units that I would wrap with the 1×4’s but I wasn’t able to find one at the right size since it’s less than 3.5″ wide. If you have space, you could definitely find some photos of shelves like this on Pinterest!
Thanks,
Rachel
I love how you did this laundry room makeover. This is amazing. I like to try this out.