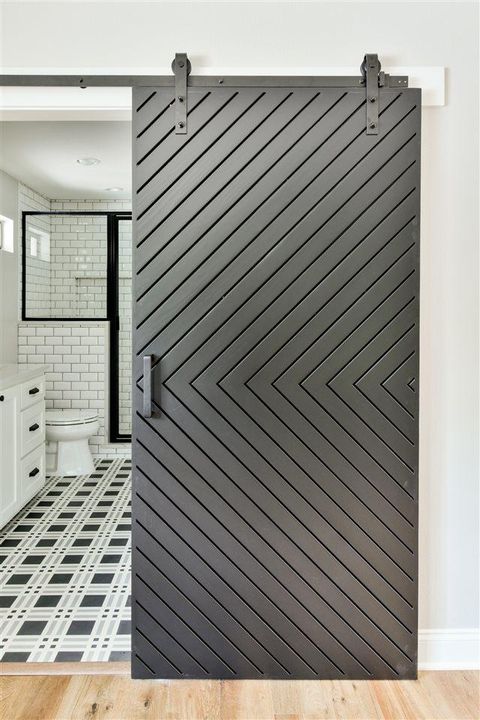
Easy DIY Modern Barn Door Design
(This post contains affiliate links which means I receive a small compensation at no cost to you. As an Amazon Associate I earn from qualifying purchases. You can read more about it here. Thank you for supporting my blog!)
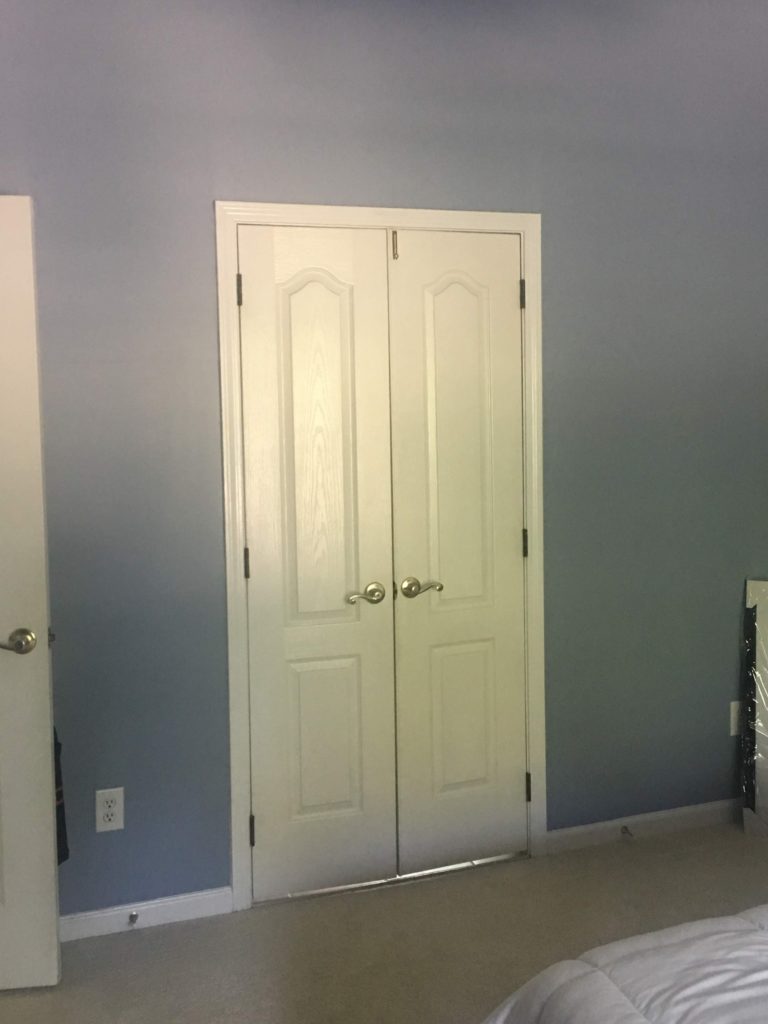
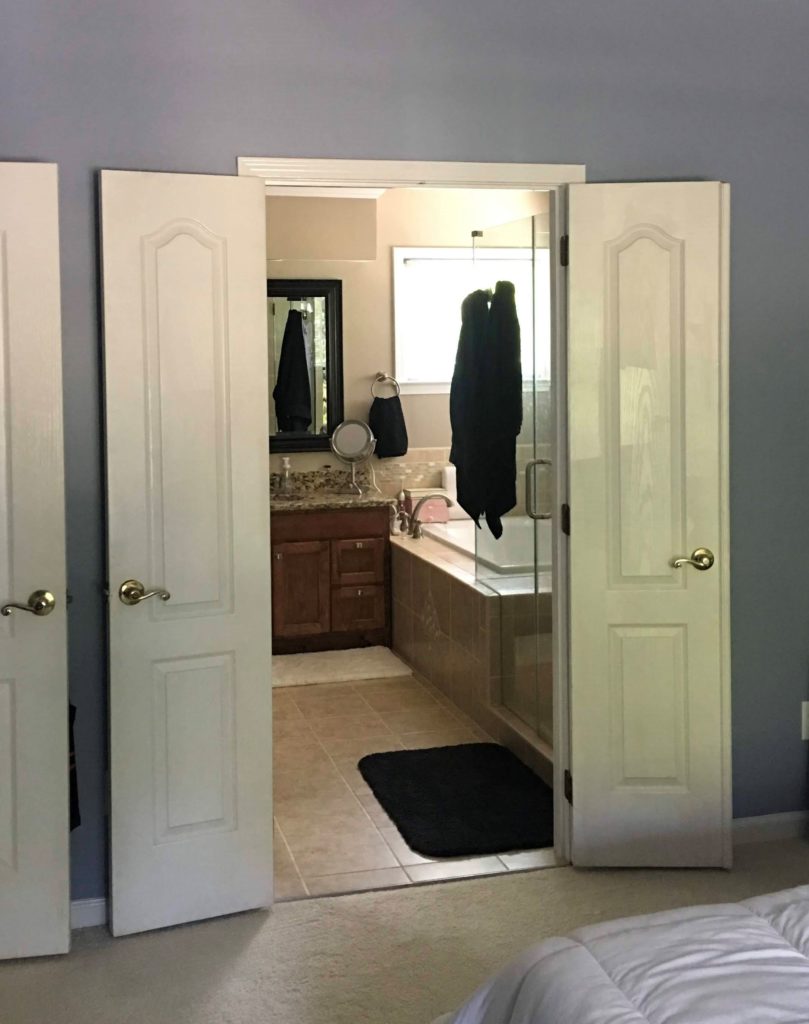
One of my least favorite features of our home, when we bought it were the the doors to our primary bathroom. The opening was larger than a standard door, at 41.5″ wide, but instead of one large door, the builder put in 2 extremely narrow doors. That locked from the outside. Enough said, these doors had to go. I was going to DIY my own modern barn door!
Sure, there are pre-fab barn doors that you can find at the Home Improvement Store and online but forget “Modern Farmhouse”, most look like they belong in an actual barn. They also typically come in the standard 31″ width, oh yeah, and they cost $300-400. None of those things was going to work for me.
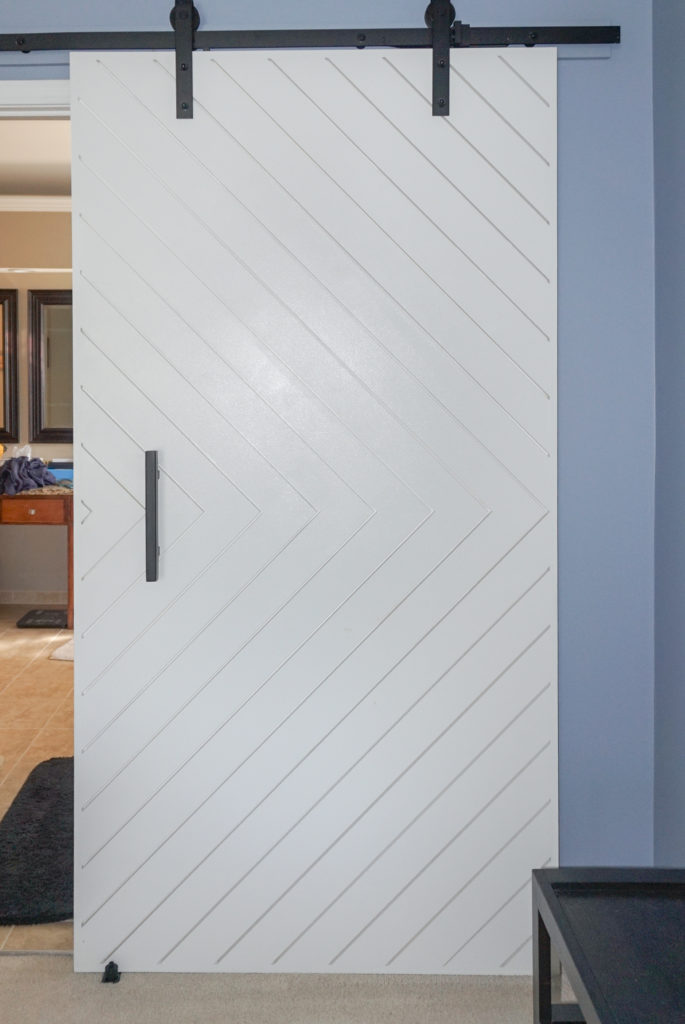
Below, I’ll show you how to build your own DIY Modern Barn door. The total cost of materials for my 45.5″ wide door including the soft-close hardware was under $200.
See the full cost breakdown HERE!
MATERIALS:
3/4″ MDF (plywood works too)
Primed MDF trim boards (I used 1″ x 4″)
1″ x 2″ trim boards (for the frame)
1- 1″ x 3″ Solid board
18g Nails, Wood Screws (3″ for attaching to studs)
1- Beadboard Panel (optional back side of door)
TOOLS:
Miter Saw, Table Saw or Circular Saw
Hand Sander (220 grit paper)
Wood Glue, Wood Filler
Wood Clamps, Tape Measure, Level, Stud finder
Painting Supplies (Brushes, Roller)
STEP 1- Measure your door opening
Measure the length and width of your door opening. My door opening is 36″ wide but I have trim that I want to cover, so I measured from outside trim to outside trim- 41.5″. Then, I added 2″ on each side to make sure there was enough coverage when the door was closed. Don’t go crazy adding a large amount of extra coverage because it’s pretty easy to accurately hang your door, but you do want to make sure it’s slightly larger than the exact measurement.
While you’re in the space, you’ll also want to measure the wall on the side of the opening that you want the door to slide to and the space above the door. Make sure that your wall space is the width of your door plus at least 5-7″ and there’s at least 6″ above your door height for the mounting hardware. These exact dimensions are specific to the hardware you’re using so definitely reference the instructions to confirm.
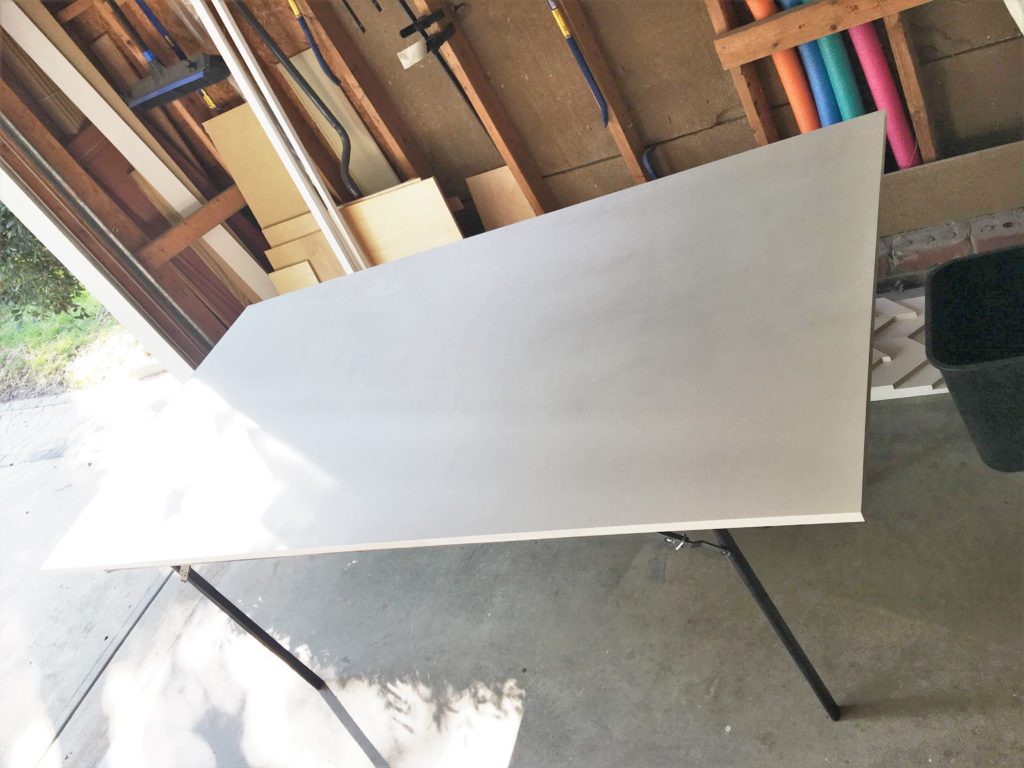
STEP 2- Cut your MDF Board to size
If you don’t have a table saw or circular saw, Lowes or Home Depot will cut your wood when you buy it. You want to cut your board to the size you calculated in step 1. Make sure to take into account the trim you will add to the door by subtracting 1.5″ off the width and height (1″ x 2″ board is actually 0.75″ wide). My MDF board measures 42.5″ x 80.5″.
STEP 3- Paint your Board and Trim
Paint your board and your trim now, because once the trim is attached to the board, it’s really difficult to get good coverage in all the little cracks. Of course, I didn’t think about this when I was building my door, so later on, I got to struggle through exactly what I’m helping you avoid. If you’re using unprimed MDF, make sure to use a primer to get the material ready to accept paint, otherwise you might need a few coats of the expensive stuff. See why priming is so important, HERE. If your trim boards are already primed, like mine were, you can skip the primer and go right to paint!
STEP 4- Choose your Design
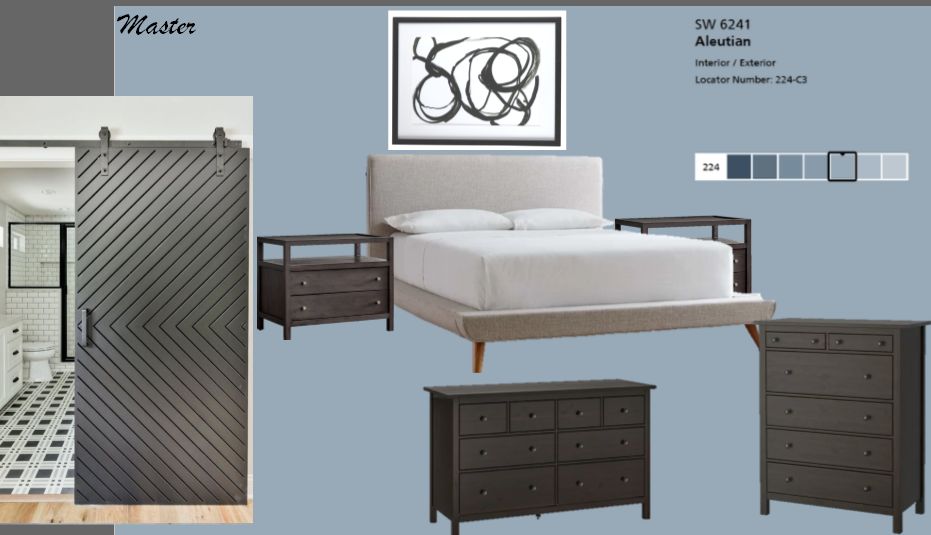
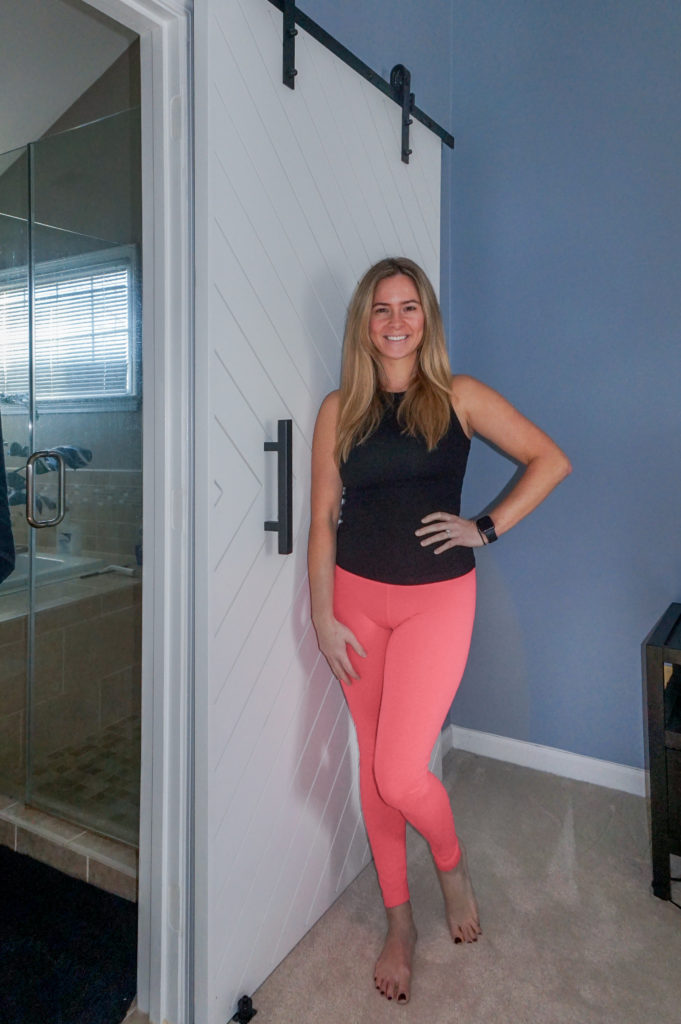
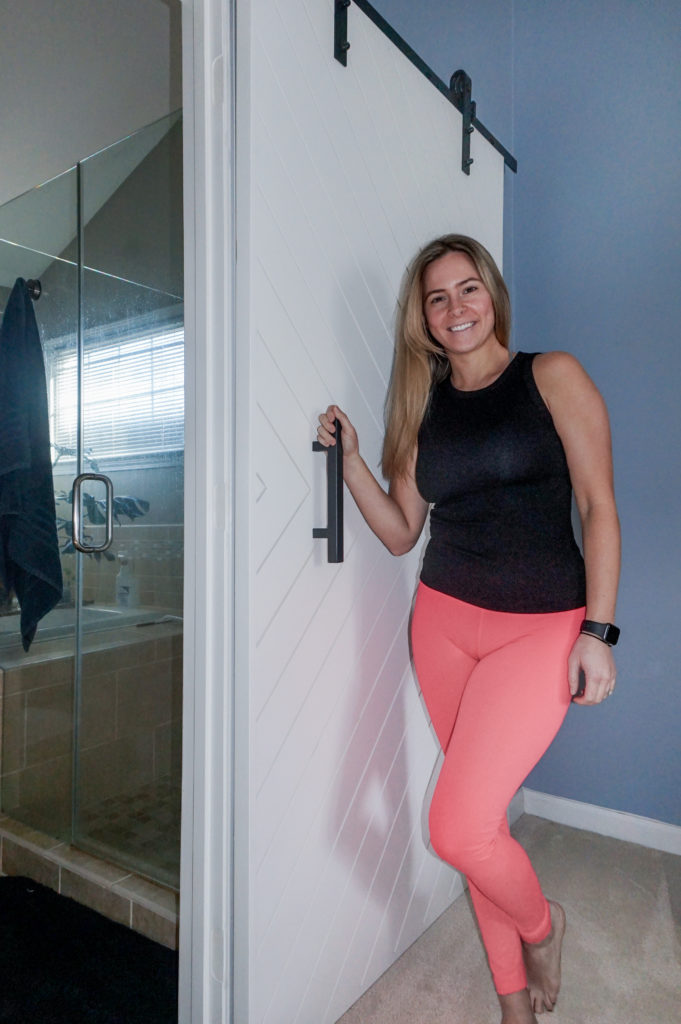
In this step, you can get creative with your trim and build any design that you want. I will be detailing the specific modern barn door design that I actually built for this tutorial. Speaking of, I chose to build a pattern that I was seeing all over instagram that was inspired by a door from the HGTV show, Fixer Upper. It really fit in with my bedroom mood board.
STEP 5- Attach your Trim
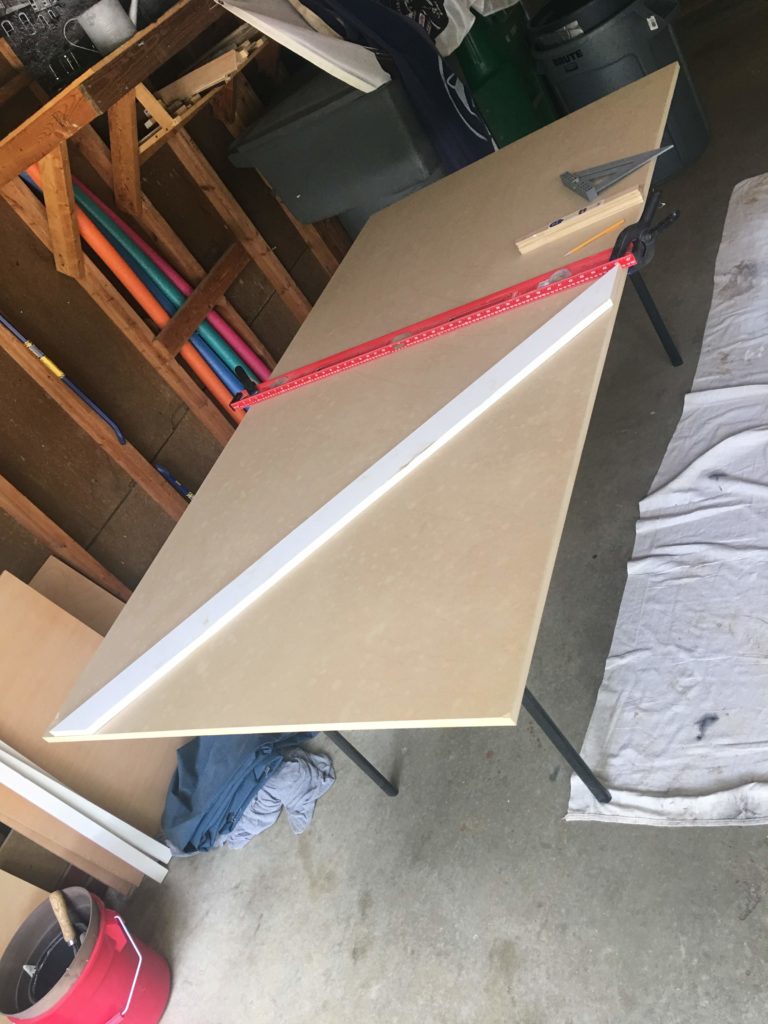
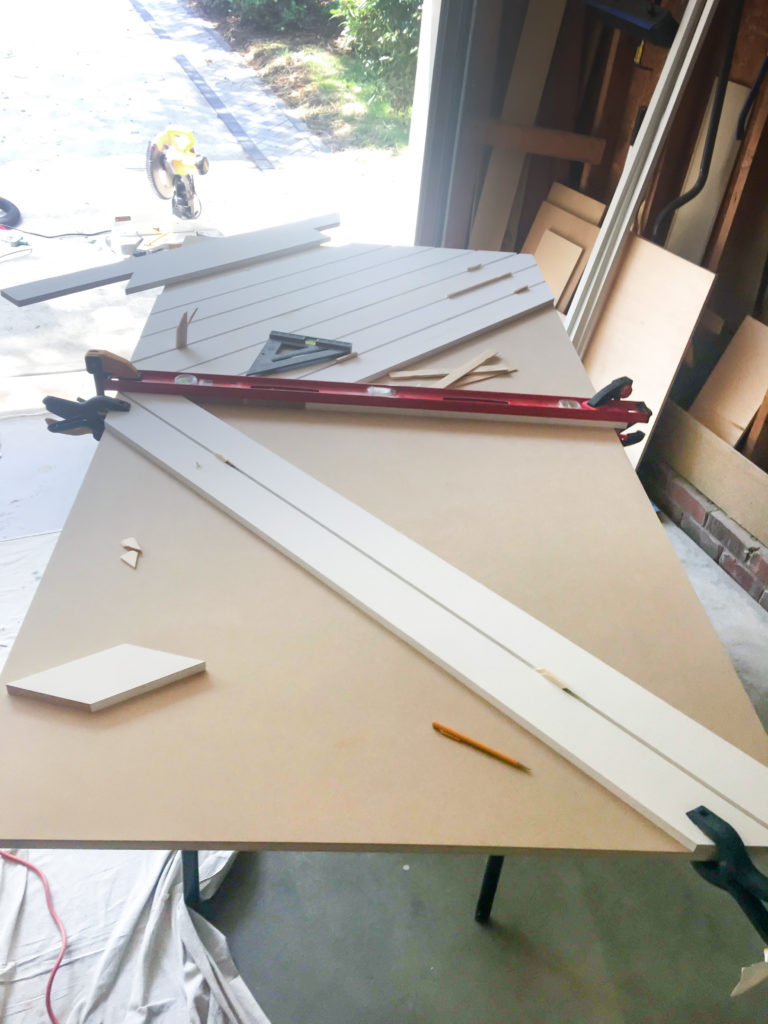
Using a pencil line or a straight edge, mark the midline on your board. I found that using a 4′ level clamped to my board was really helpful to get a precise fit for my pattern- a spare piece of trim would work too. Cut your first piece of trim at a 45° angle and lay it on the board, matching up the angle you cut with the vertical (side) edge. On the uncut side of the trim, take a pencil and trace the edge of the MDF. This is where the other side of your board needs to be cut. All your cuts will be at a 45° angle even if your line doesn’t perfectly match up. Once you cut the board, glue and nail it in place.
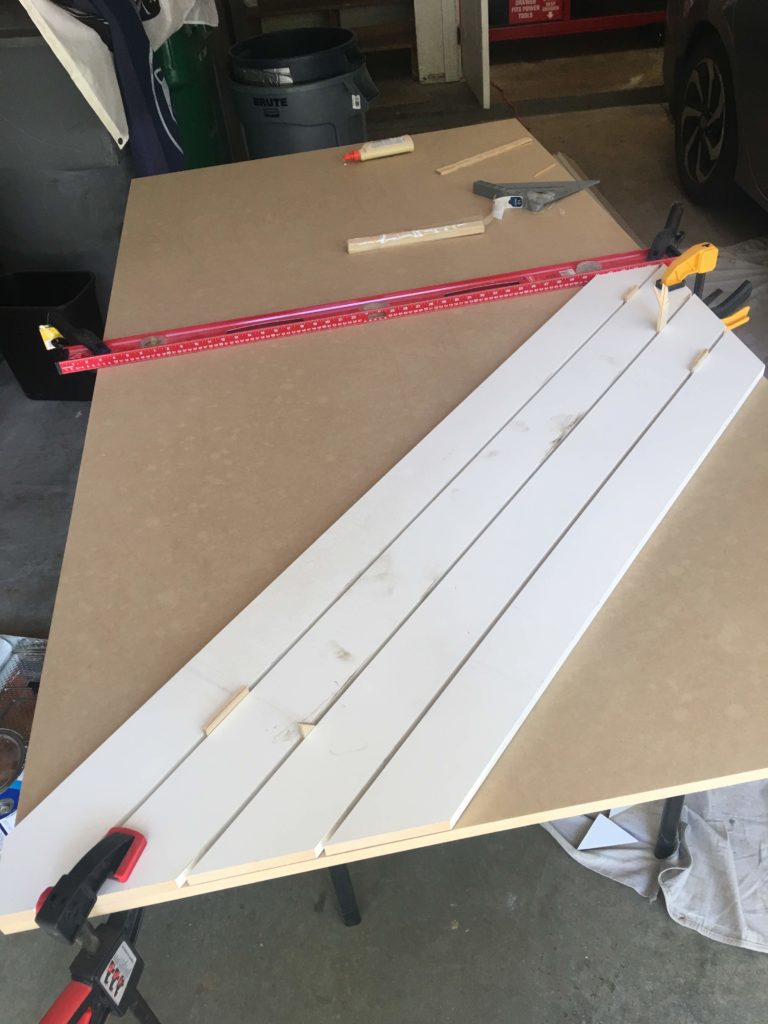
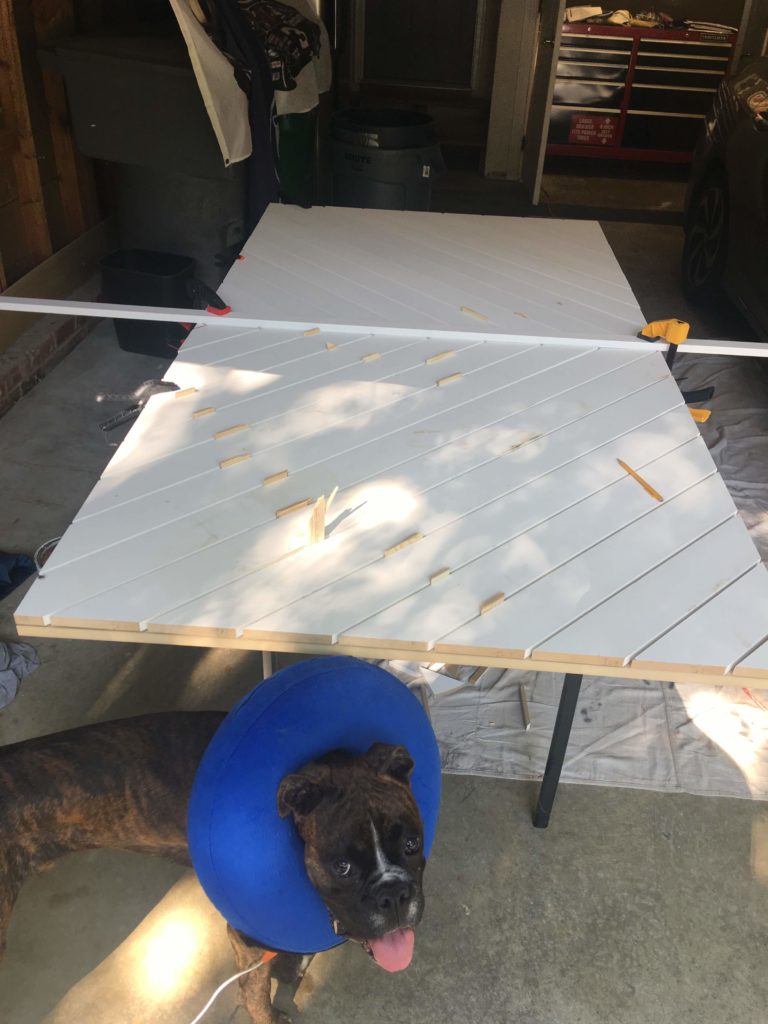
Continue to cut and attach boards for the upper half of the door. Make sure to build off your first board, cutting and placing the longest boards first. Use a spacer to keep gaps consistent (I used a scrap that was 0.25″ wide). Start on the other side when you’re about 75% done with the first side and only have small, corner cuts left. This will help to ensure you’re not using long piece of wood to cut small pieces.
For the opposite side, match up the middle of your boards from the first side, instead of using the side of the door as your guide. This might mean you have to adjust your spacers slightly to get a perfect match in the middle. Trust me, it will be almost unnoticeable if your space increases or decreases a slight amount over the length of the board. It will be extremely noticeable if your trim boards don’t match up in the middle!

(OPTIONAL) STEP 6- Attach Beadboard Panel
I tend to go a little overboard with planning details before I start my projects. This barn door is a perfect example. Painting the MDF on the back of the door would have been just fine but I decided to add a panel of beadboard to give the other side some love (and texture). It’s not a big undertaking, but it’s an additional step that doesn’t have a great ROI.
Cut the beadboard panel to size, and attach it to the back of the door using wood glue and brad nails. Easy Peasy. You can paint the beadboard before you attach it, or after- whatever you prefer.
STEP 7- Frame
Now that you’re done with your design, it’s time to attach the edge trim. Using the length and width measurements of the door to this point, cut the edge trim pieces at 45° angles on both ends to create a mitered corner and attach them using wood glue and brad nails.

STEP 7- Wood Fill & Sand
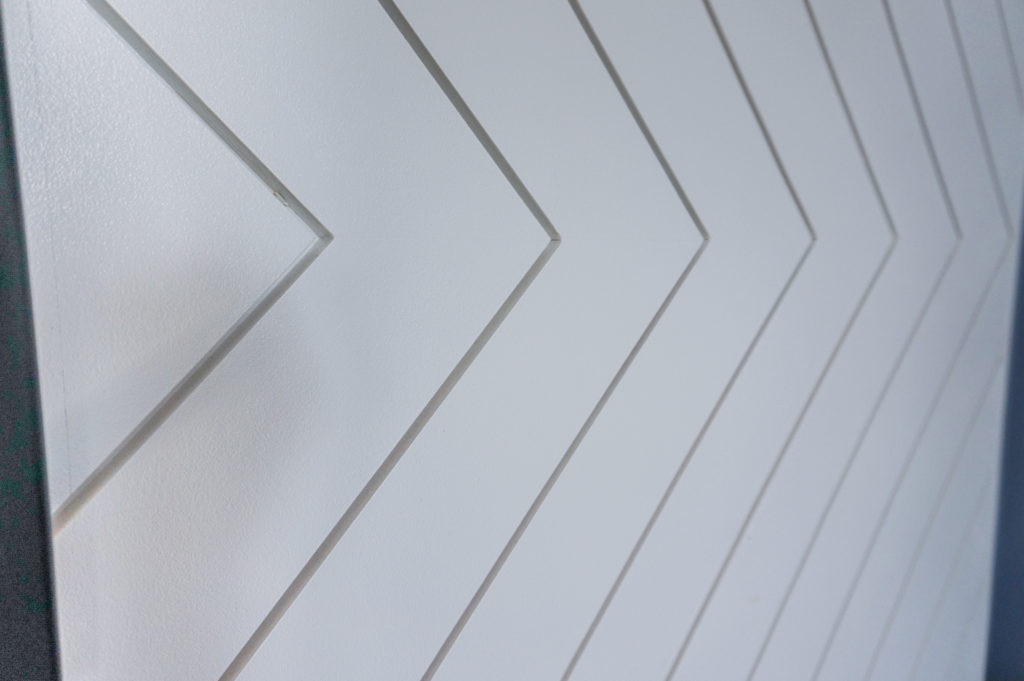
Wherever you have seams (where wood meets wood), or you placed a nail, fill with wood filler. Once it’s dry, sand it smooth with 220 grit sandpaper. I lightly sanded the top of the entire door for a smooth finish/paint application. If you already painted, you can of course still do this, just make sure to give the whole door a light coat of paint. Look how perfect those seams are after wood filling, sanding and paint!
STEP 8- Paint
Now you get to paint! Or paint again! At this point you only need to paint over the areas you filled/sanded since most of the wood was painted in Step 3. Since I was so smart and didn’t paint my door beforehand, I had to use a tiny paint brush and try to get in all the little cracks of my door. It took a long time, but I was able to get it done!

STEP 8- Hang the Door
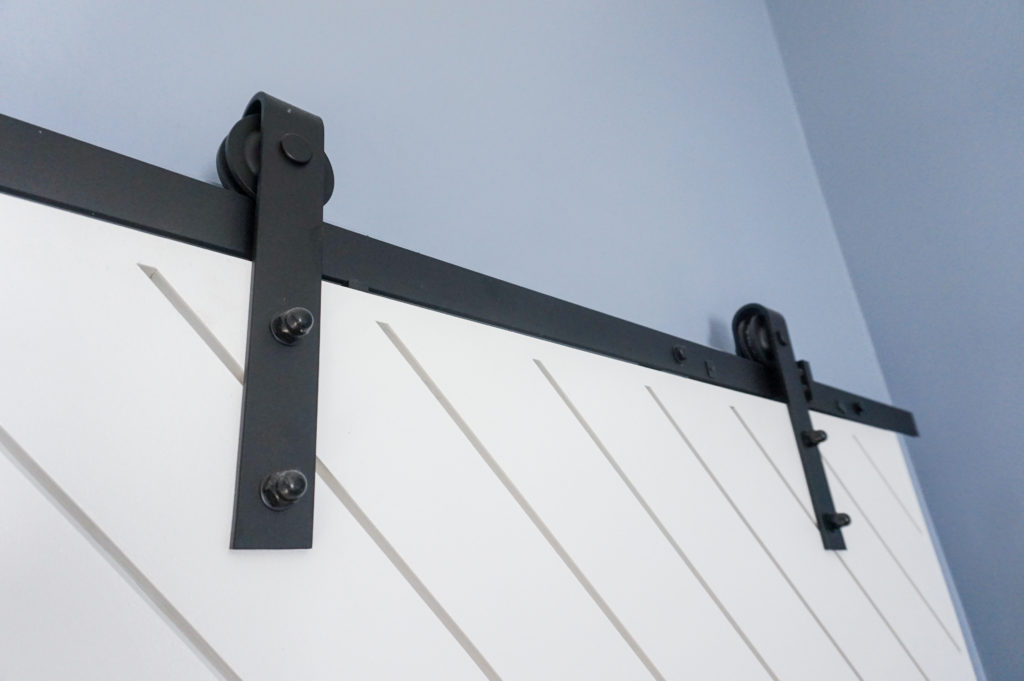
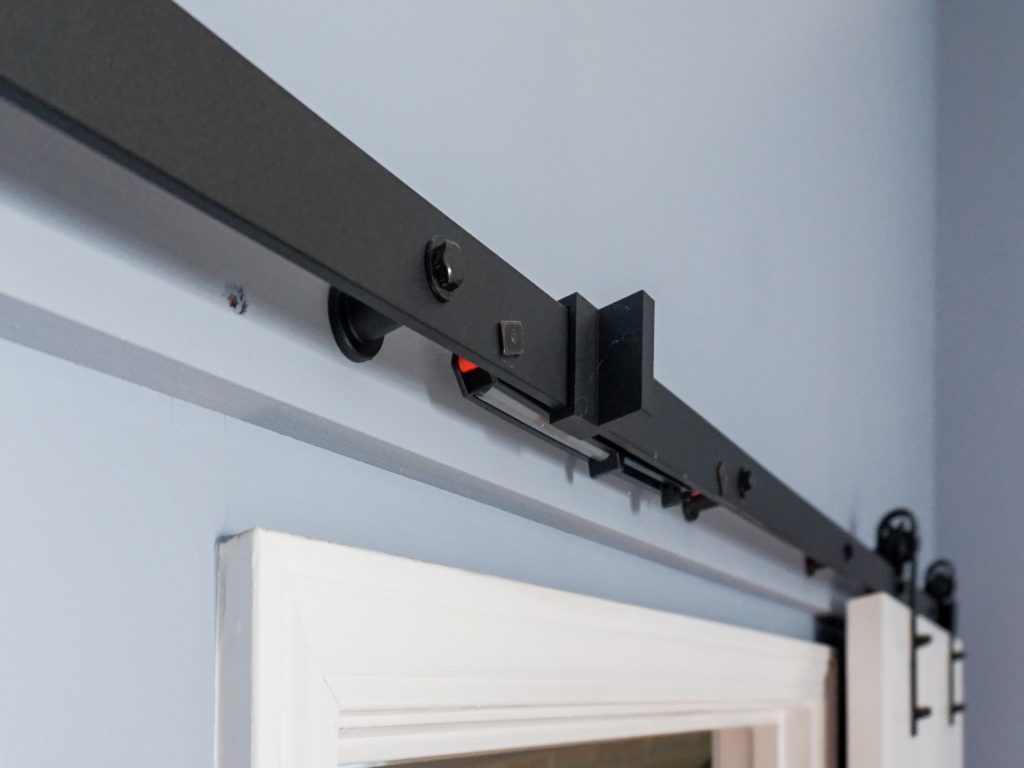
Door frames are weird- they don’t always follow the rules when it comes to the framing around (and above) them. To hang the door, your best bet is to first hang a piece of 1″ x 3″ solid wood on the wall, securing it into each stud with 3″ screws. This door is heavy and it moves side to side, so you’re going to want a lot of support for the track. I painted my 1″ x 3″ the same color as the wall so it would blend in (SW Aleutian).
I bought an 8′ hardware kit to support my 45.5″ door. This gave me 96″ of space to move the door from side to side, plenty of room. If you are doing a standard size doorway (30″-36″), you will likely only need the 6′ hardware. Install for hardware will vary- so use the instructions that came with your kit to attach it to the door.
Once the 1″ x 3″ is secured to the wall, lay out the sliding rail onto the 1″ x 3″. Mark the rail holes and drill a pilot hole at each mark. Follow the kit directions to attach the rail hardware and make sure it’s level and secure. Now it’s time to hang the door onto the rail and check that it’s sliding properly.
Quick Tip: Since your door is heavy, prop it up on a 2×4″s, position it so that the wheels are above the rail and remove the 2×4’s slowly. This will allow the door to slowly hang on the rail and is easier to prop the door on wood vs holding it up on your own.
With the soft close hardware, this is the point when you can adjust the settings for how far the door should slide to open and closed, as well as add the slow close features. It’s so nice to be able to customize exactly where your door starts and stops.
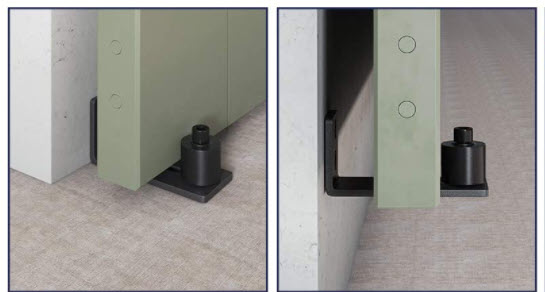
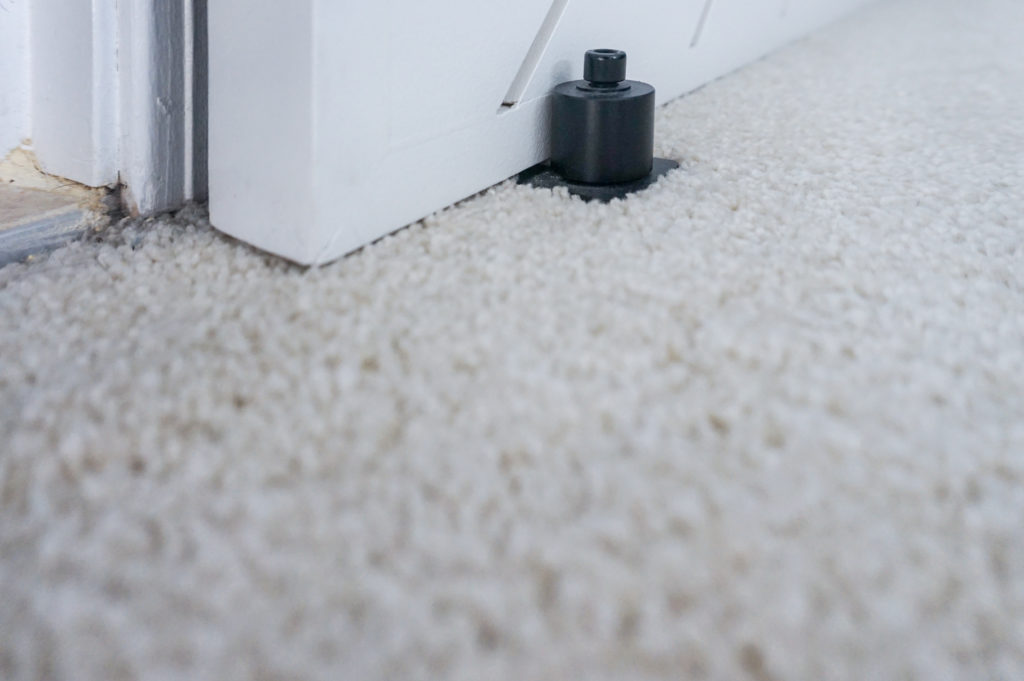
STEP 9- Install Bottom Guide and Handle
Next, install a bottom guide to the molding behind the door. It may be easiest to lift the door off the rail for this step since you’ll want to pick a spot where the door touches when it’s both open and closed, generally right in the middle. Otherwise the bottom guide could interfere with the door opening or closing. Screw the guide into the molding and adjust the wheel to match the thickness of your door. This is a great design so I didn’t have to screw anything into the carpeted floor.
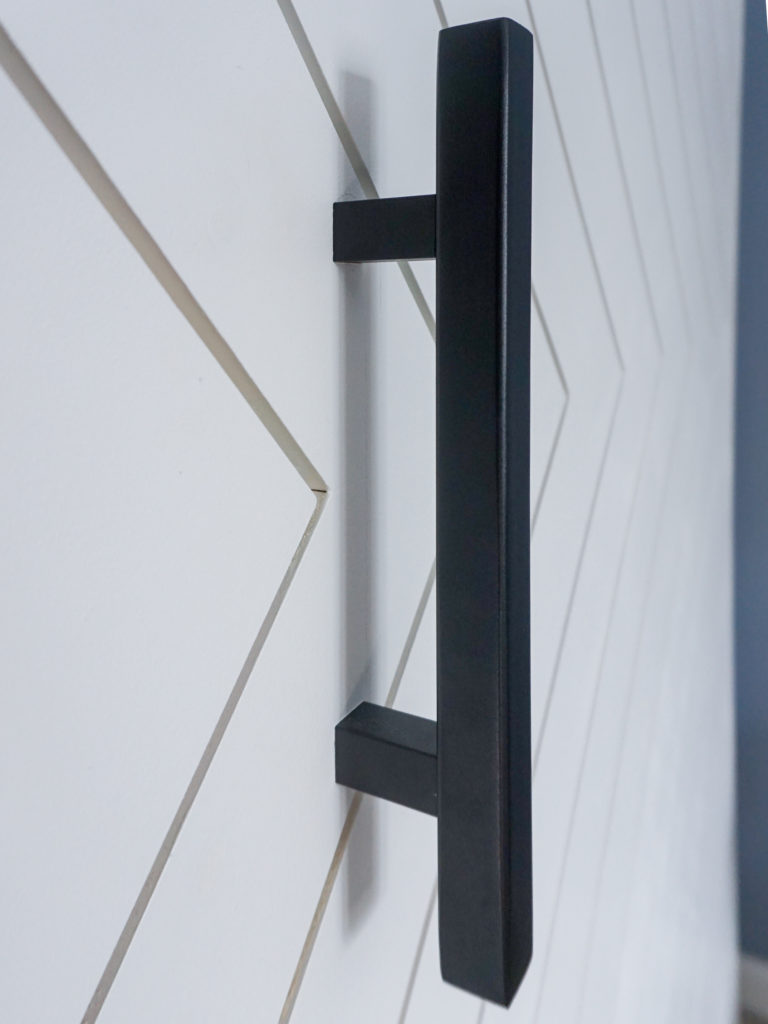
For the handle, follow the instruction that came with your hardware. The handle I bought required 2 holes to be drilled into the door and then the handle attached with two screws. Quick and easy!
Once I finished hanging the barn door, I showed the work to my boyfriend of 8 years, Mark. He was obviously super impressed with my skills and talent. And just 2 months later, he proposed to me! I’m not saying that building this barn door is going to result in your significant other marrying you but I’m not, not saying that.
If I had known this, I would have built this barn door 6 years earlier! (Kidding, Mark.)

Cost Breakdown:
MDF Backing & 1″ x 4″ Primed MDF Boards- $60
1″ x 3″ Solid Wood Board- Free! I had this
18g Nails, Wood Screws- Free! I had these
Beadboard Panel- $20
Paint- $20
Hardware- $100
Total Cost- $200
Want to keep up with my newest projects? Come hang out on Instagram!