How to Install a Ceiling Fan to Two Wall Switches
(This post contains affiliate links which means I receive a small compensation at no cost to you. As an Amazon Associate I earn from qualifying purchases. You can read more about it here. Thank you for supporting my blog!)
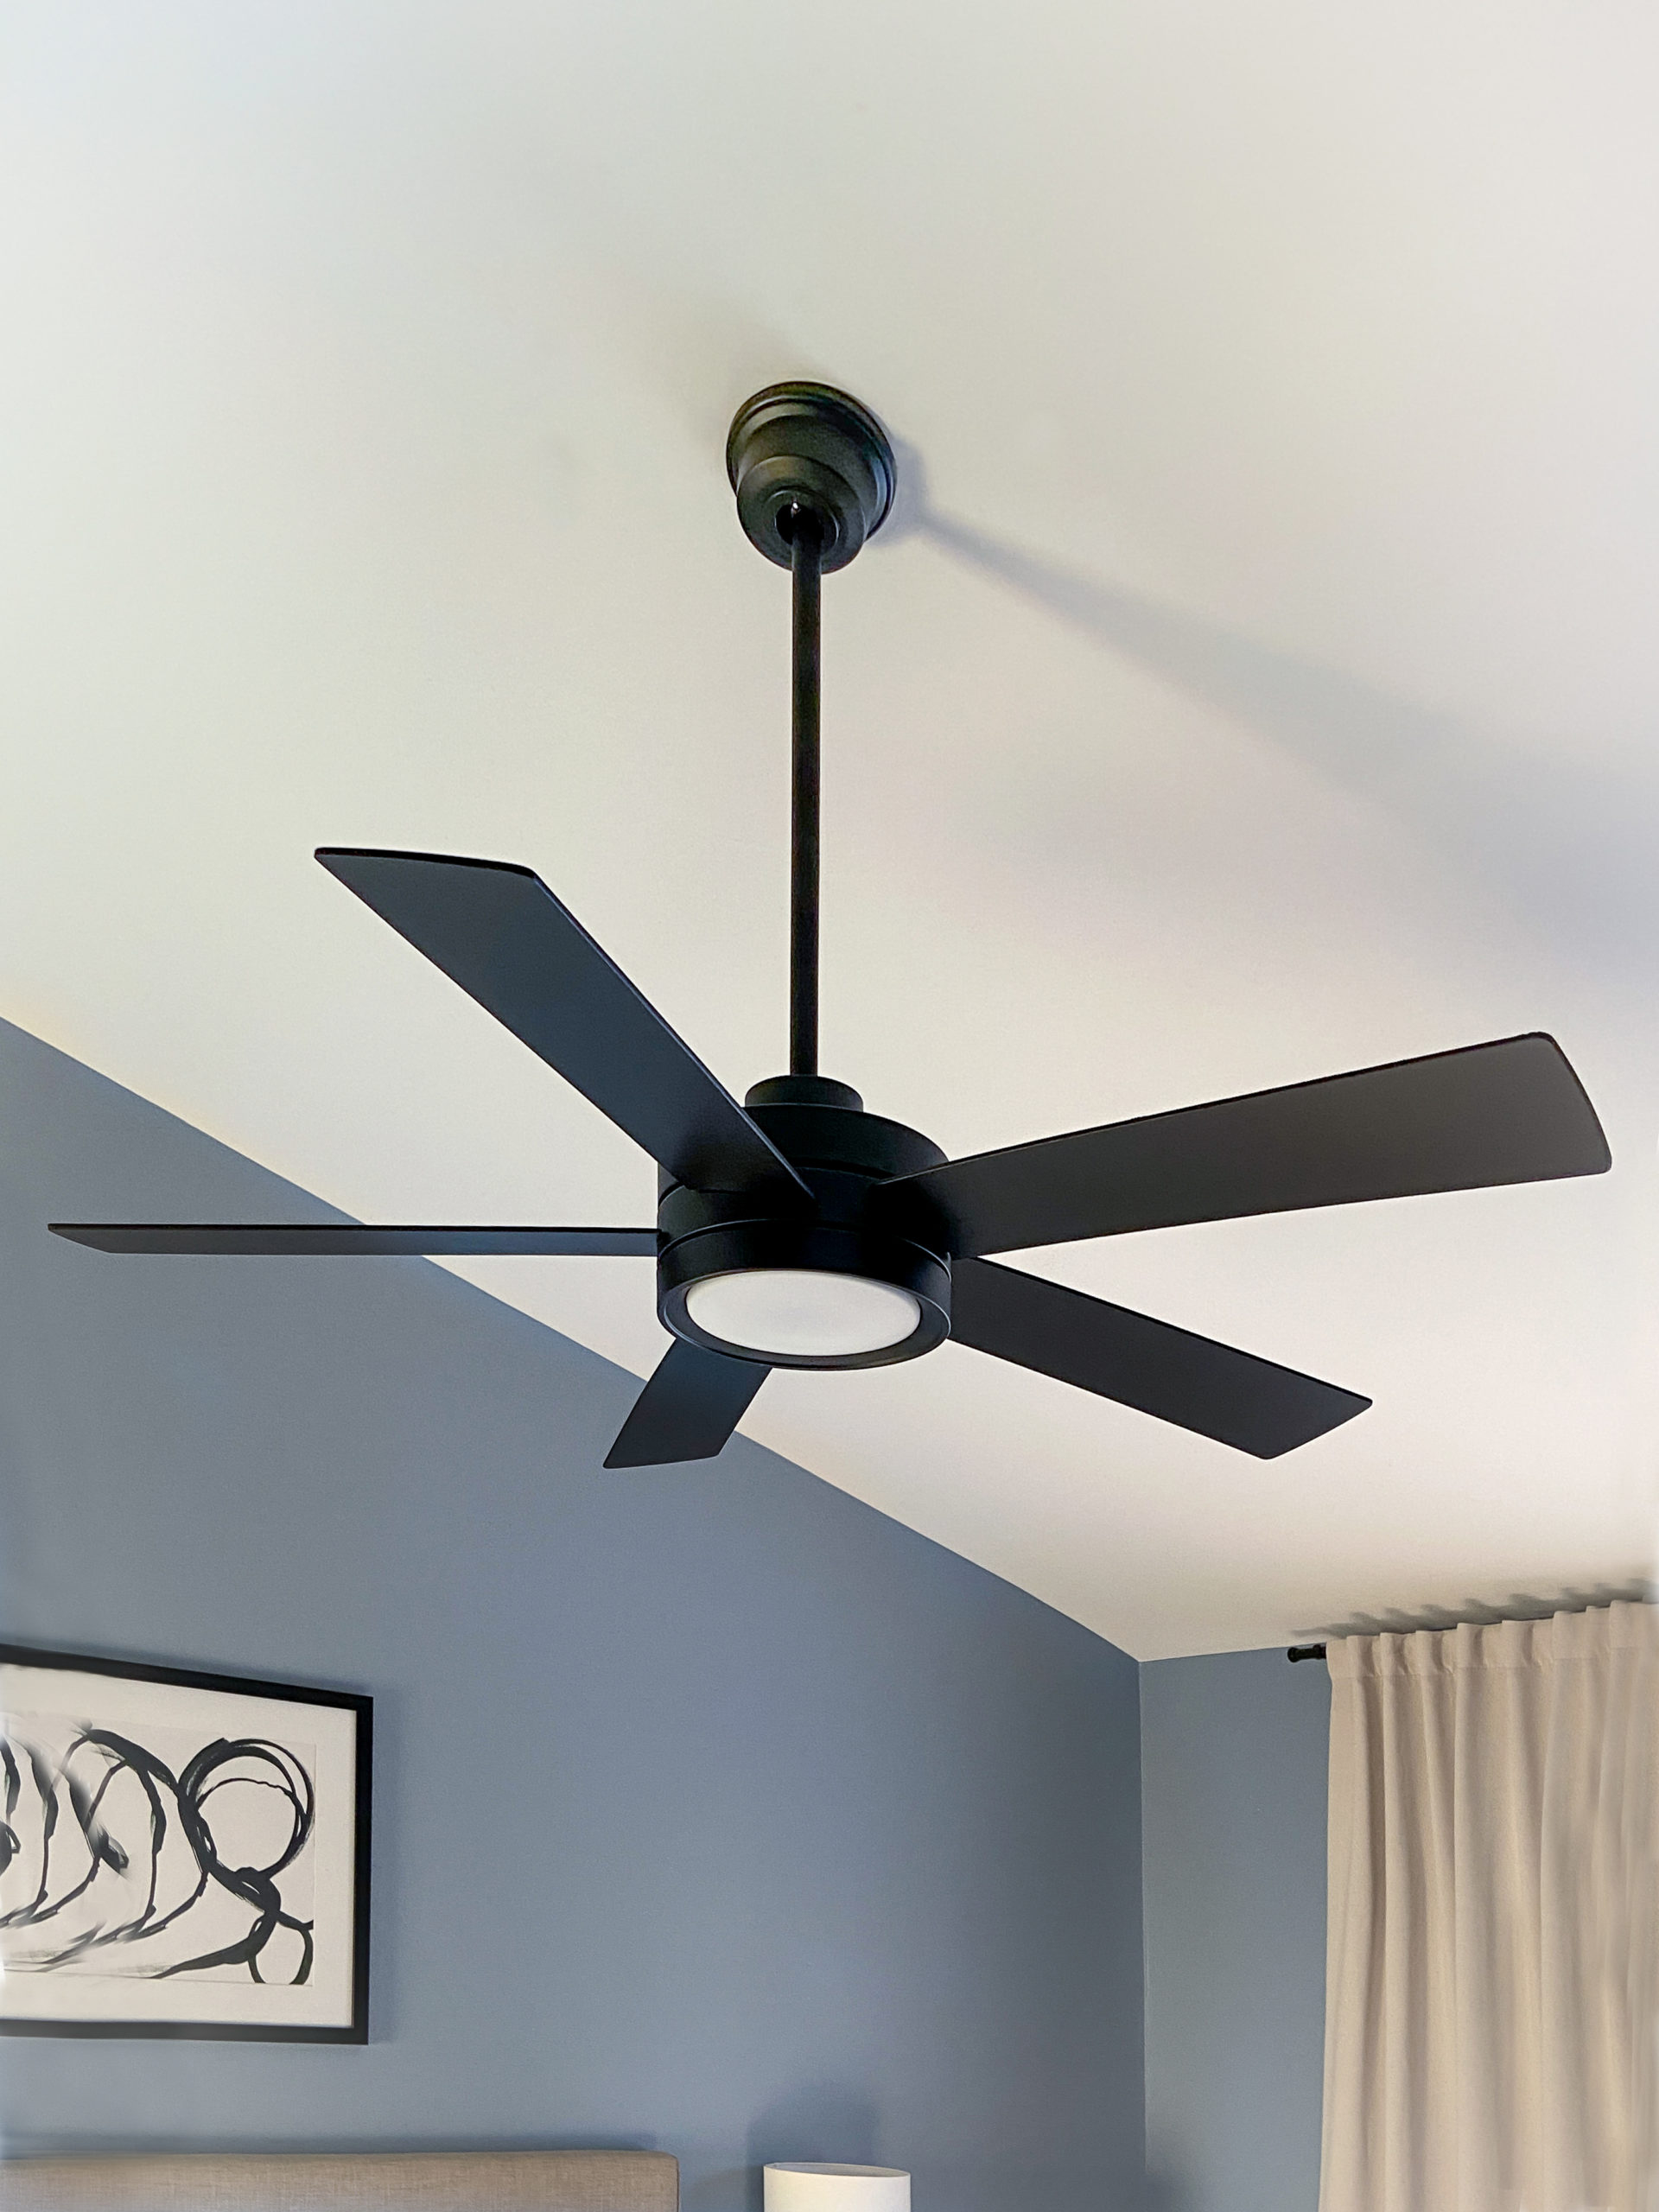
Link to my fan: Baxtan 56″ Ceiling Fan (I’ve also used this hack with this, larger fan: Honeywell Ceiling Fans Xerxes, 62 Inch)
Nothing is as frustrating as my attempt to replace all the white and gold fans in my 90’s home. Something I love about our house is that we have ceiling fans in a lot of our rooms. Most are hardwired to two separate wall switches- one for the light and one for the fan. I love the dual functionality, being able to run the fan while watching a movie, and obviously using the light without the fan turning on during the winter! I need to be able to install my ceiling fan to two wall switches.
Most fans these days have so much more function than just on/off. Almost all the fan’s I’ve bought have different fan speeds, a dimmable light, timers, special schedules etc. I love options, don’t get me wrong. But I hate the fact that because of all these special features, the fans come with remotes. You have to use these remotes to even use the basic functionality. That doesn’t work for me.
If installed according to the directions, the fan can be attached to one wall switch that will function as one thing- power on/off. This isn’t light on/off. It’s just power- and whatever settings the fixture was last on, will kick on. In an effort to not drone on about why these remotes suck, I’ll sum it up here:
5 reasons why ceiling fans with remotes are the worst:
- If you lose the remote, you won’t be able to change the settings on the fixture. Which means, if Mark throws the remote in the wash with our sheets (like he did with our TV remote) then whatever setting was last on, will be the permanent setting. I don’t trust the process of getting a replacement remote while I live without a light in my bedroom for a month.
- There’s a 3 second delay when turning on the light- even if it was the last setting. The remote receiver in the fan unit, slows the electricity down just enough for you to notice it and hate it.
- You have to have the remote to change the settings. As in, physically have it in your hand. I can’t imagine a life where I always know where the remote is. I won’t even buy a car if it means I have to dig through my purse to find the keys. It has to have keyless unlock and keyless start. My fan also needs keyless start.
- The receivers that are wired to the actual fan are so big and bulky, and you’re expected to stuff that along with all the wires up into the ceiling box. I still don’t have a solve for this without losing all functionality of different fan settings but it’s still a reason why fans with remotes suck.
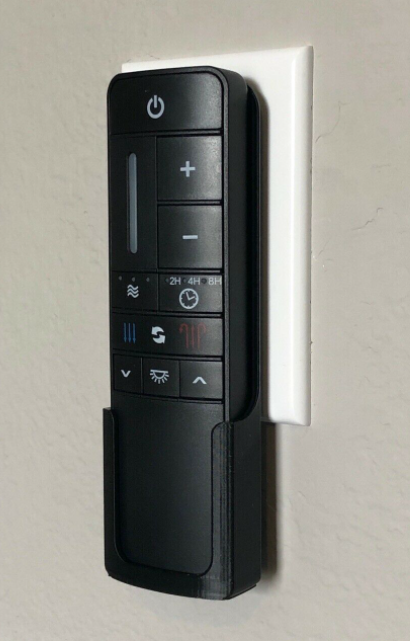
- “But you can mount the remote to the wall and use it like a wall switch” HAHAHAHA ABSOLUTELY NOT. (I present the evidence–>)
I kinda feel strongly about this.
if you couldn’t tell…
Here’s how I installed a ceiling fan with a remote to two wall switches-
without losing the functionality of the switches or fan speed options!
*You will lose functionality of controlling the light from the remote if you follow the steps in this blog.
This site is meant for informational purposes only. Electricity is dangerous and can cause personal injury or DEATH as well as other property loss or damage if not used or constructed properly.
The following steps describe a generic process for assembling, modifying and installing a ceiling fan. All ceiling fan specifications are different and you should follow the instruction manual that comes with your ceiling fan when installing your fixture. Any modifications made to your ceiling fan whether as described in this post or other is dangerous and will increase the risk of personal injury or DEATH as well as property loss or damage. At the very least, it will void your fixture warranty.
If you feel you do not have enough electrical wiring knowledge or experience about performing DIY electrical work, PLEASE do the smart thing and have your fan installed by a licensed electrician. DO NOT ATTEMPT ANY WIRING OF ANY KIND if you lack the knowledge and understanding required. ANY HAZARD CREATED IS THE SOLE RESPONSIBILITY OF THE USER.
STEP 1: Turn off Power
Start by turning off the power at the breaker, and verifying it’s off with a non-contact voltage tester.
STEP 2: Unpack Fan and Prep for Install
Link to my fan: Baxtan 56″ Ceiling Fan (I’ve also used this hack with this, larger fan: Honeywell Ceiling Fans Xerxes, 62 Inch)
Feed the electrical wires from the motor, through the downrod and then screw the downrod into the threads on the top of the motor. Threading the wire can be a bit tricky if you’re using a long downrod.
If your wires are getting stuck, use a long, solid item to help push them through. Choose an item that will fit inside the downrod (like a gardener’s stake or a straightened out metal clothes hanger) and tape the wires to the object before fishing the wire through the center.
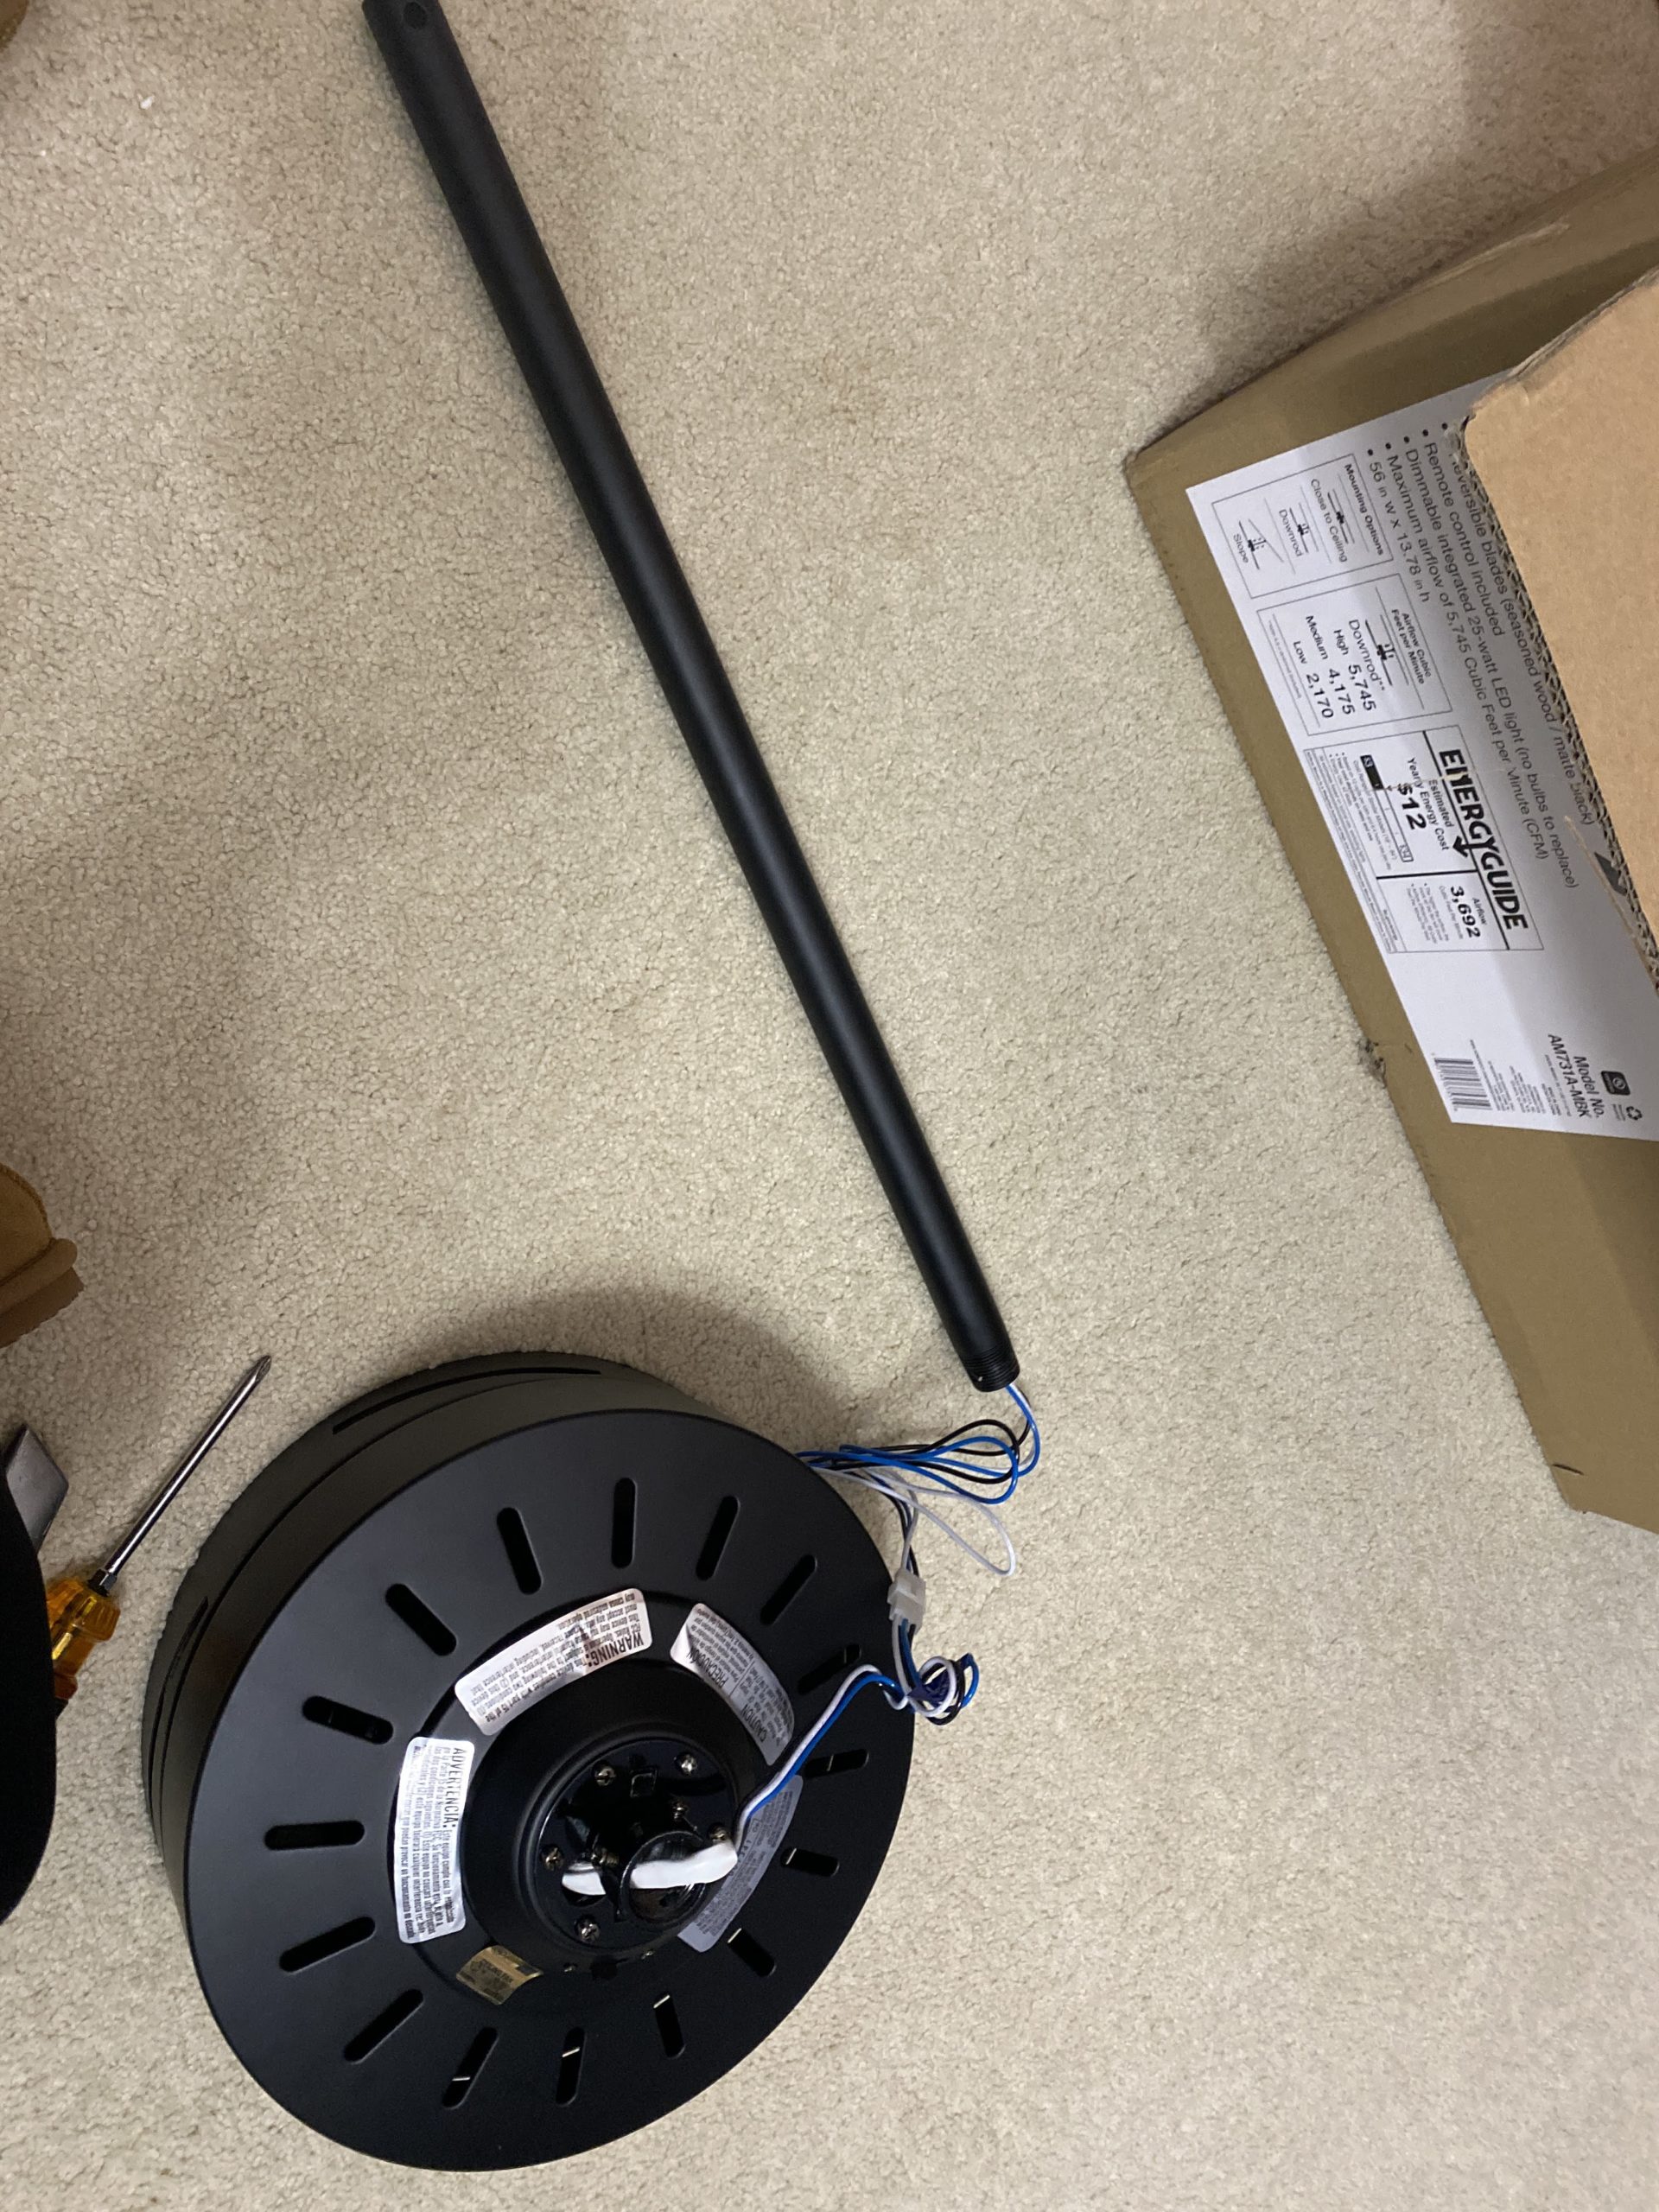
Screw the downrod onto the motor until it’s tight and the holes in the downrod and the motor line up. You can loosen the downrod just slightly if the holes don’t align at the tightest spot. Place the metal pin in the hole and secure it with the cotter pin (looks kind of like a bobby pin!). Tighten any screws around the collar to secure the downrod in place.
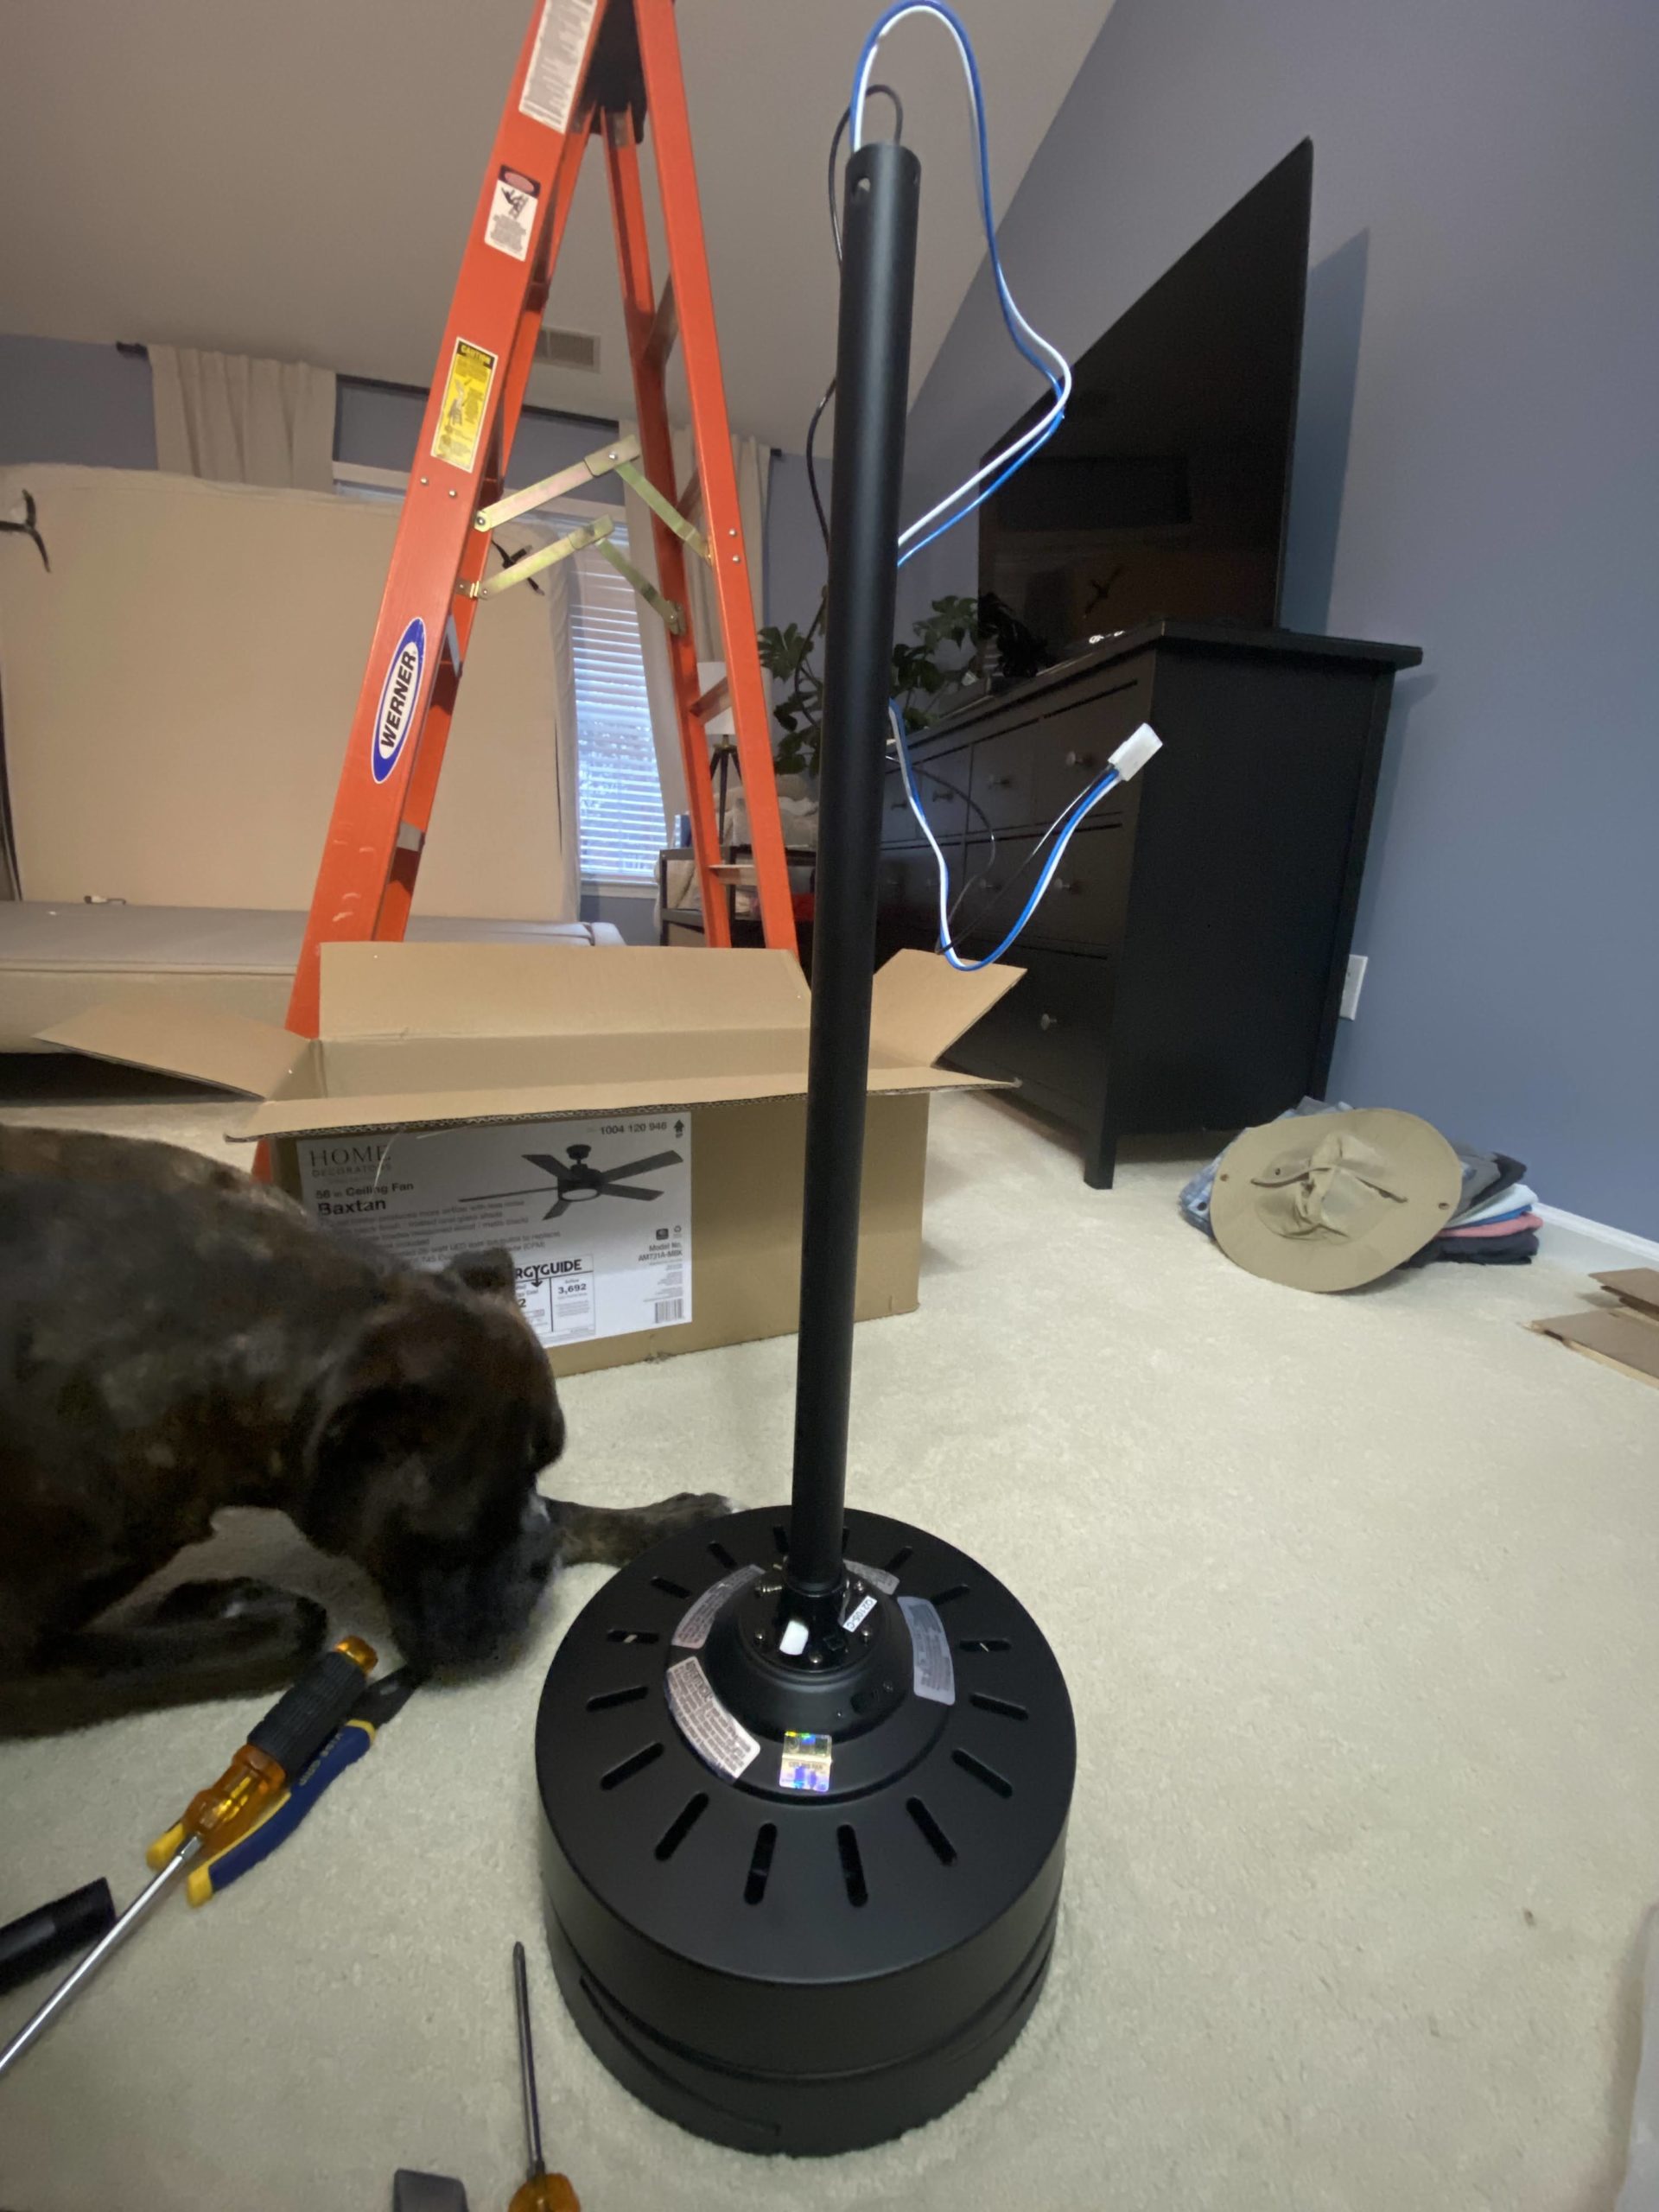
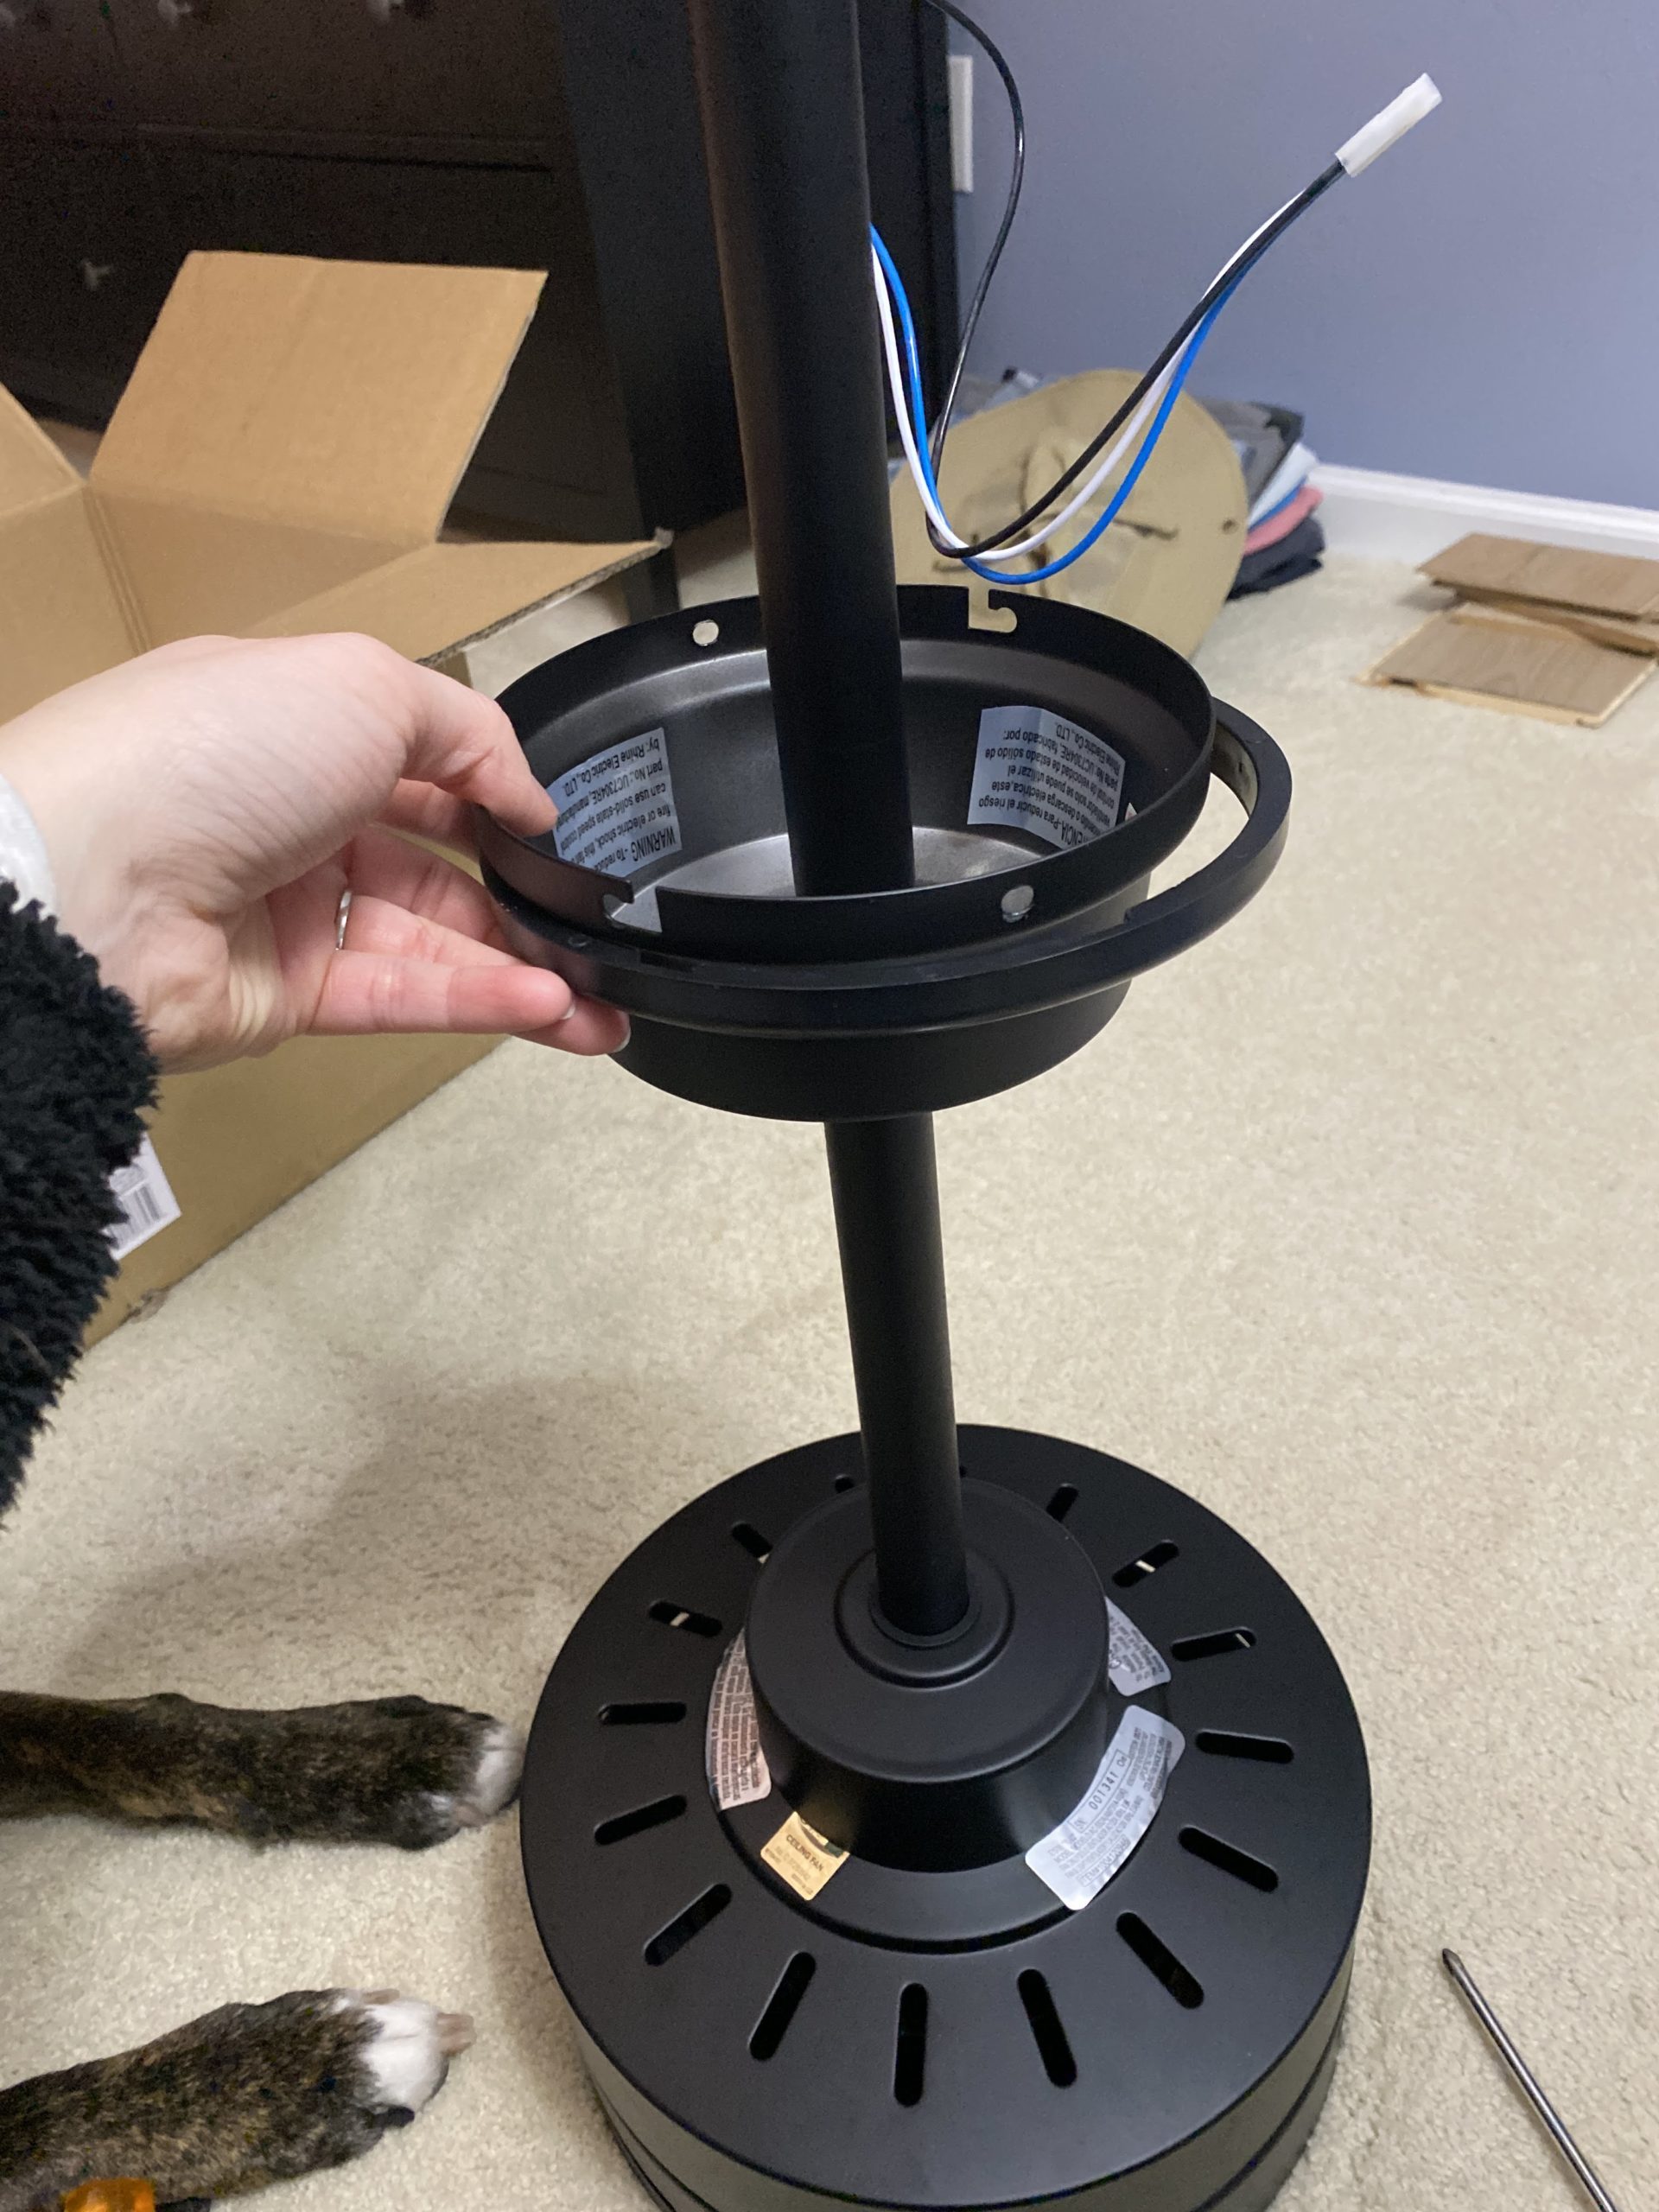
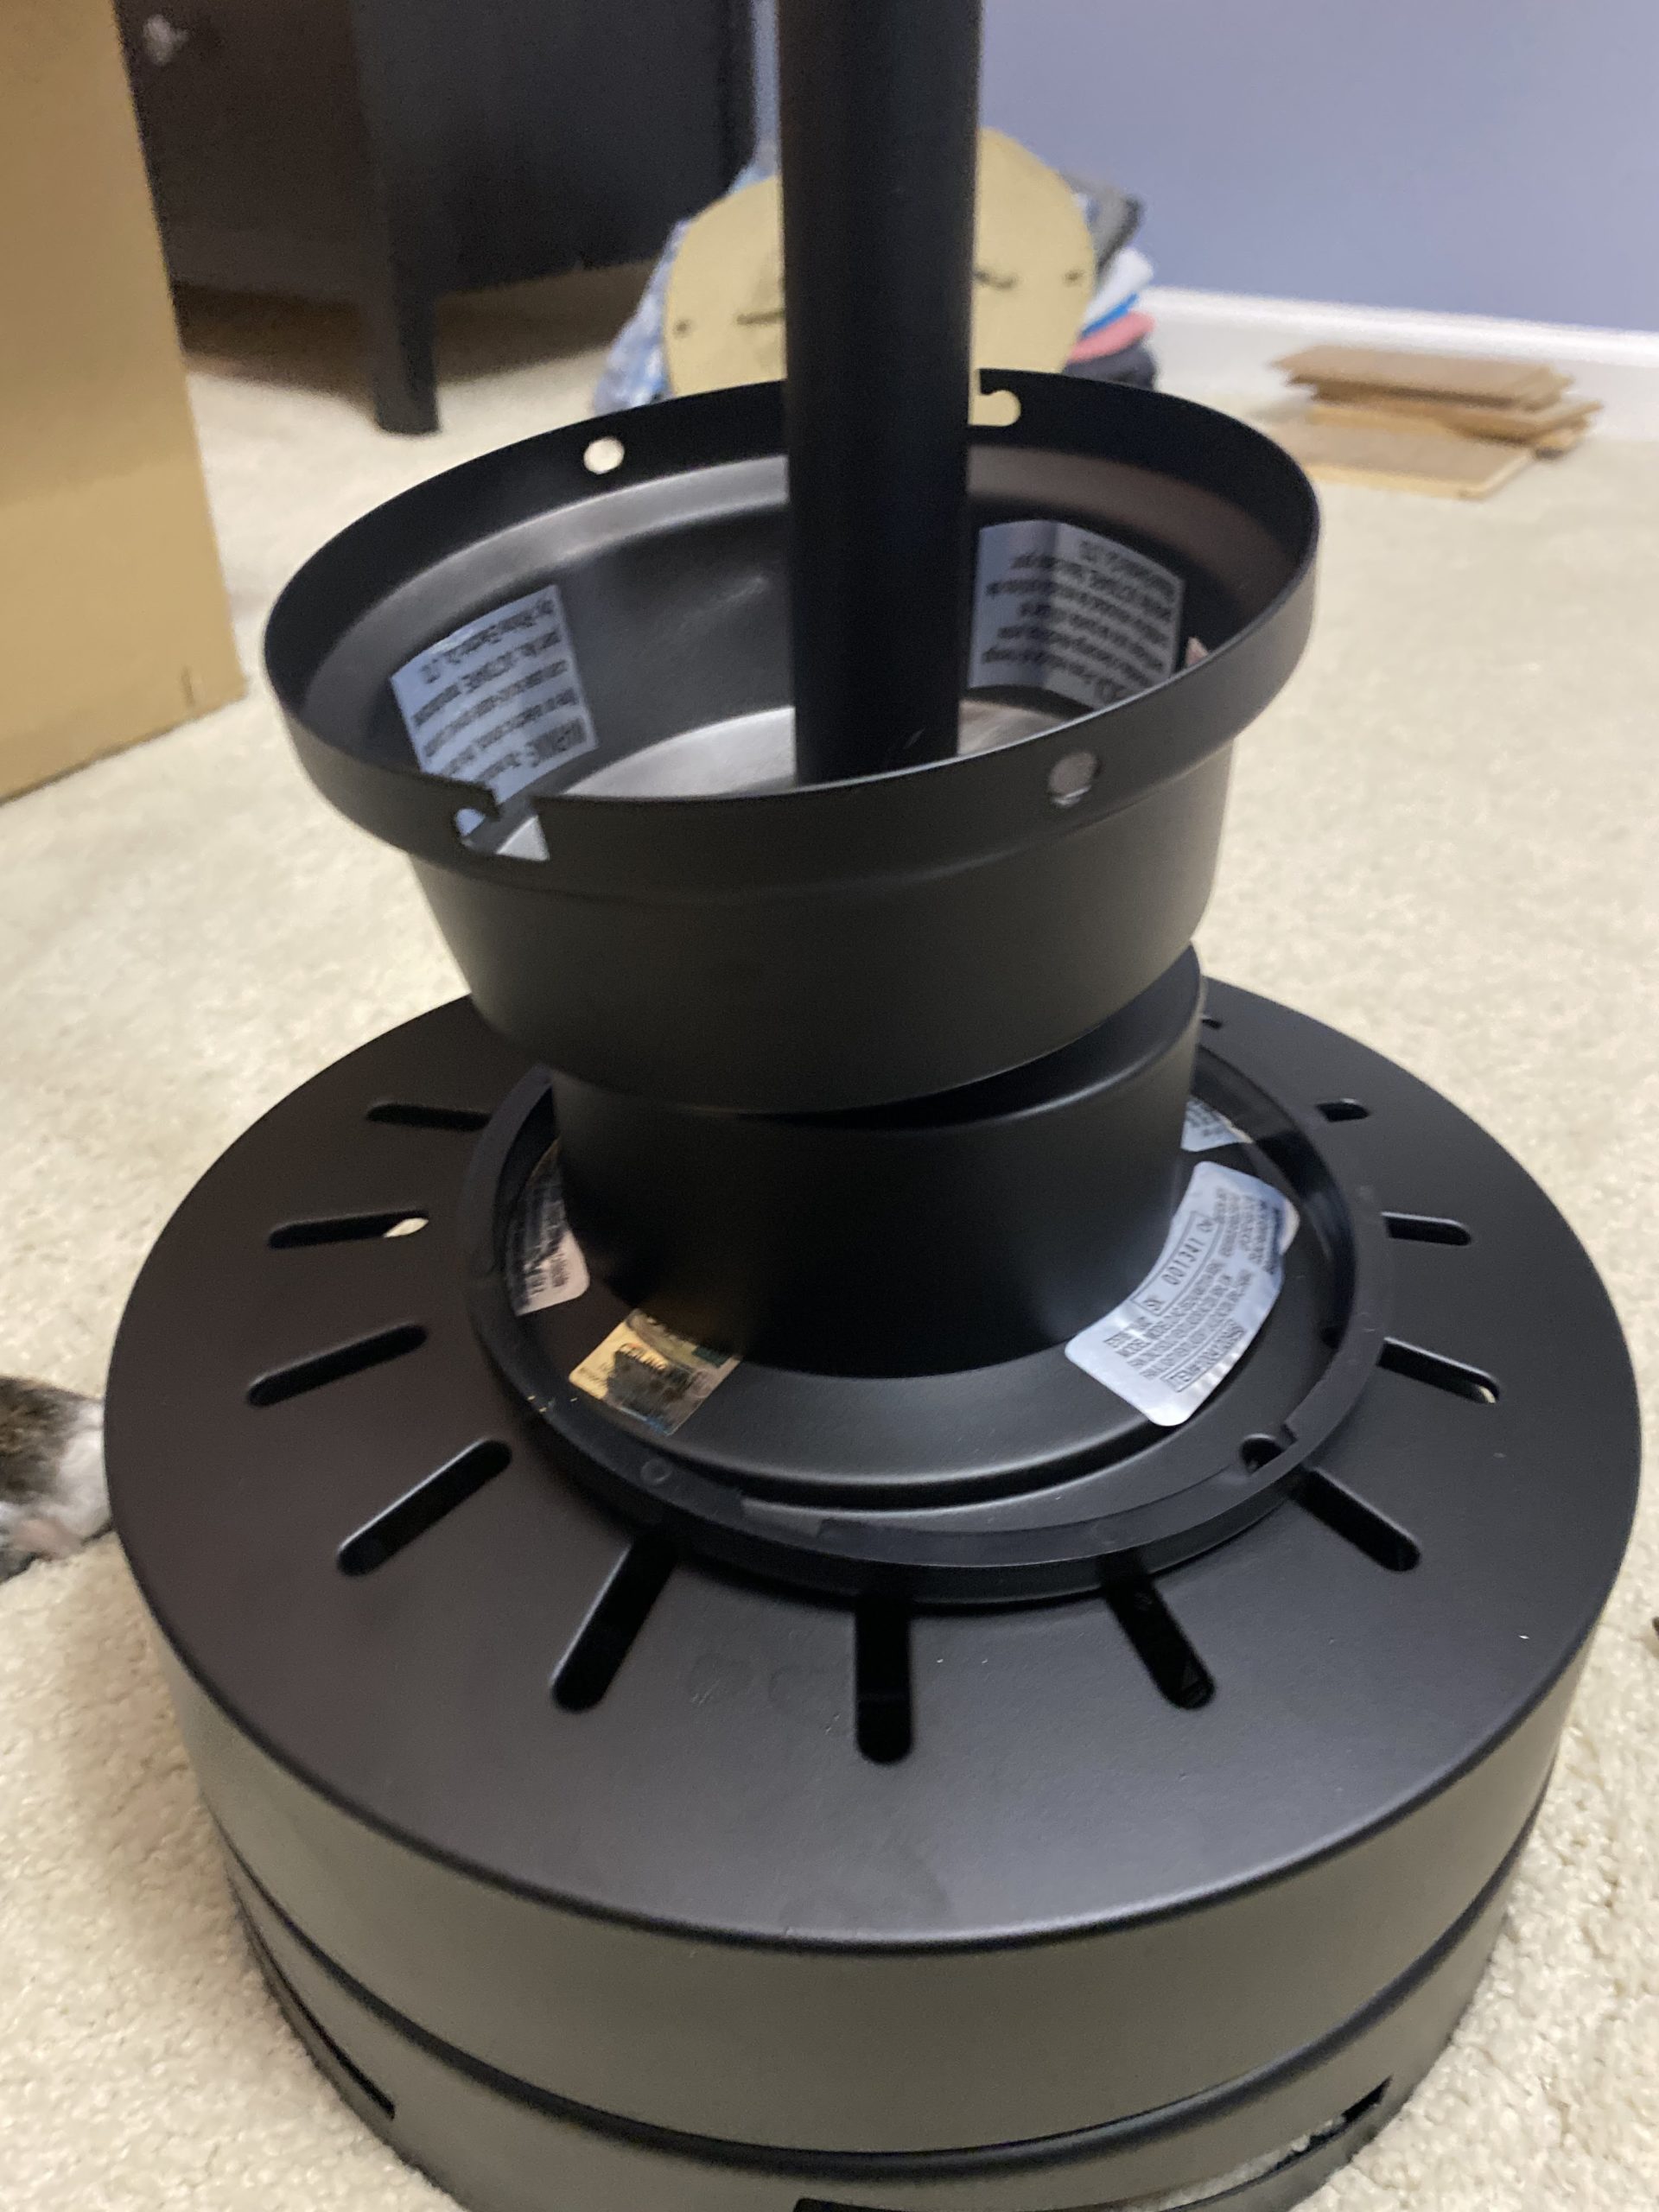
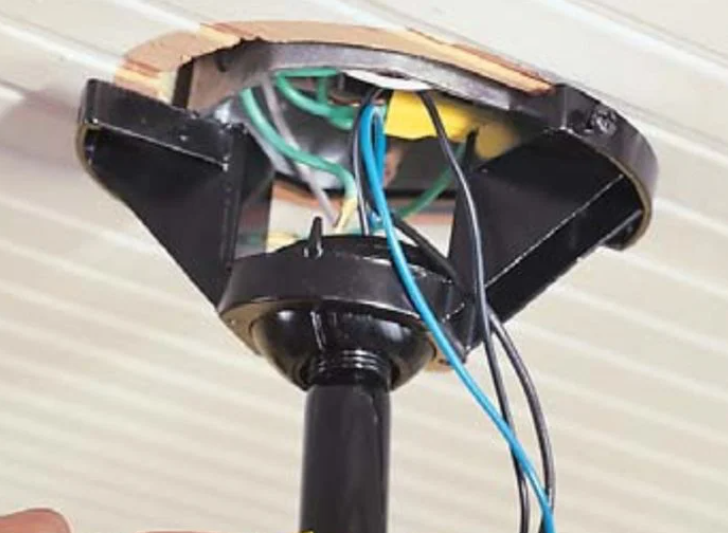
Feed the coupling cover (covers the top of the motor) over the downrod then follow with the canopy and canopy ring (these cover the electrical box in the ceiling). Until your done with installation, the canopy and ring will just rest on top of the motor.
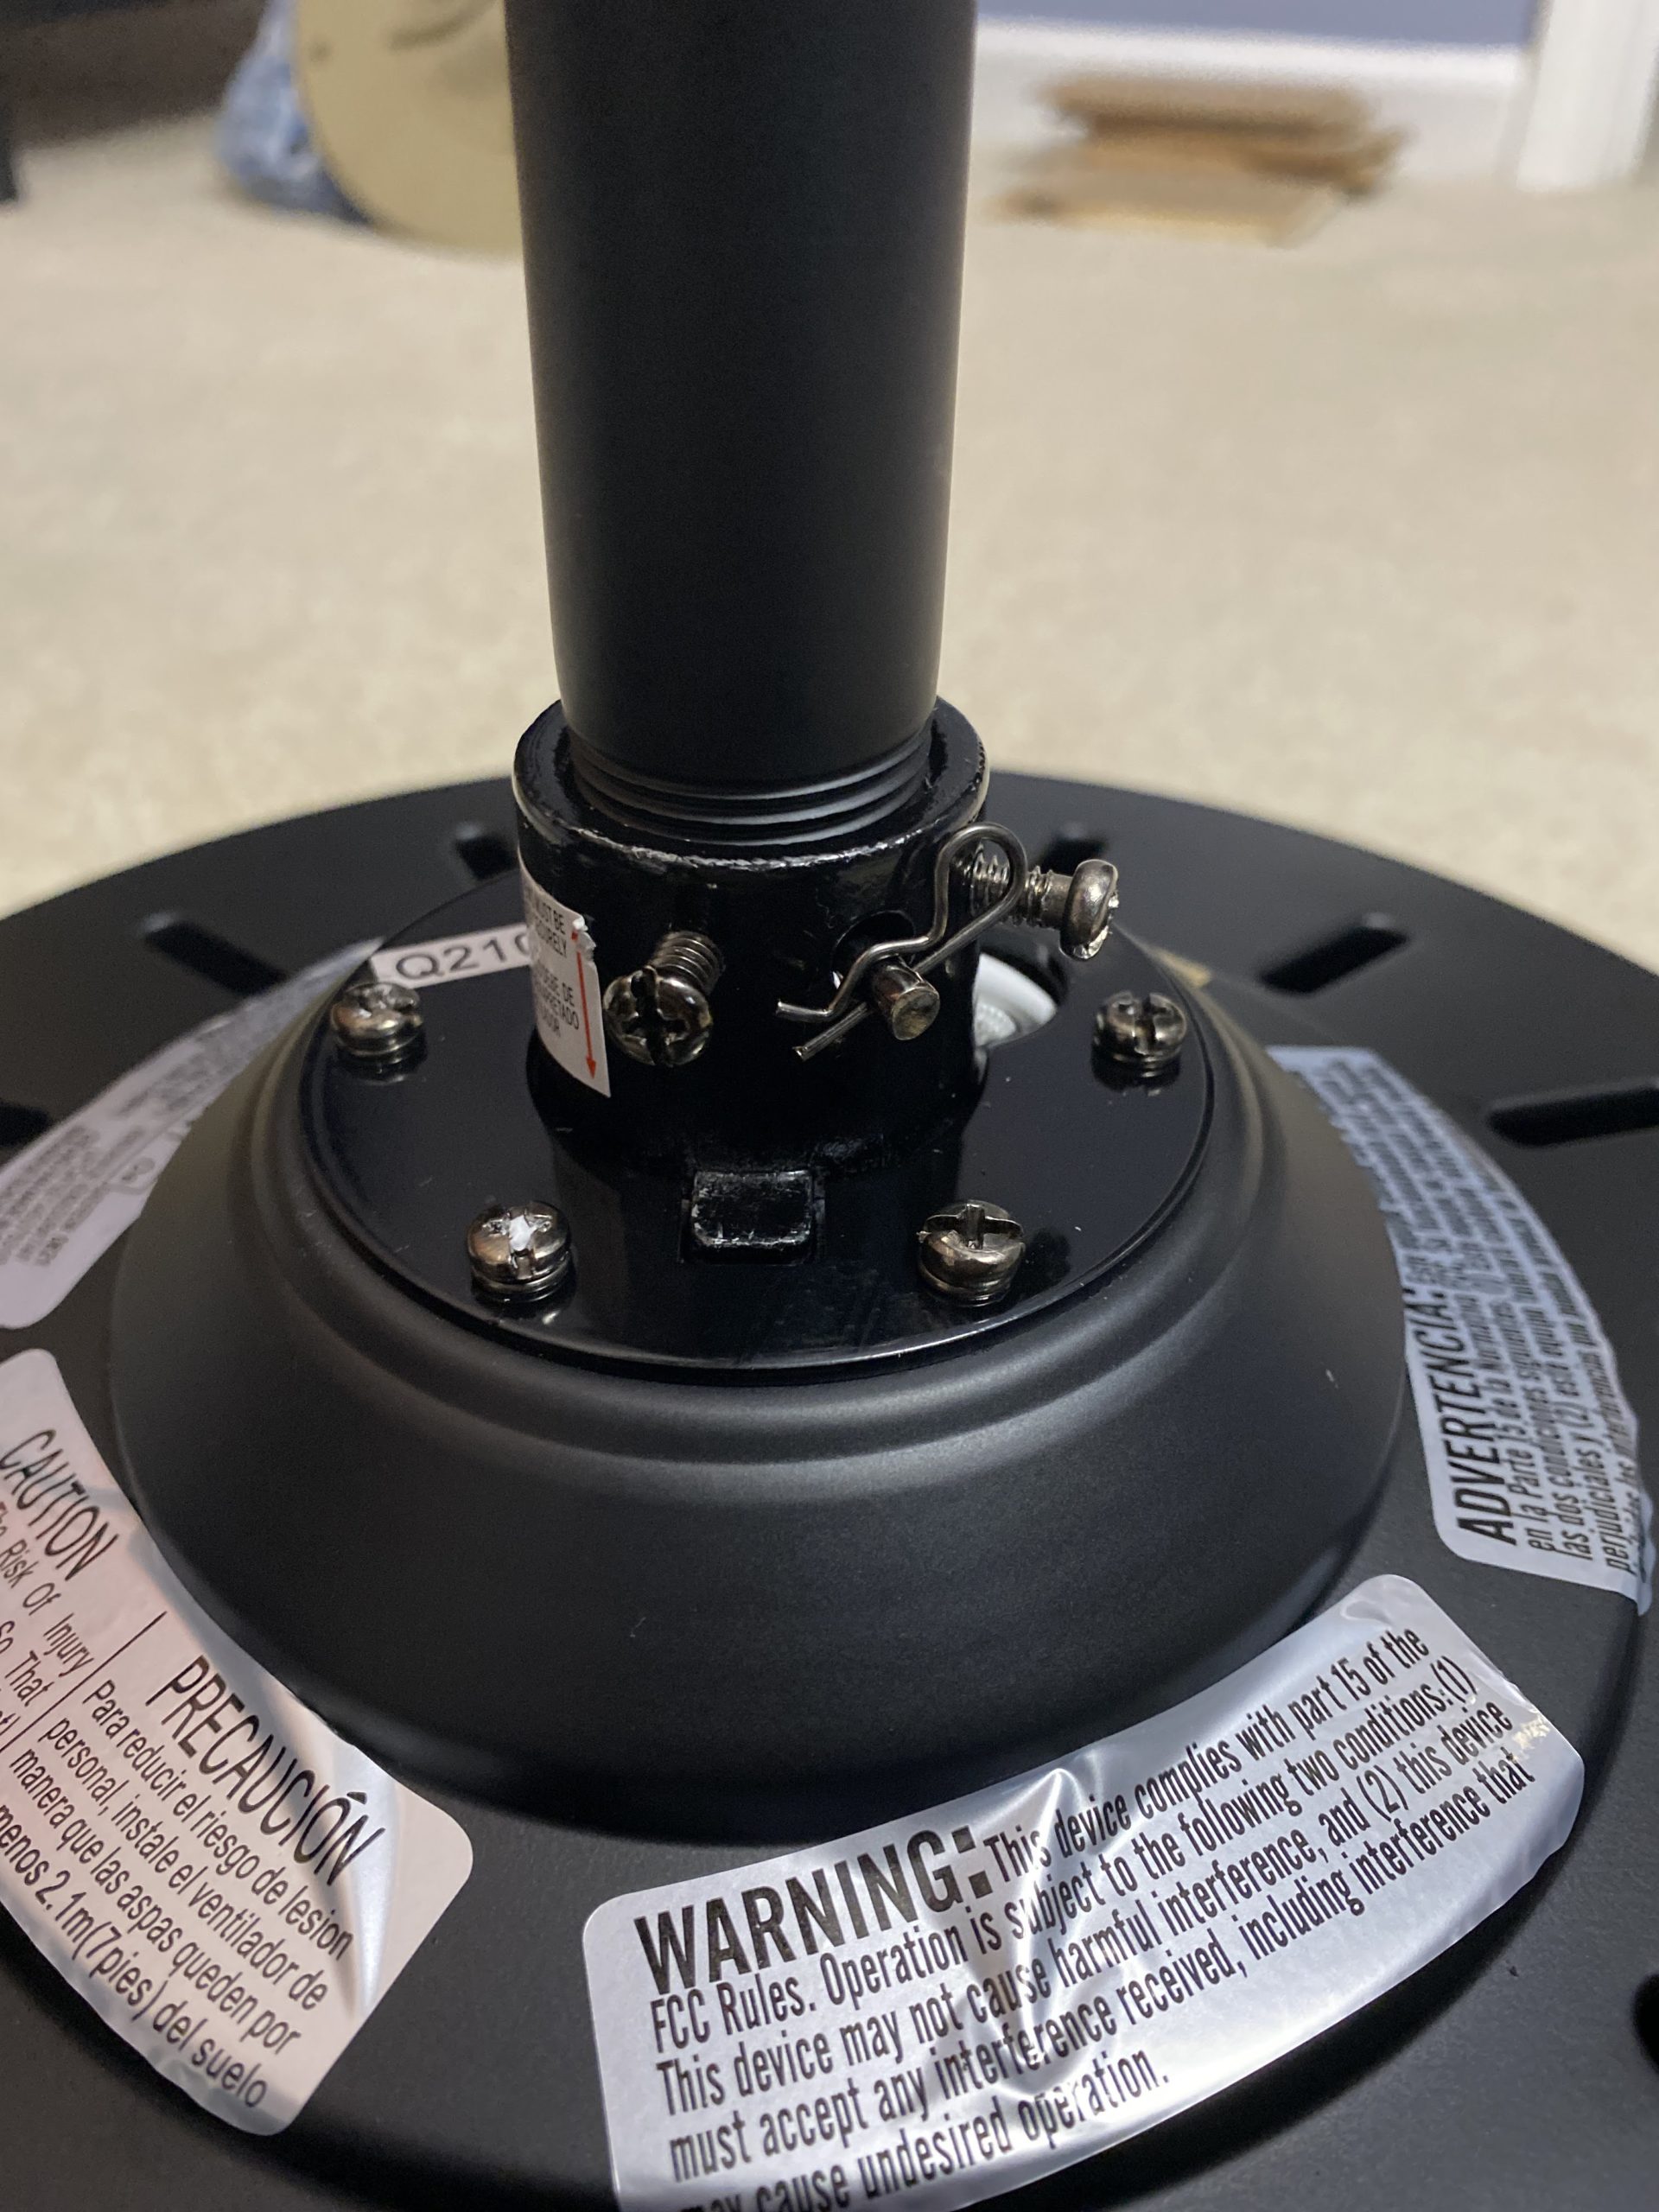

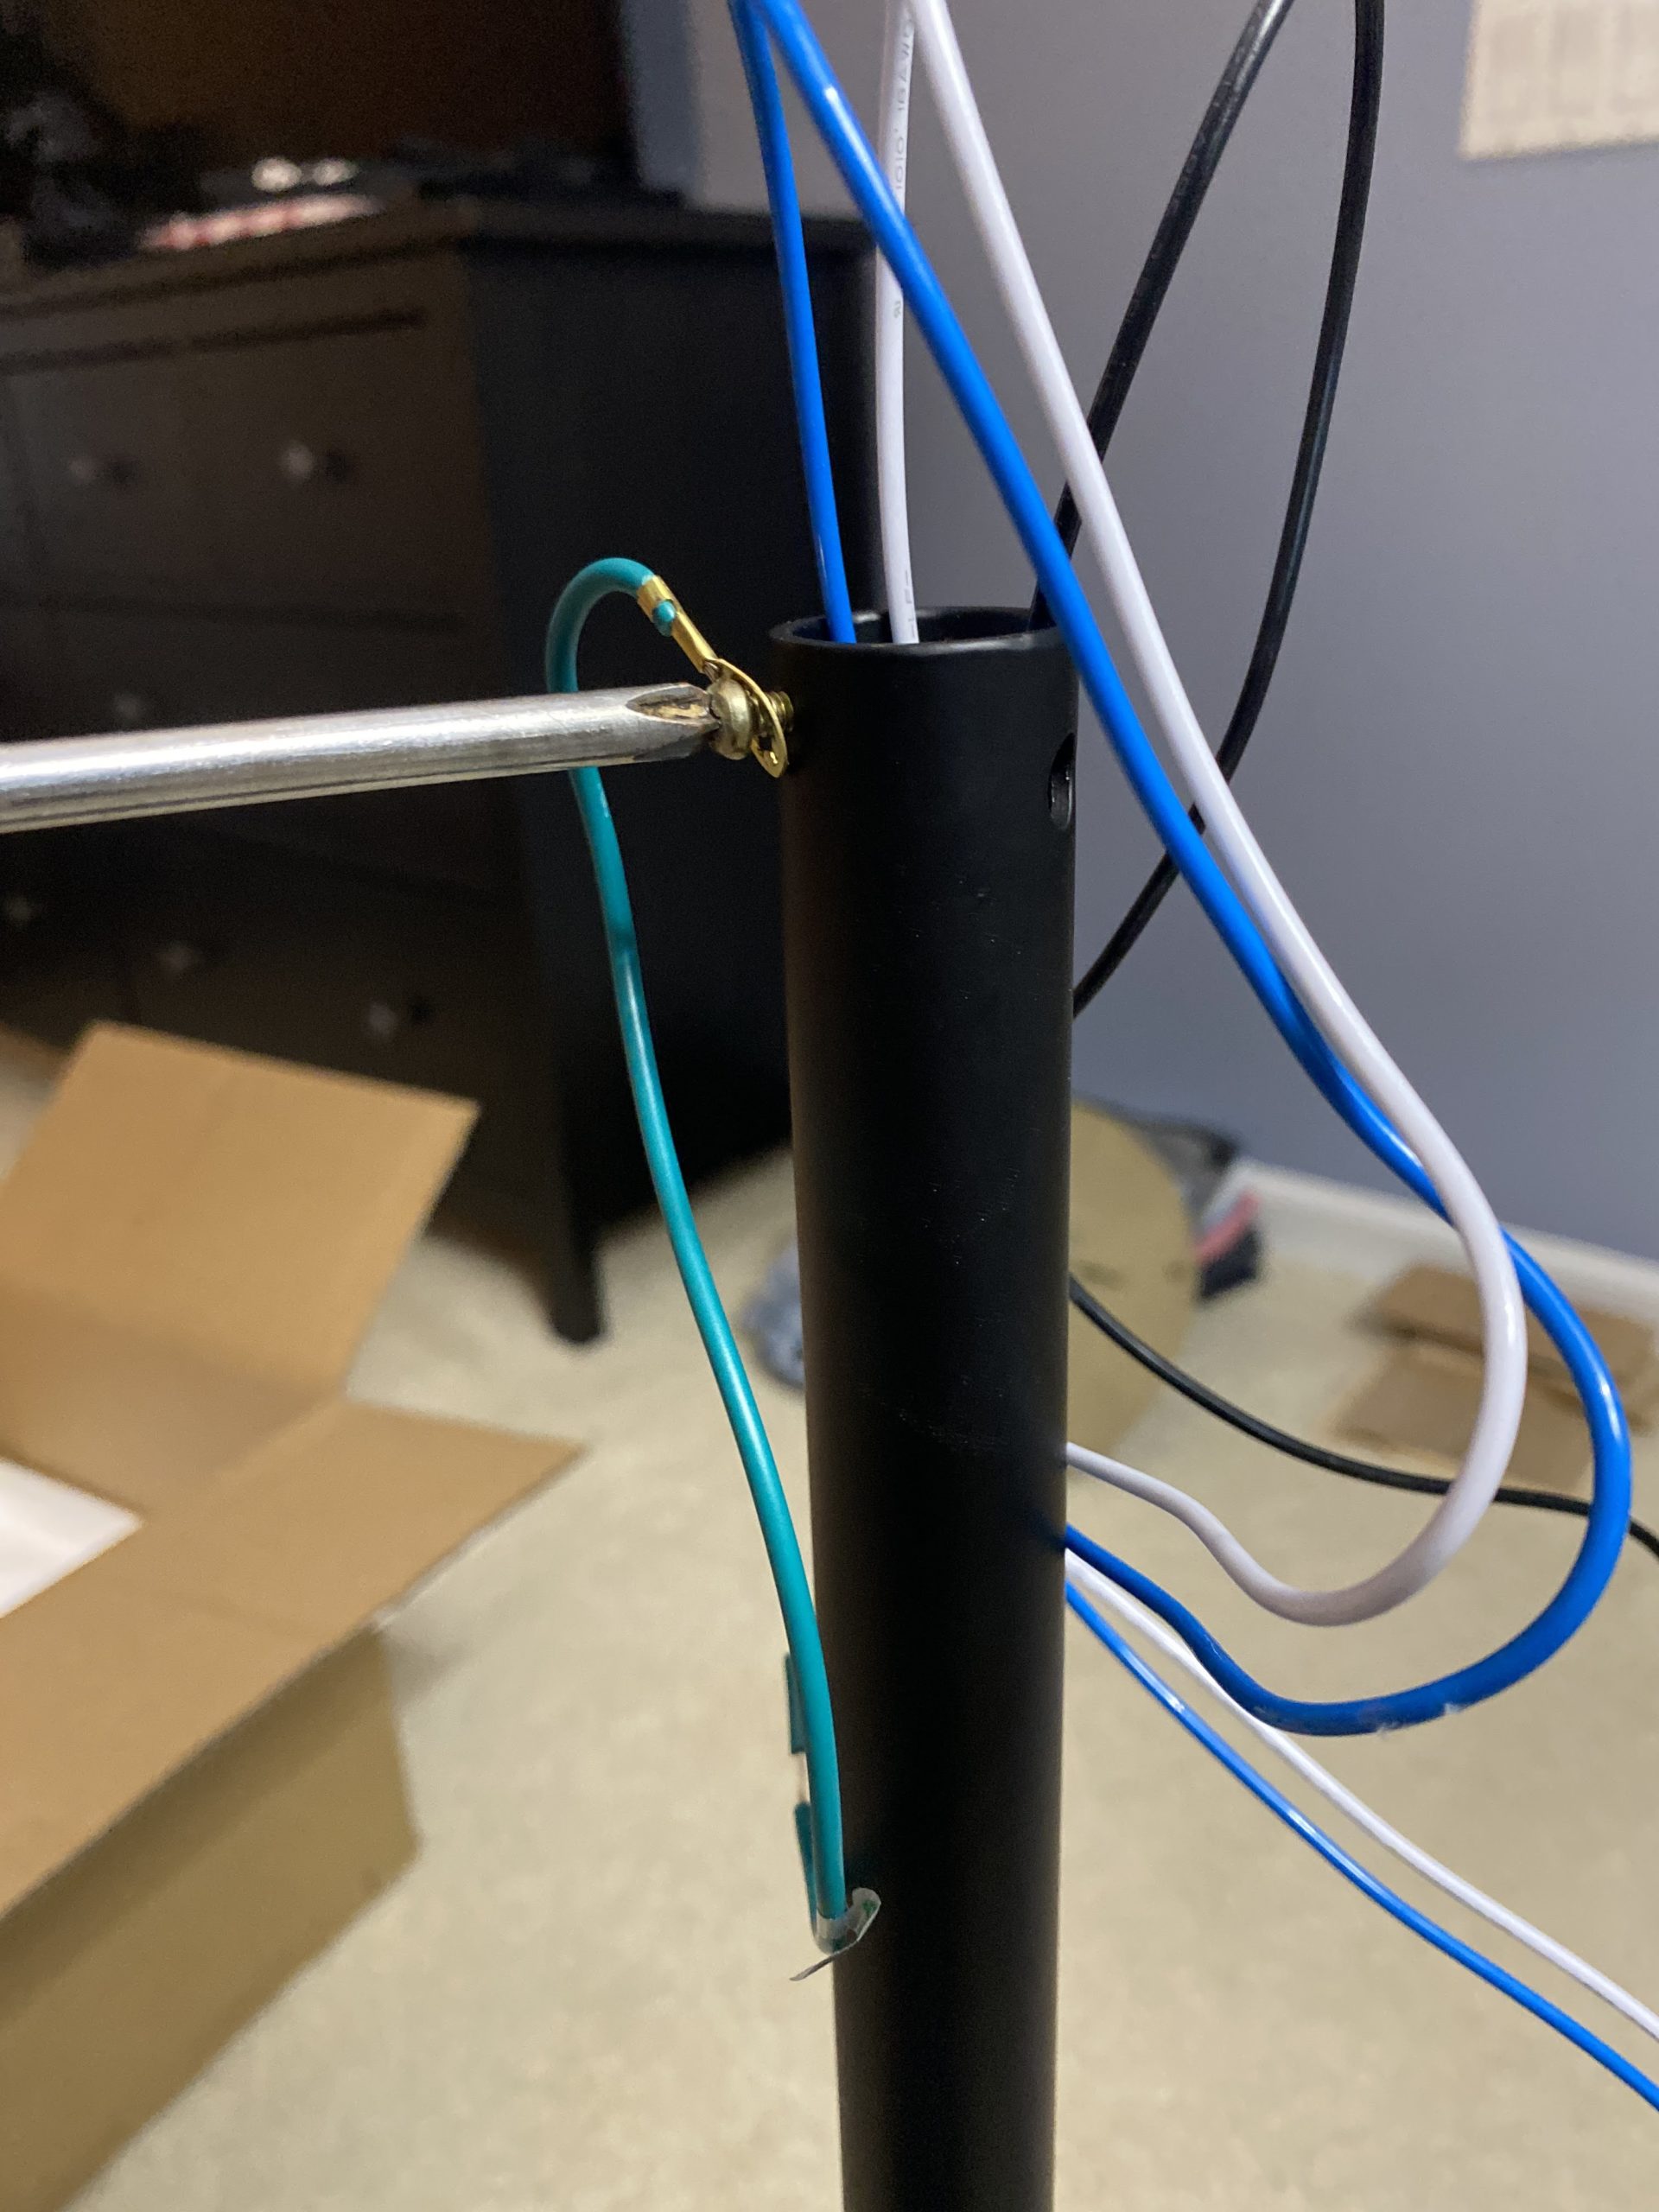
At the top of the downrod, screw the ground wire into rod and reinstall the hanger ball.
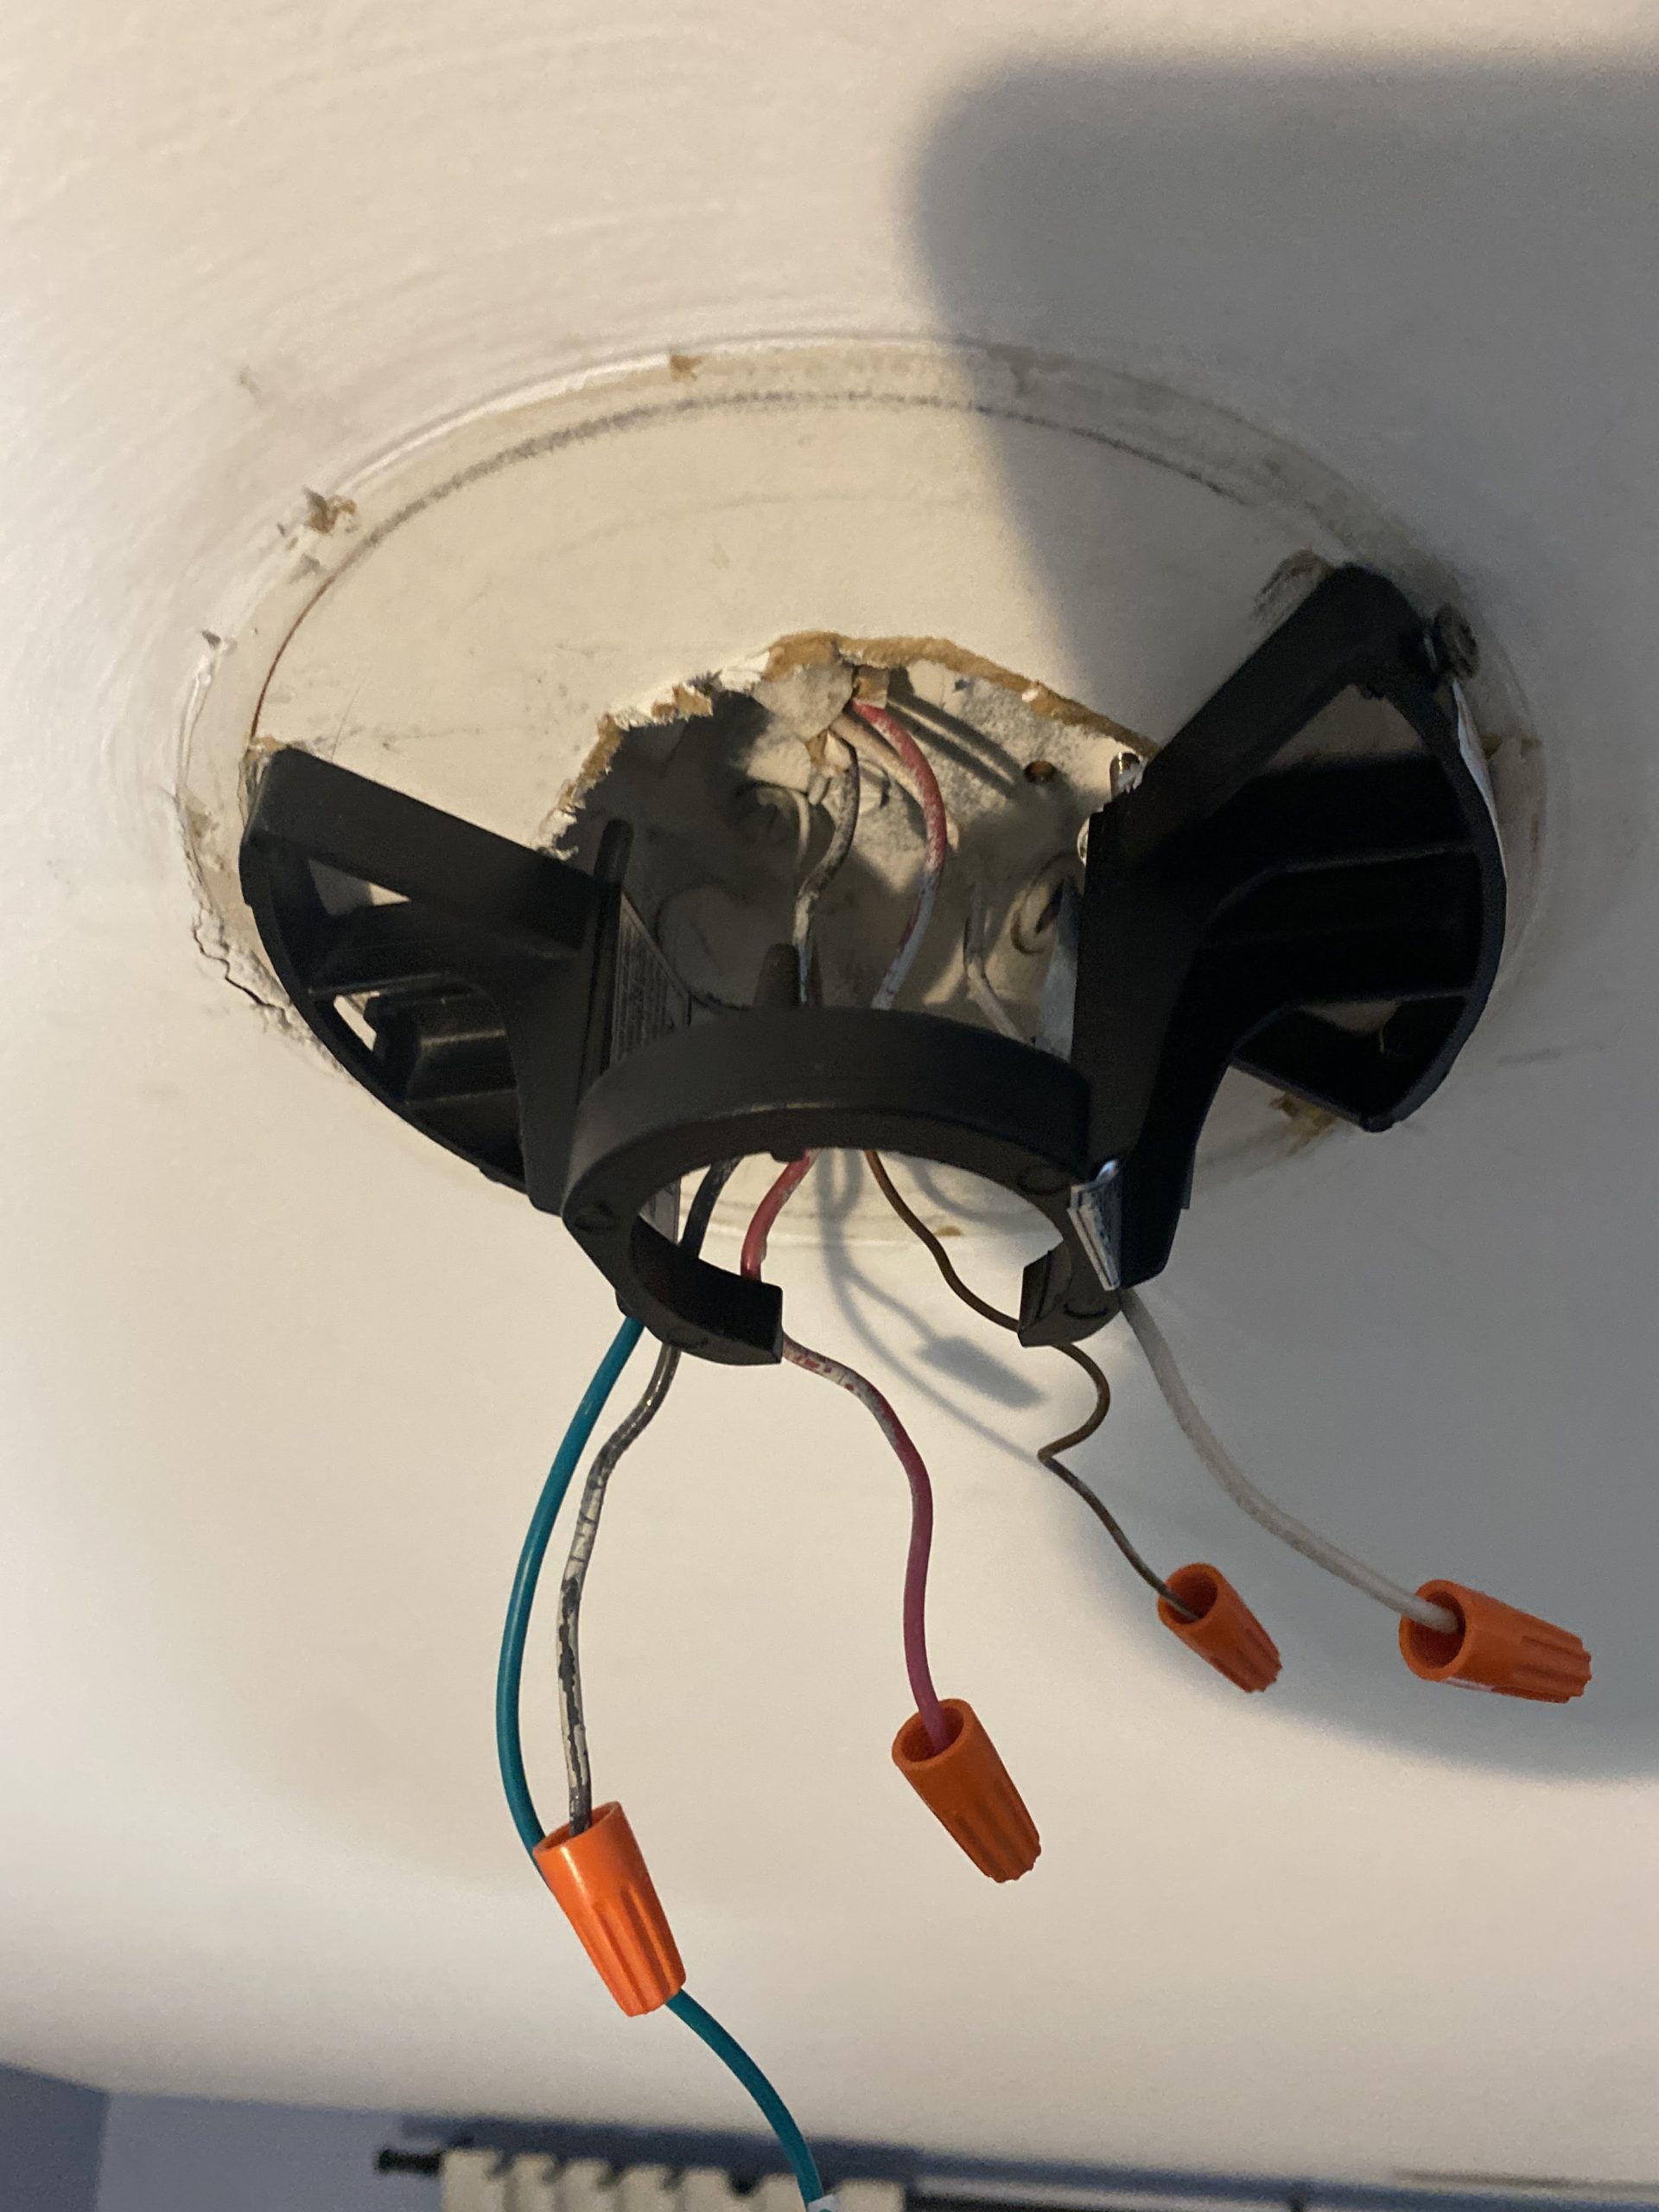
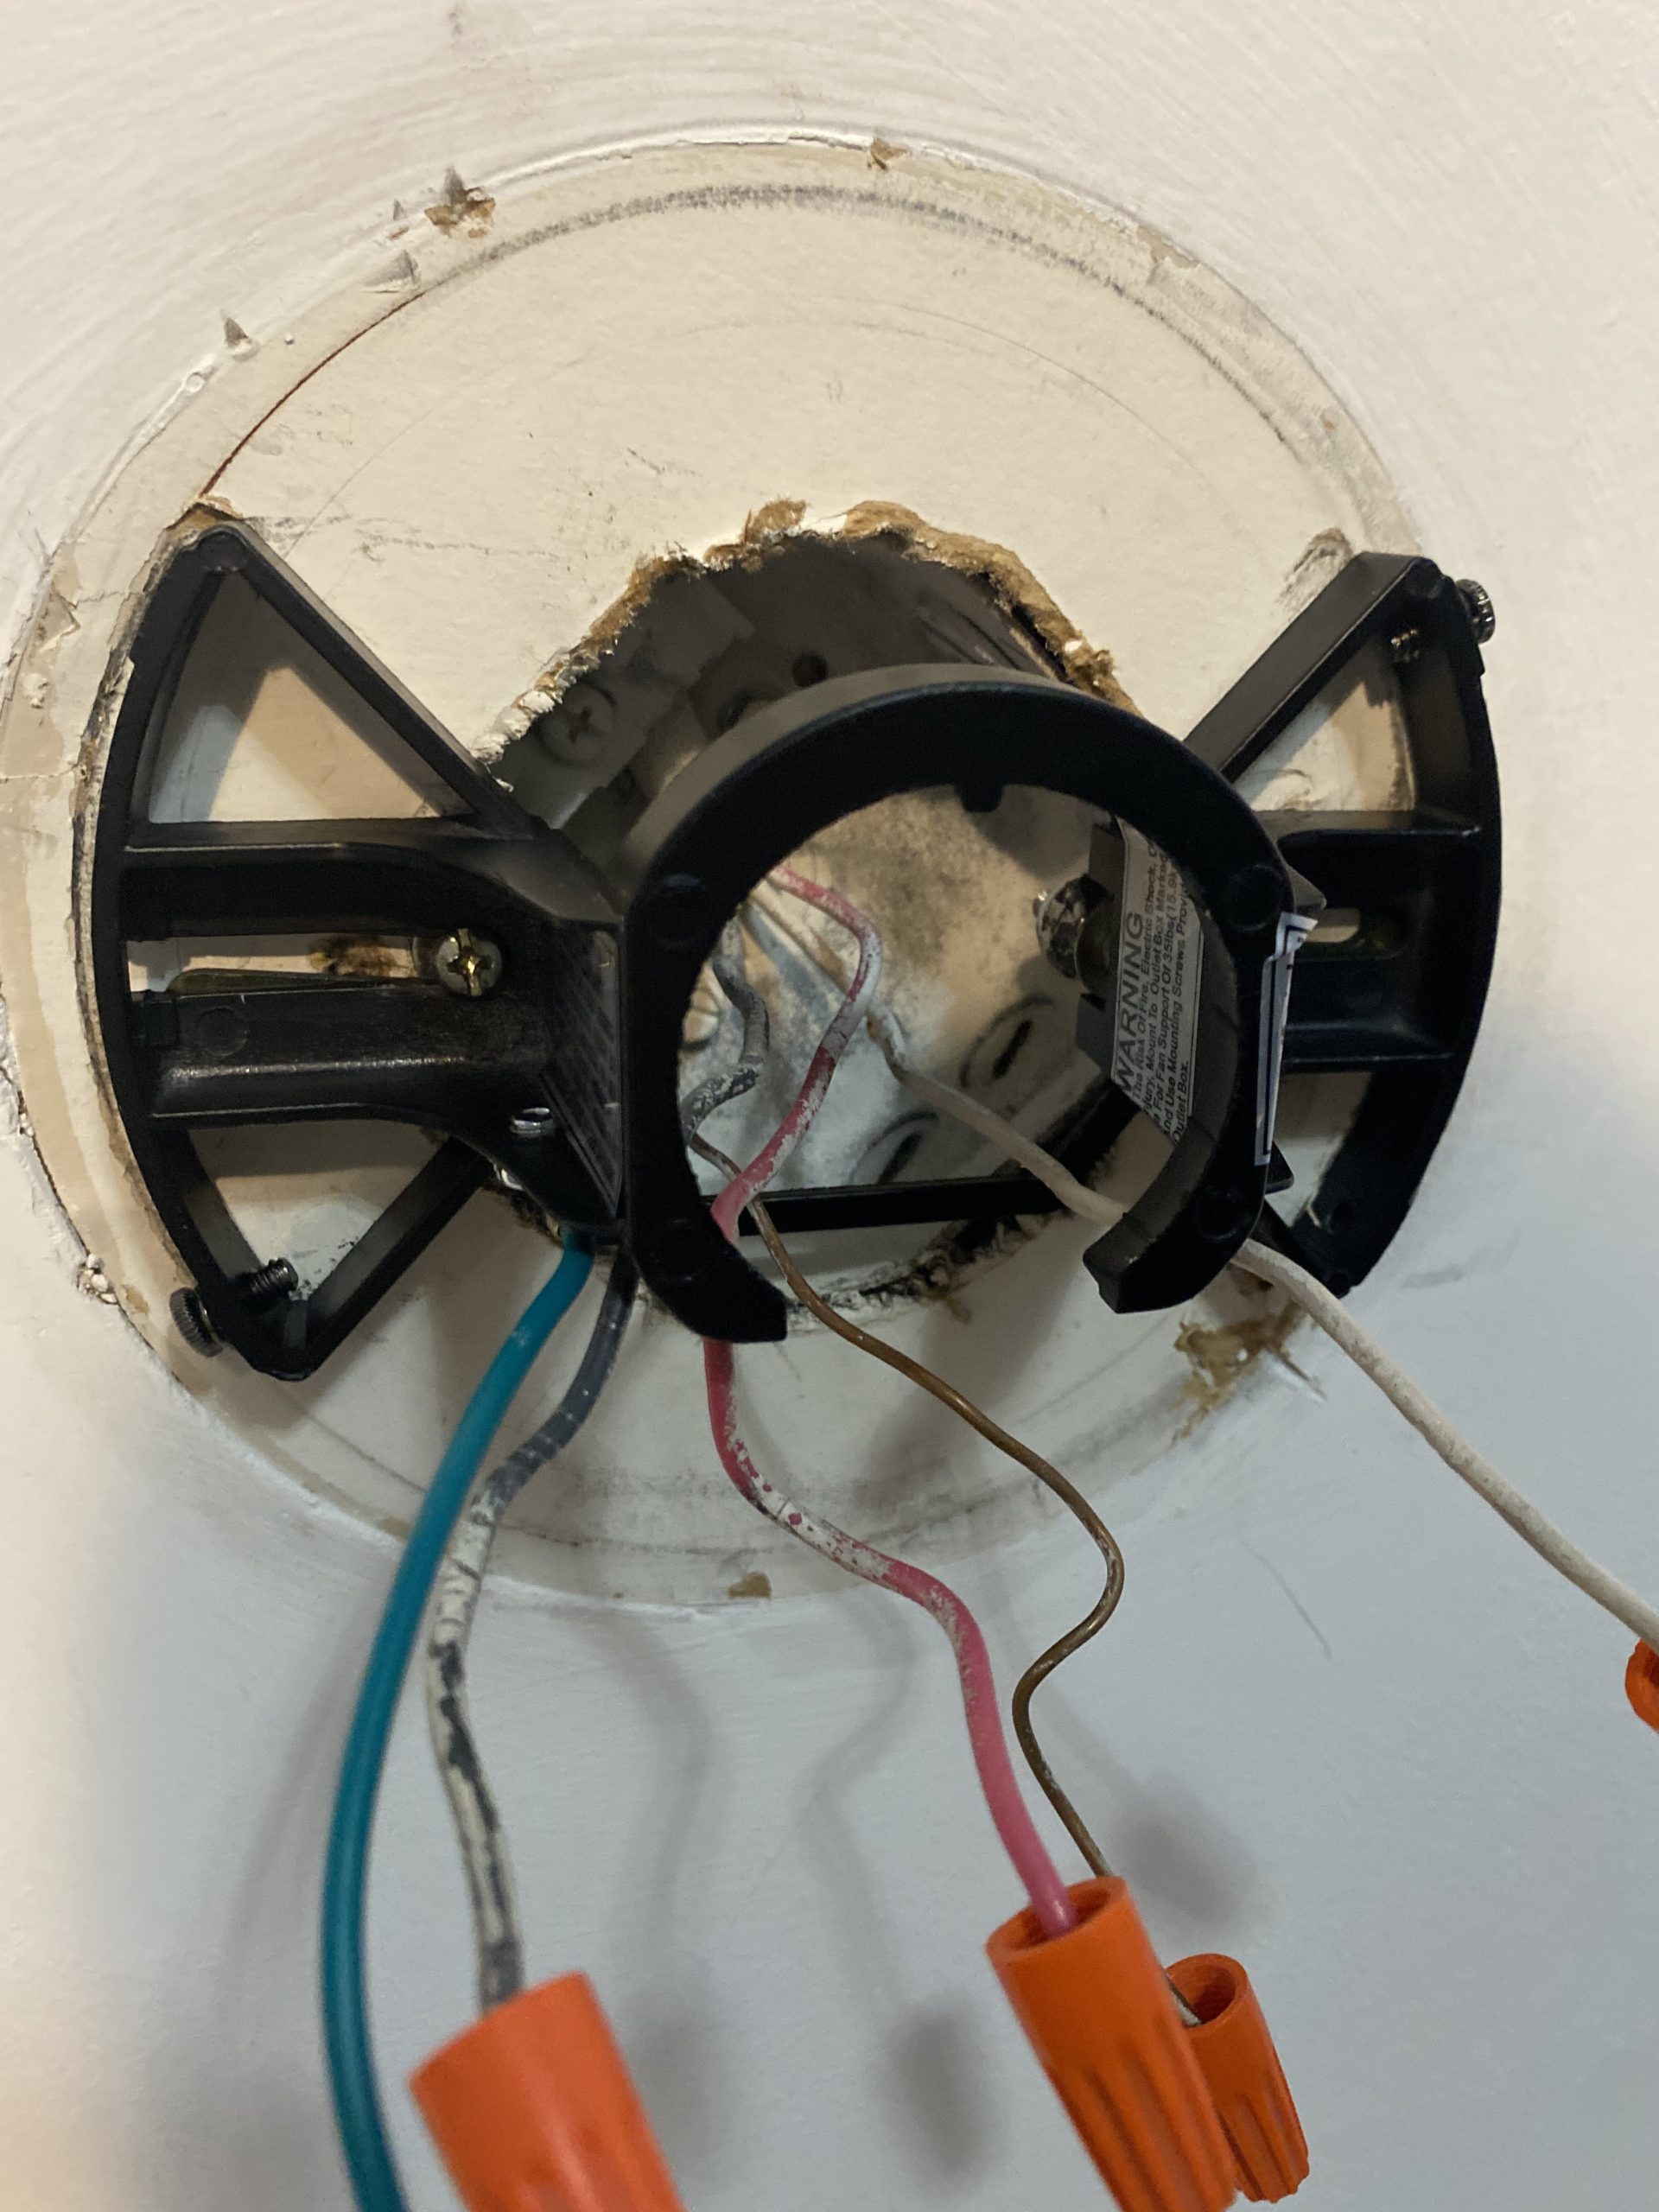
STEP 3: Install Mounting Bracket to Ceiling Box
WARNING: To reduce the risk of fire, electric shock or other personal injury, mount the fan only to an outlet box or supporting system marked acceptable for fan support and use the mounting screws provided with the outlet box.
Attach the mounting bracket on the outlet box in your ceiling by securely tightening the screws provided with the outlet box through the bracket, into the ceiling.
STEP 4: Hang Fan onto Bracket
Carefully lift the fan motor assembly up to the mounting bracket and place the hanger ball inthe mounting bracket socket.
STEP 5: Preparing the Receiver and Remote
Follow the instructions for preparing the remote and the receiver. Many times, these two components have code switches that allow them to communicate with each other. The instructions that come with your fan will tell you what code to set these switches to on each component.
The following step describes the process of modifying the factory electrical components in a ceiling fan in order to install it to two wall switches. Any modifications made to your ceiling fan whether as described in this step or other is dangerous and will increase the risk of personal injury or DEATH as well as property loss or damage. At the very least, it will void your fixture warranty.
If you feel you do not have enough electrical wiring knowledge or experience, have your fan installed by a licensed electrician.
I recommend connecting the fan as directed before following the next step to ensure proper connections and eliminate any other malfunctions in the fan before modifying the wiring
STEP 6: Cut “Light” Wire
*You will lose functionality of controlling the light from the remote if you follow these steps.
Insert your receiver into the mounting bracket as described in your instructions. For angled ceilings, you’ll need to angle the fan/hanger ball to fit the receiver into the slot.
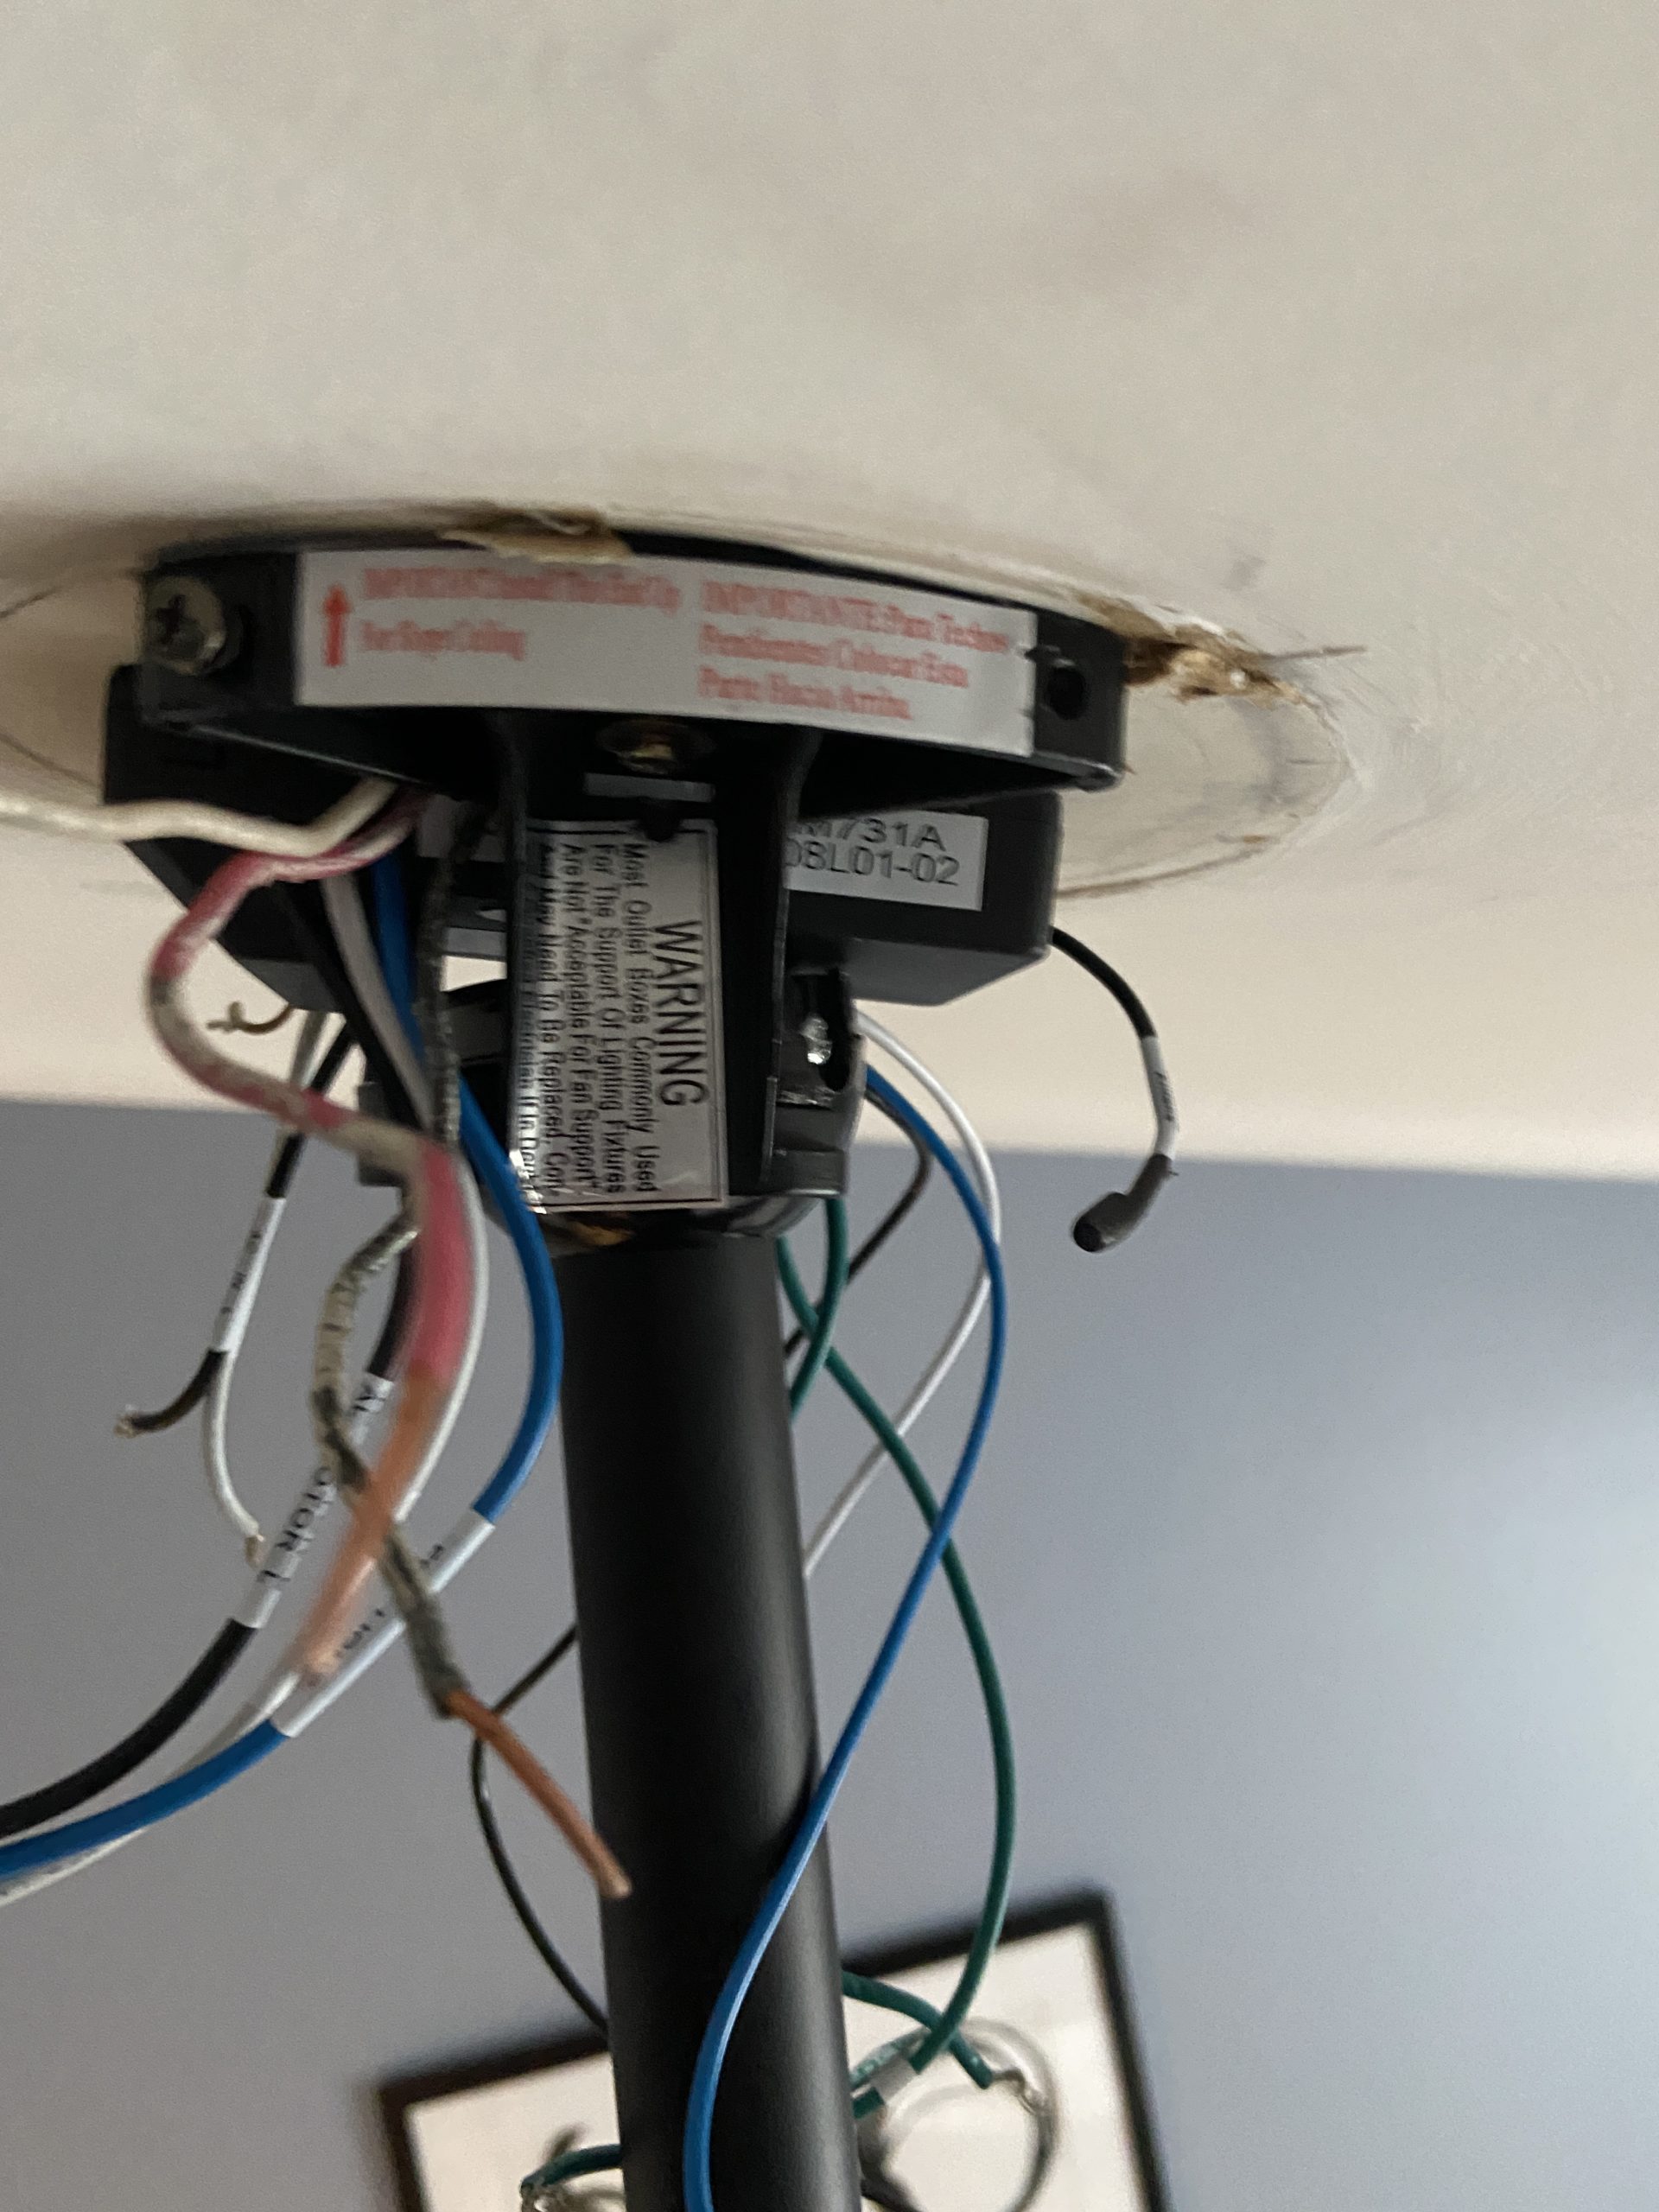
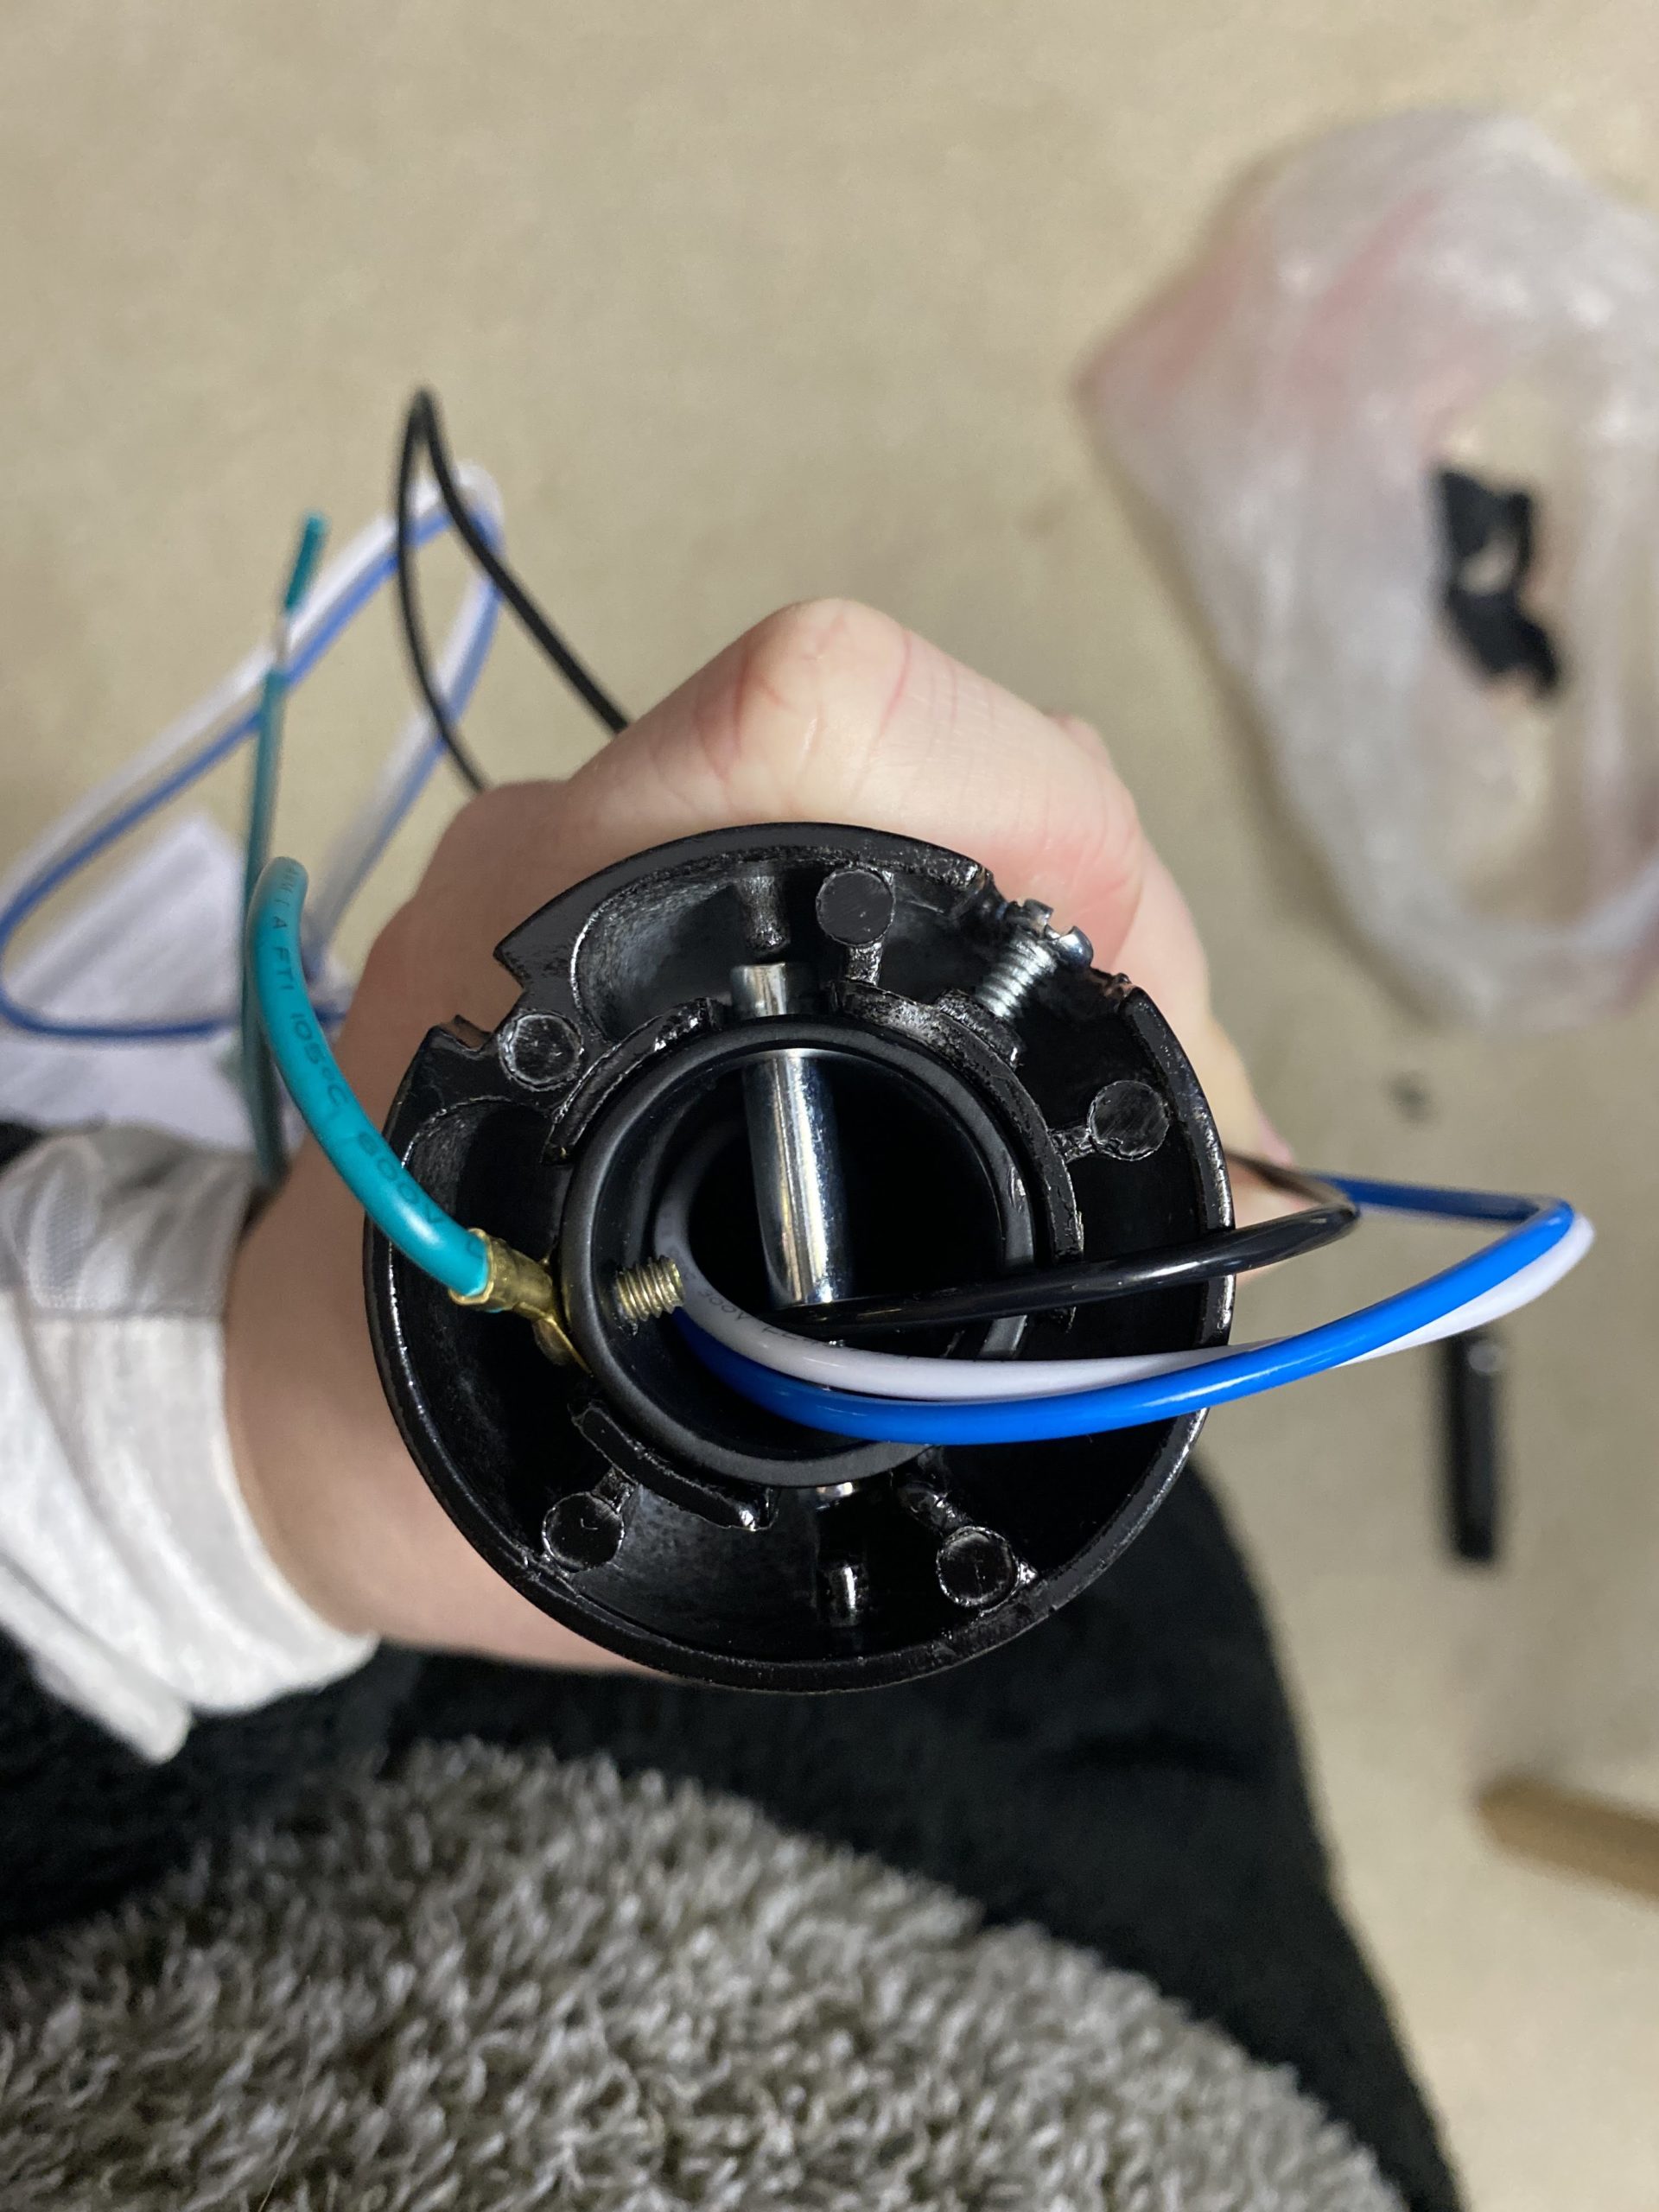
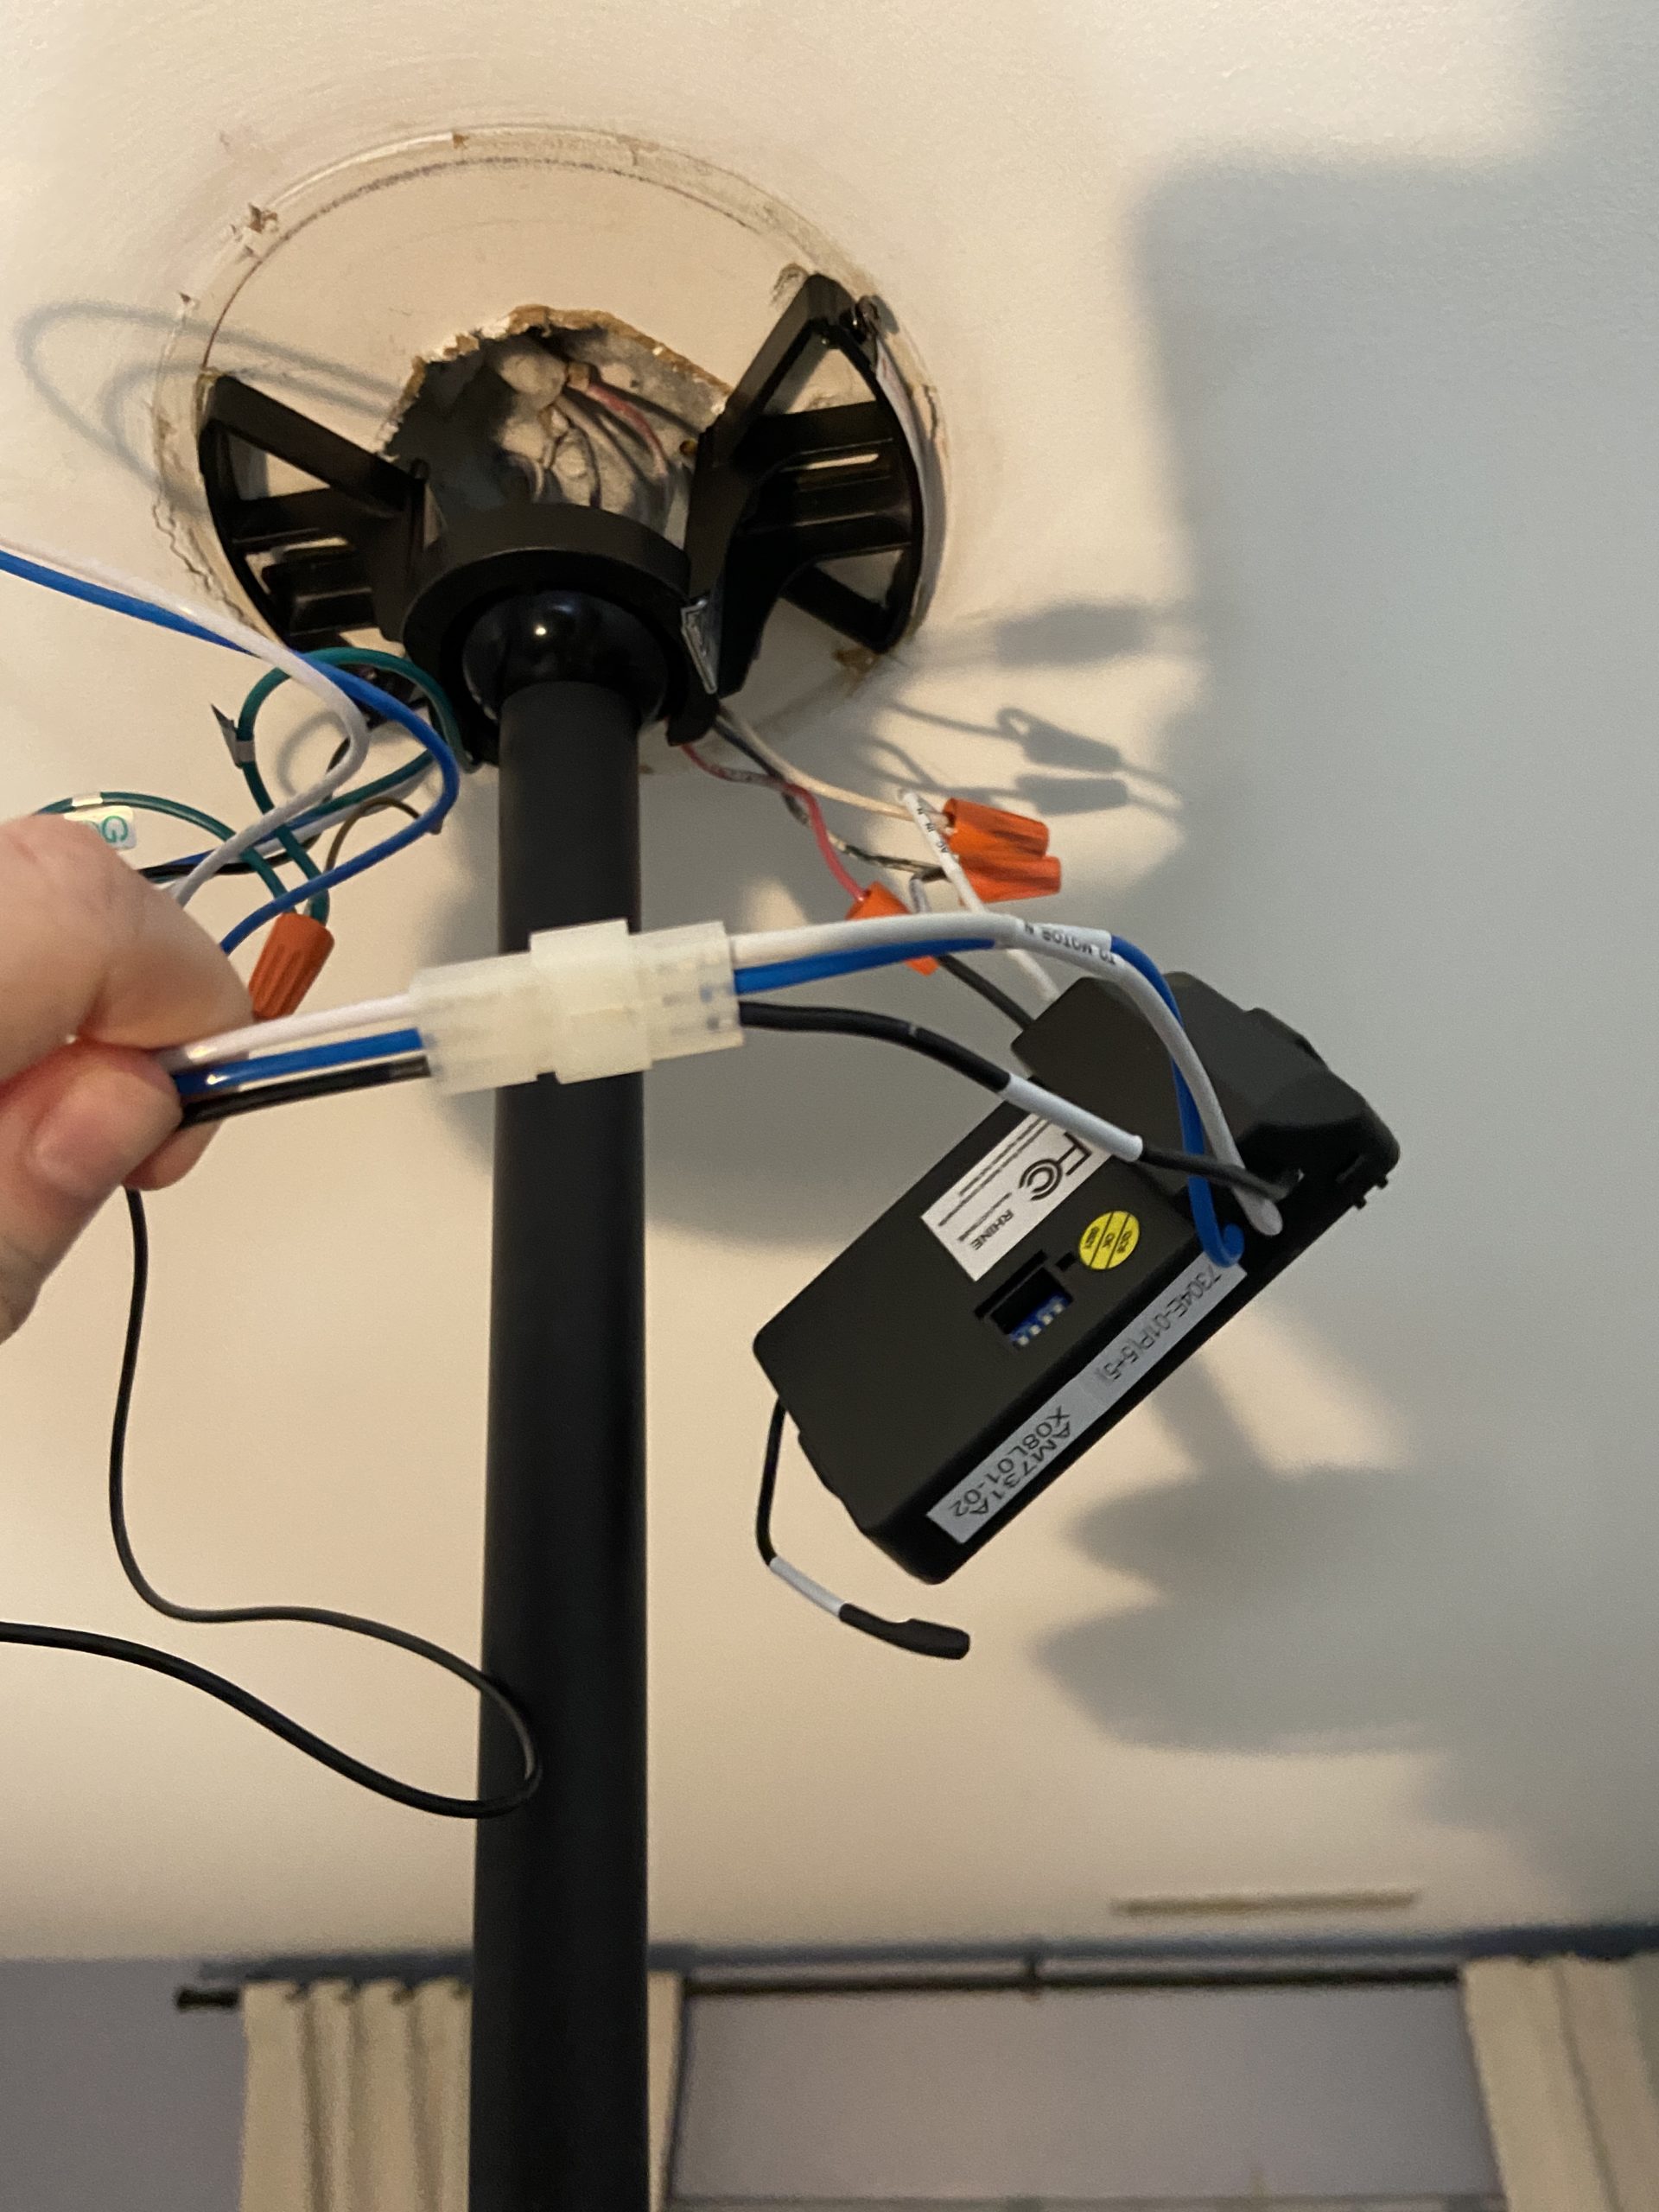
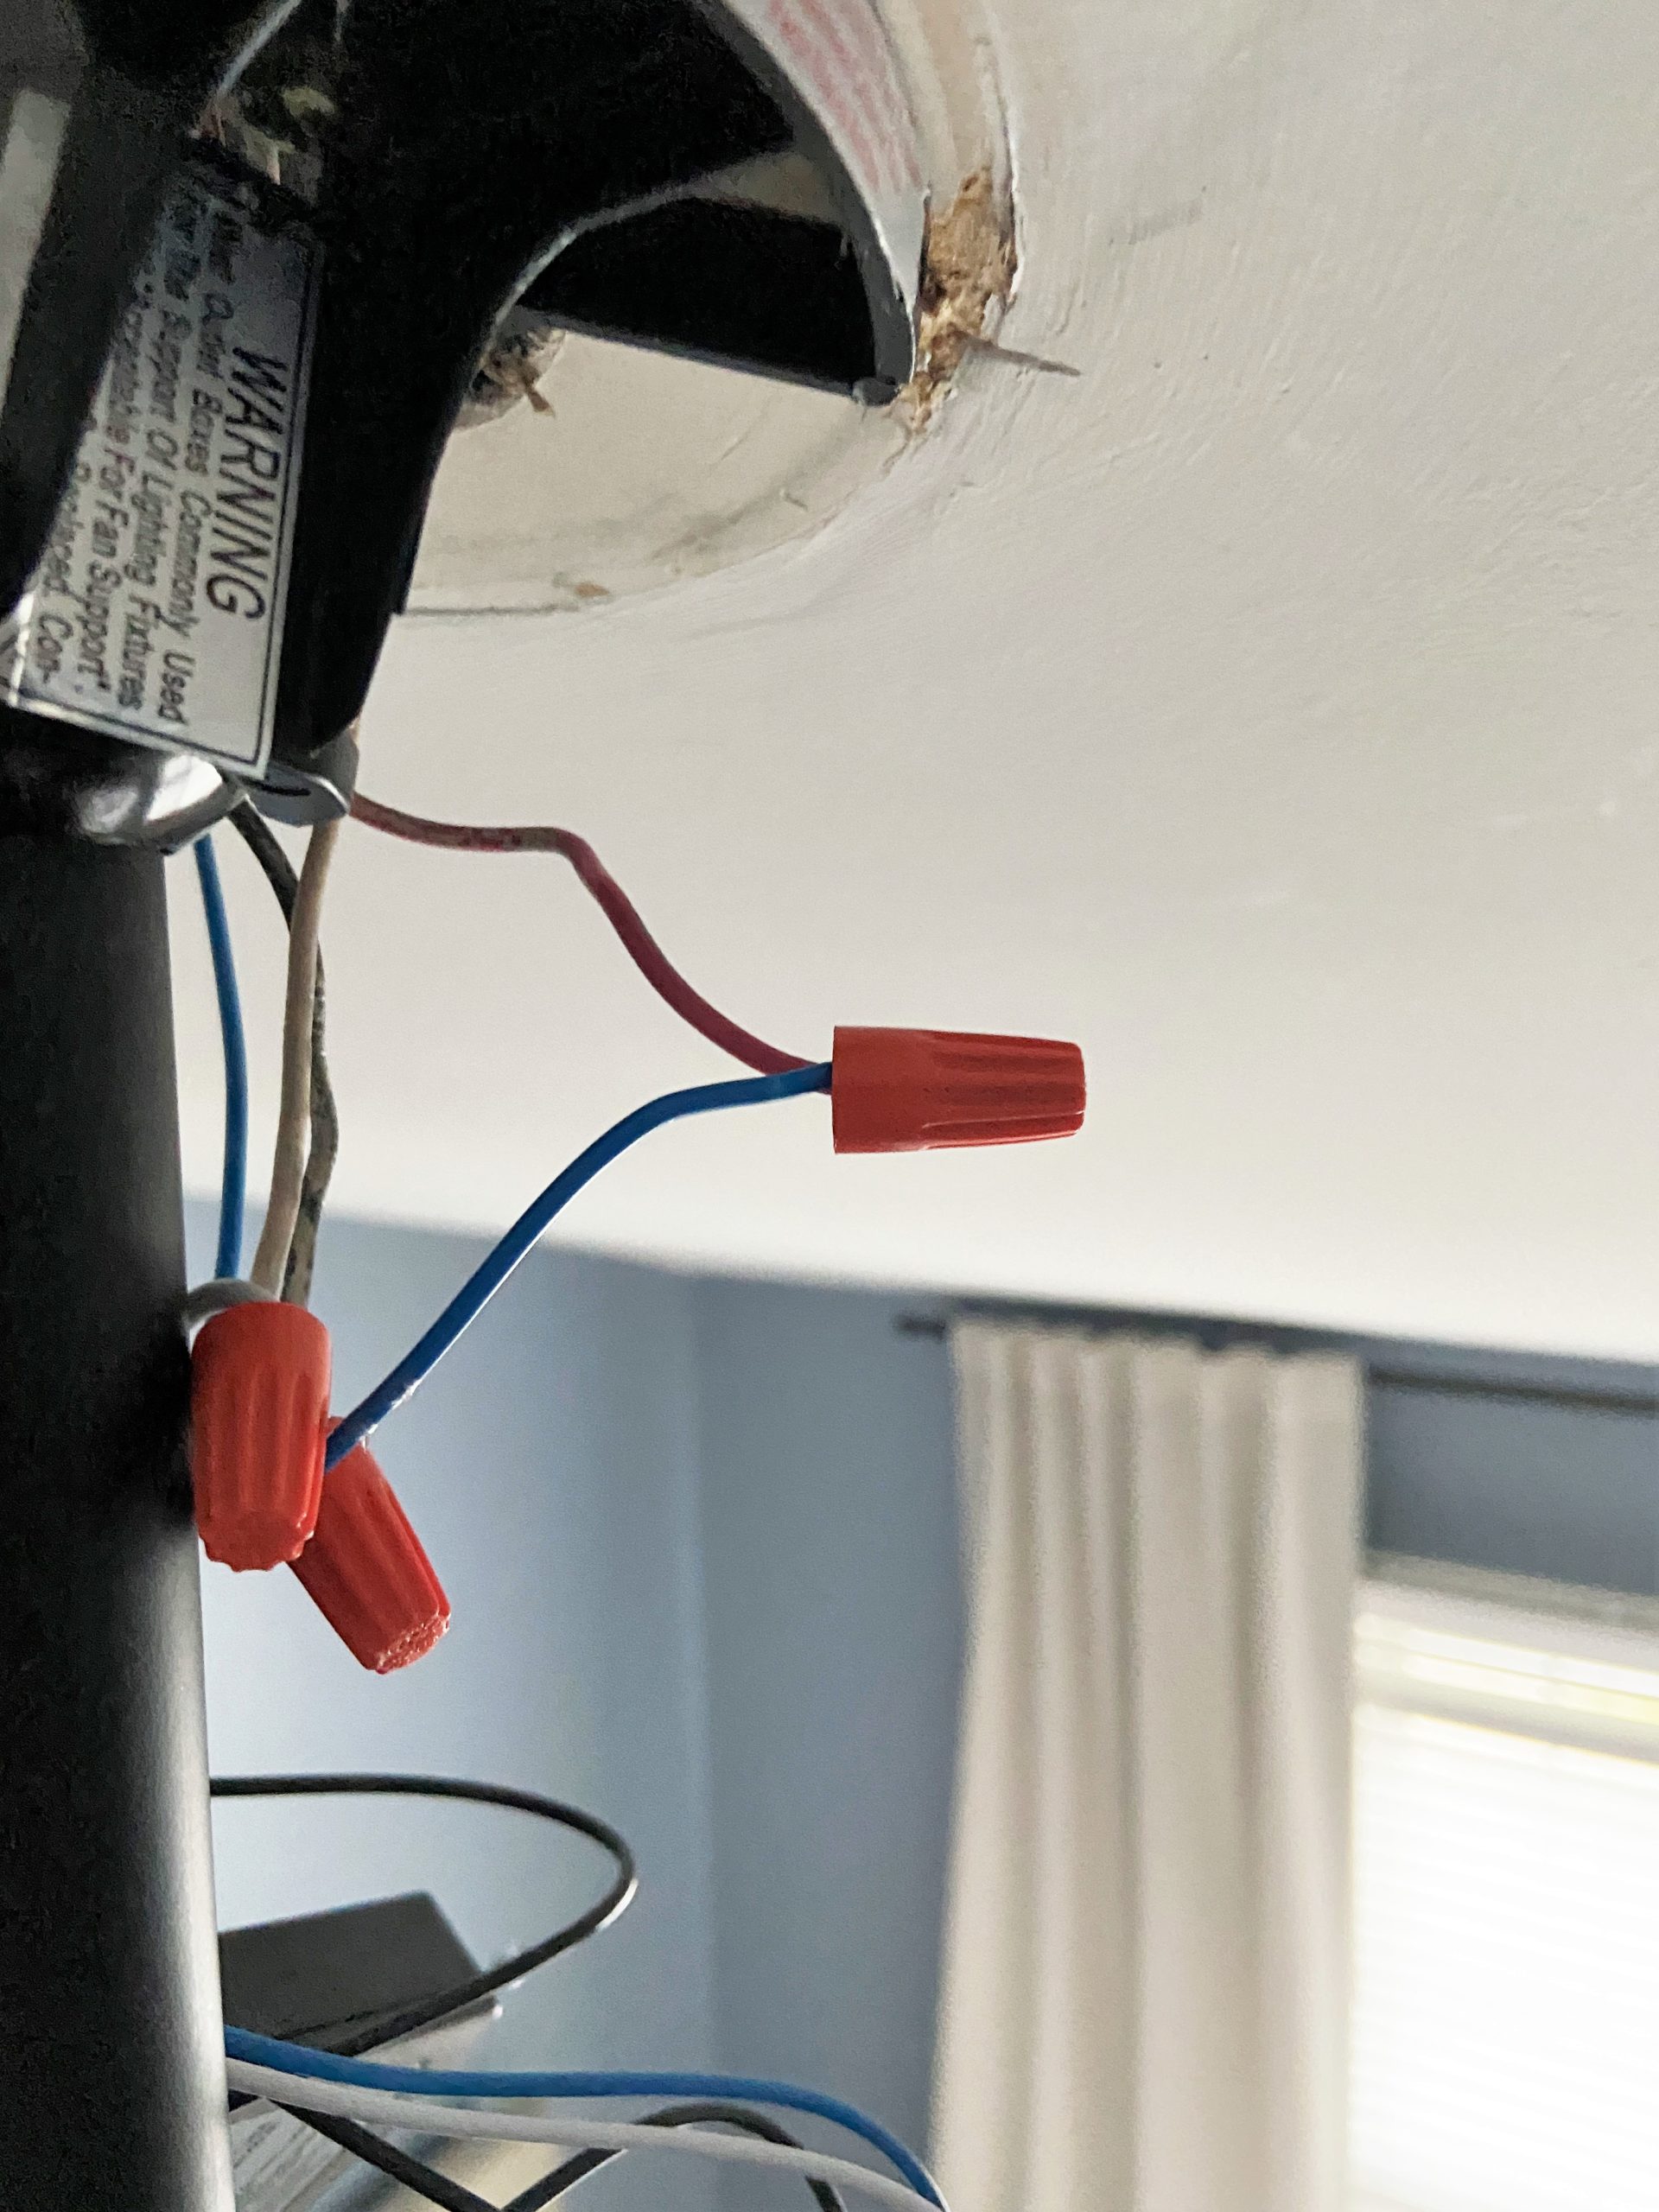
In order to be able to install your ceiling fan to two wall switches, the ceiling fan will need to have certain wires. The fan you buy has to have a receiver with 3 wires going from the motor to the receiver in order for the fan to be controlled by a remote and the two wall switches. If your wires are separated, only modifications to the connections need to be made. If these are grouped (such as mine is in the picture below), connect the grouped pins together. Cut the wire coming FROM the fan motor that goes to the light (in my case, this wire is blue). Make sure to leave enough room on each side of your cut and cap off the end of the wire meant for the receiver with a plastic wire nut.
STEP 7: Make the Electrical Connections
Using plastic wire nuts, secure the below wires together. Make sure there are no loose strands or connections.
This assumes the black wire controls the fan, while the blue controls the light kit on the fan. Check the documentation that came with the fixture, for proper wiring instructions.

From the Fan to the Receiver
If your fan has grouped wires, after cutting out the light wire, you’ll just attach them as normal to the grouped wire from the receiver. If your fan did not come with grouped wires, connect your wires according to the notes below:
Black Wire attaches to the Black Wire on the receiver.
White Wire attaches to the White Wire on the receiver.
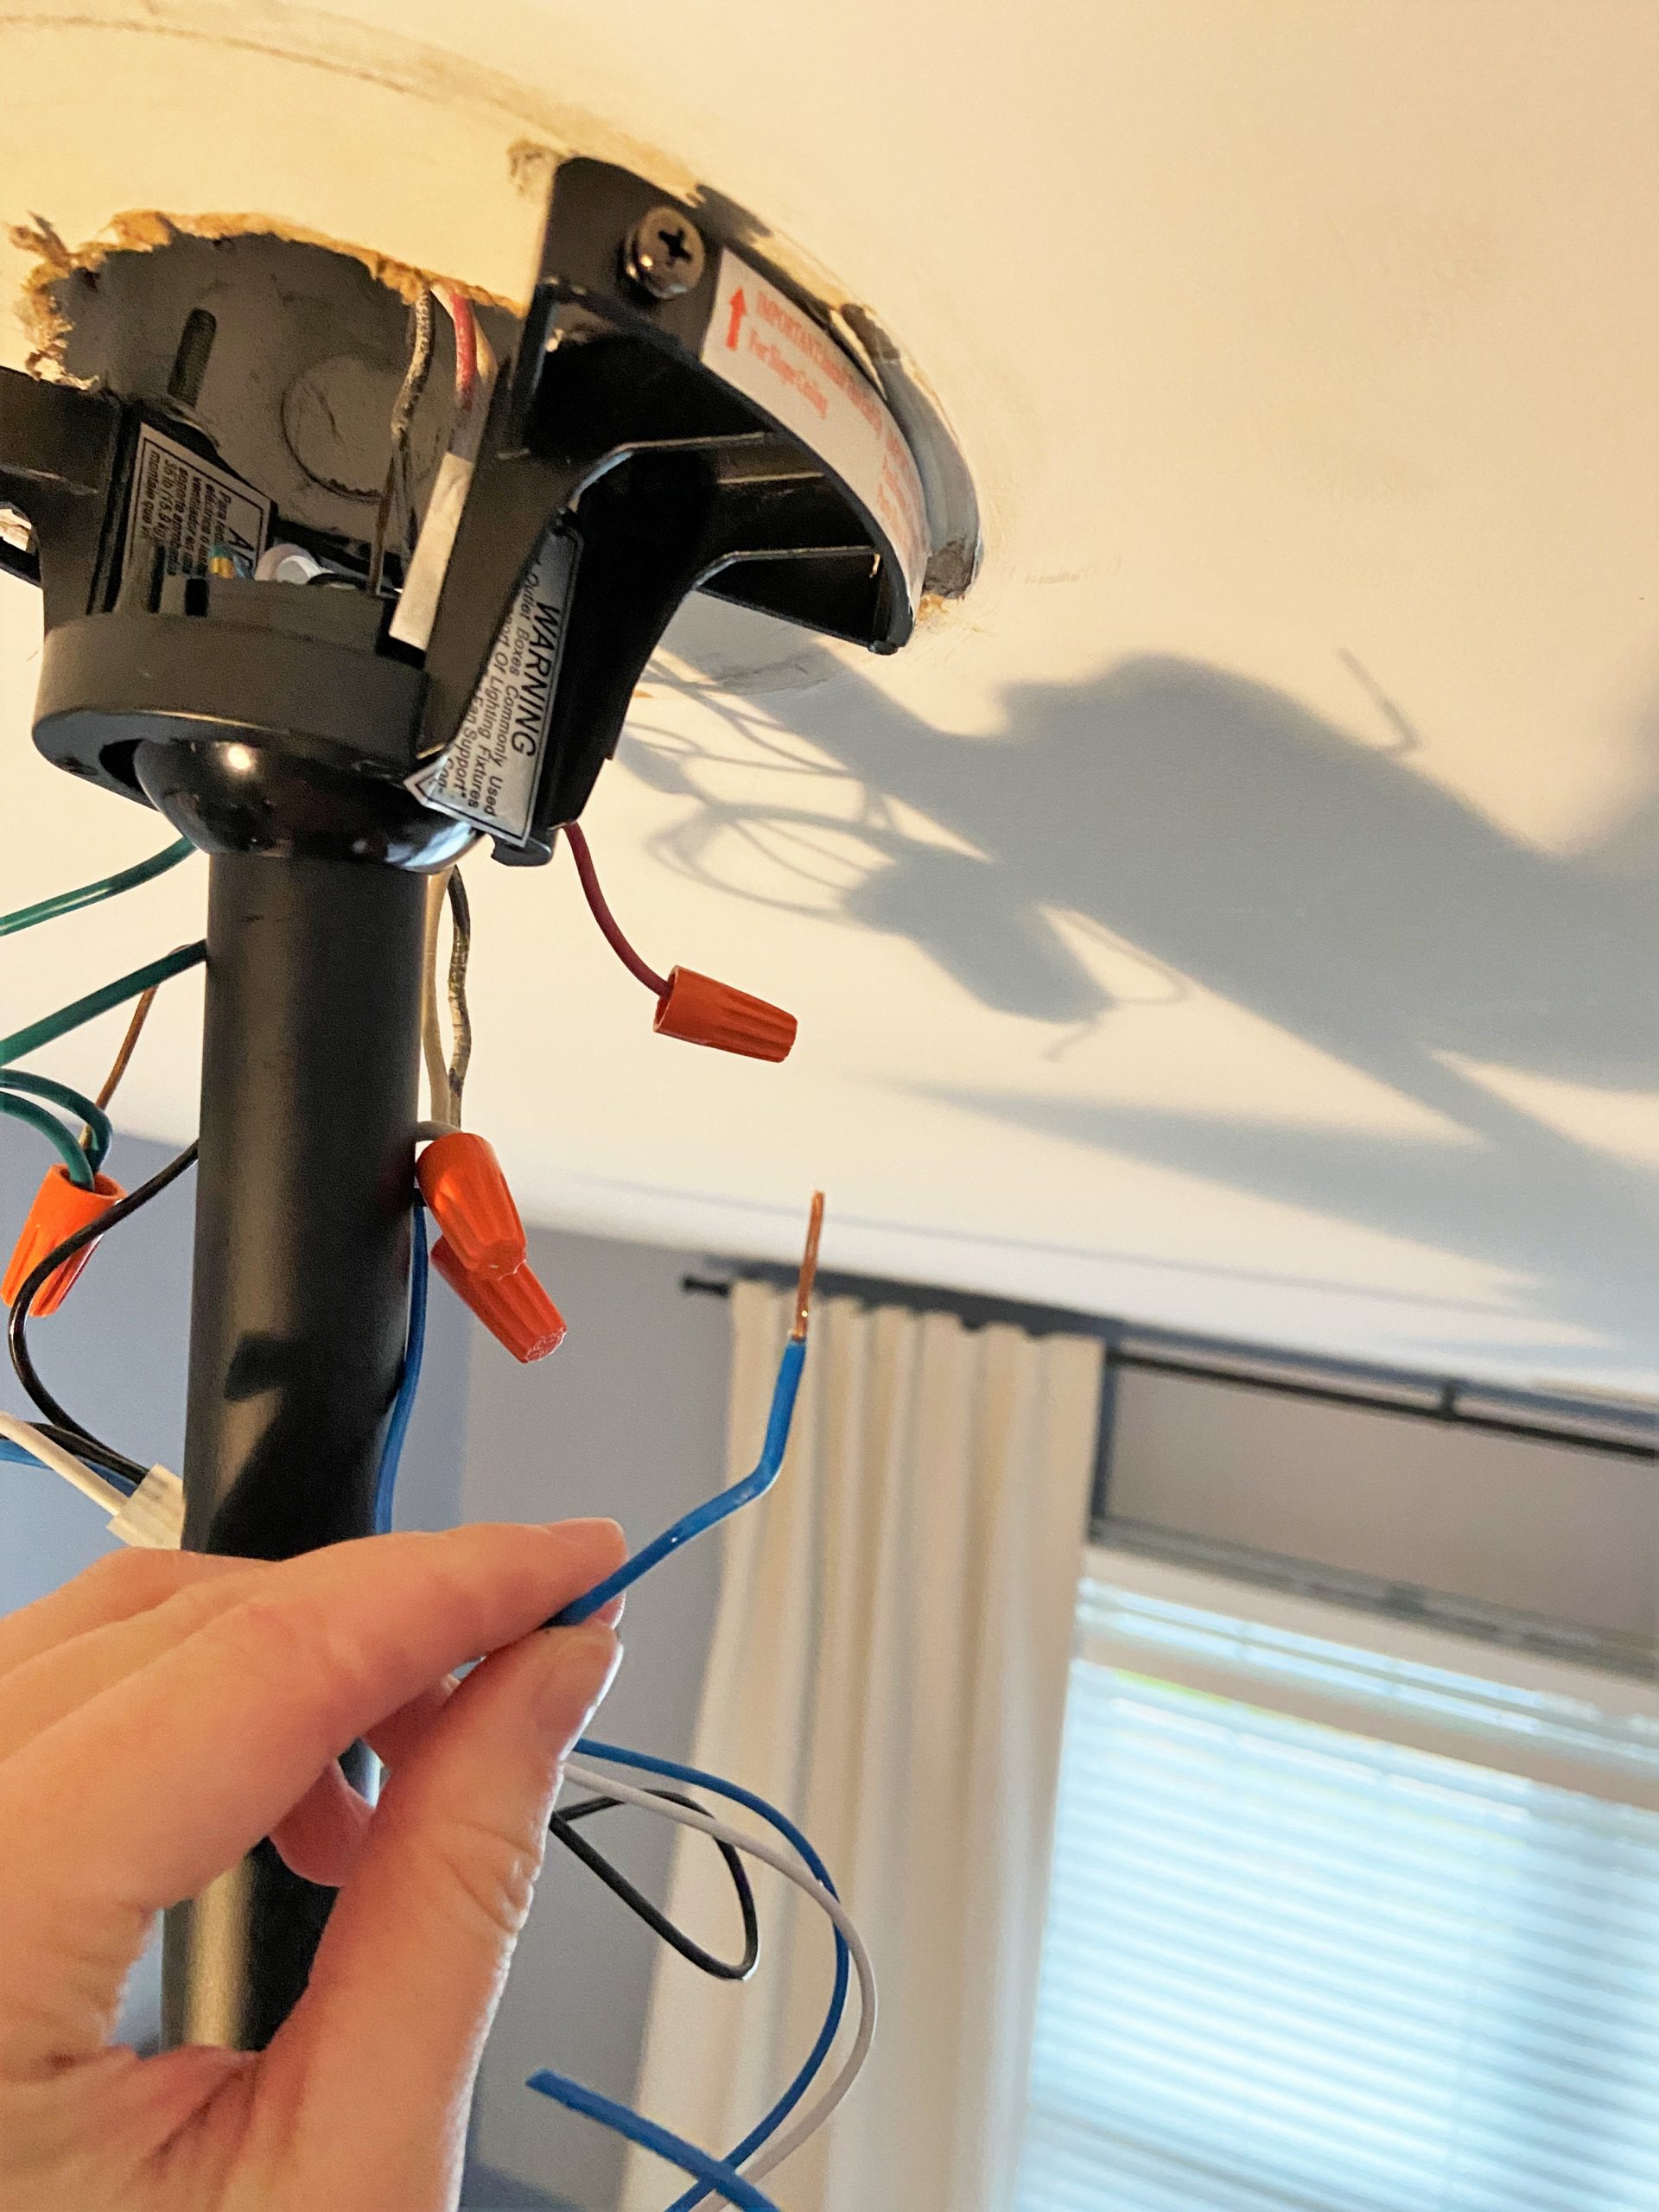
From Receiver To Outlet Box
Black Wire “AC in L” attaches to the Hot Wire in Outlet Box- connected to switch you want to control the fan. This wire is most often black or red. Mine is black.
White Wire “AC in N”, (which is already attached to the White Wire from the fan) attaches to the Neutral Wire (White) in the outlet box.
Blue Wire from the receiver gets capped with a plastic wire nut.
From Fan To Outlet Box
Blue Wire that we cut (Light) attaches to the other Hot Wire in the Outlet Box- connected to the switch you want to control the light (mine is red).
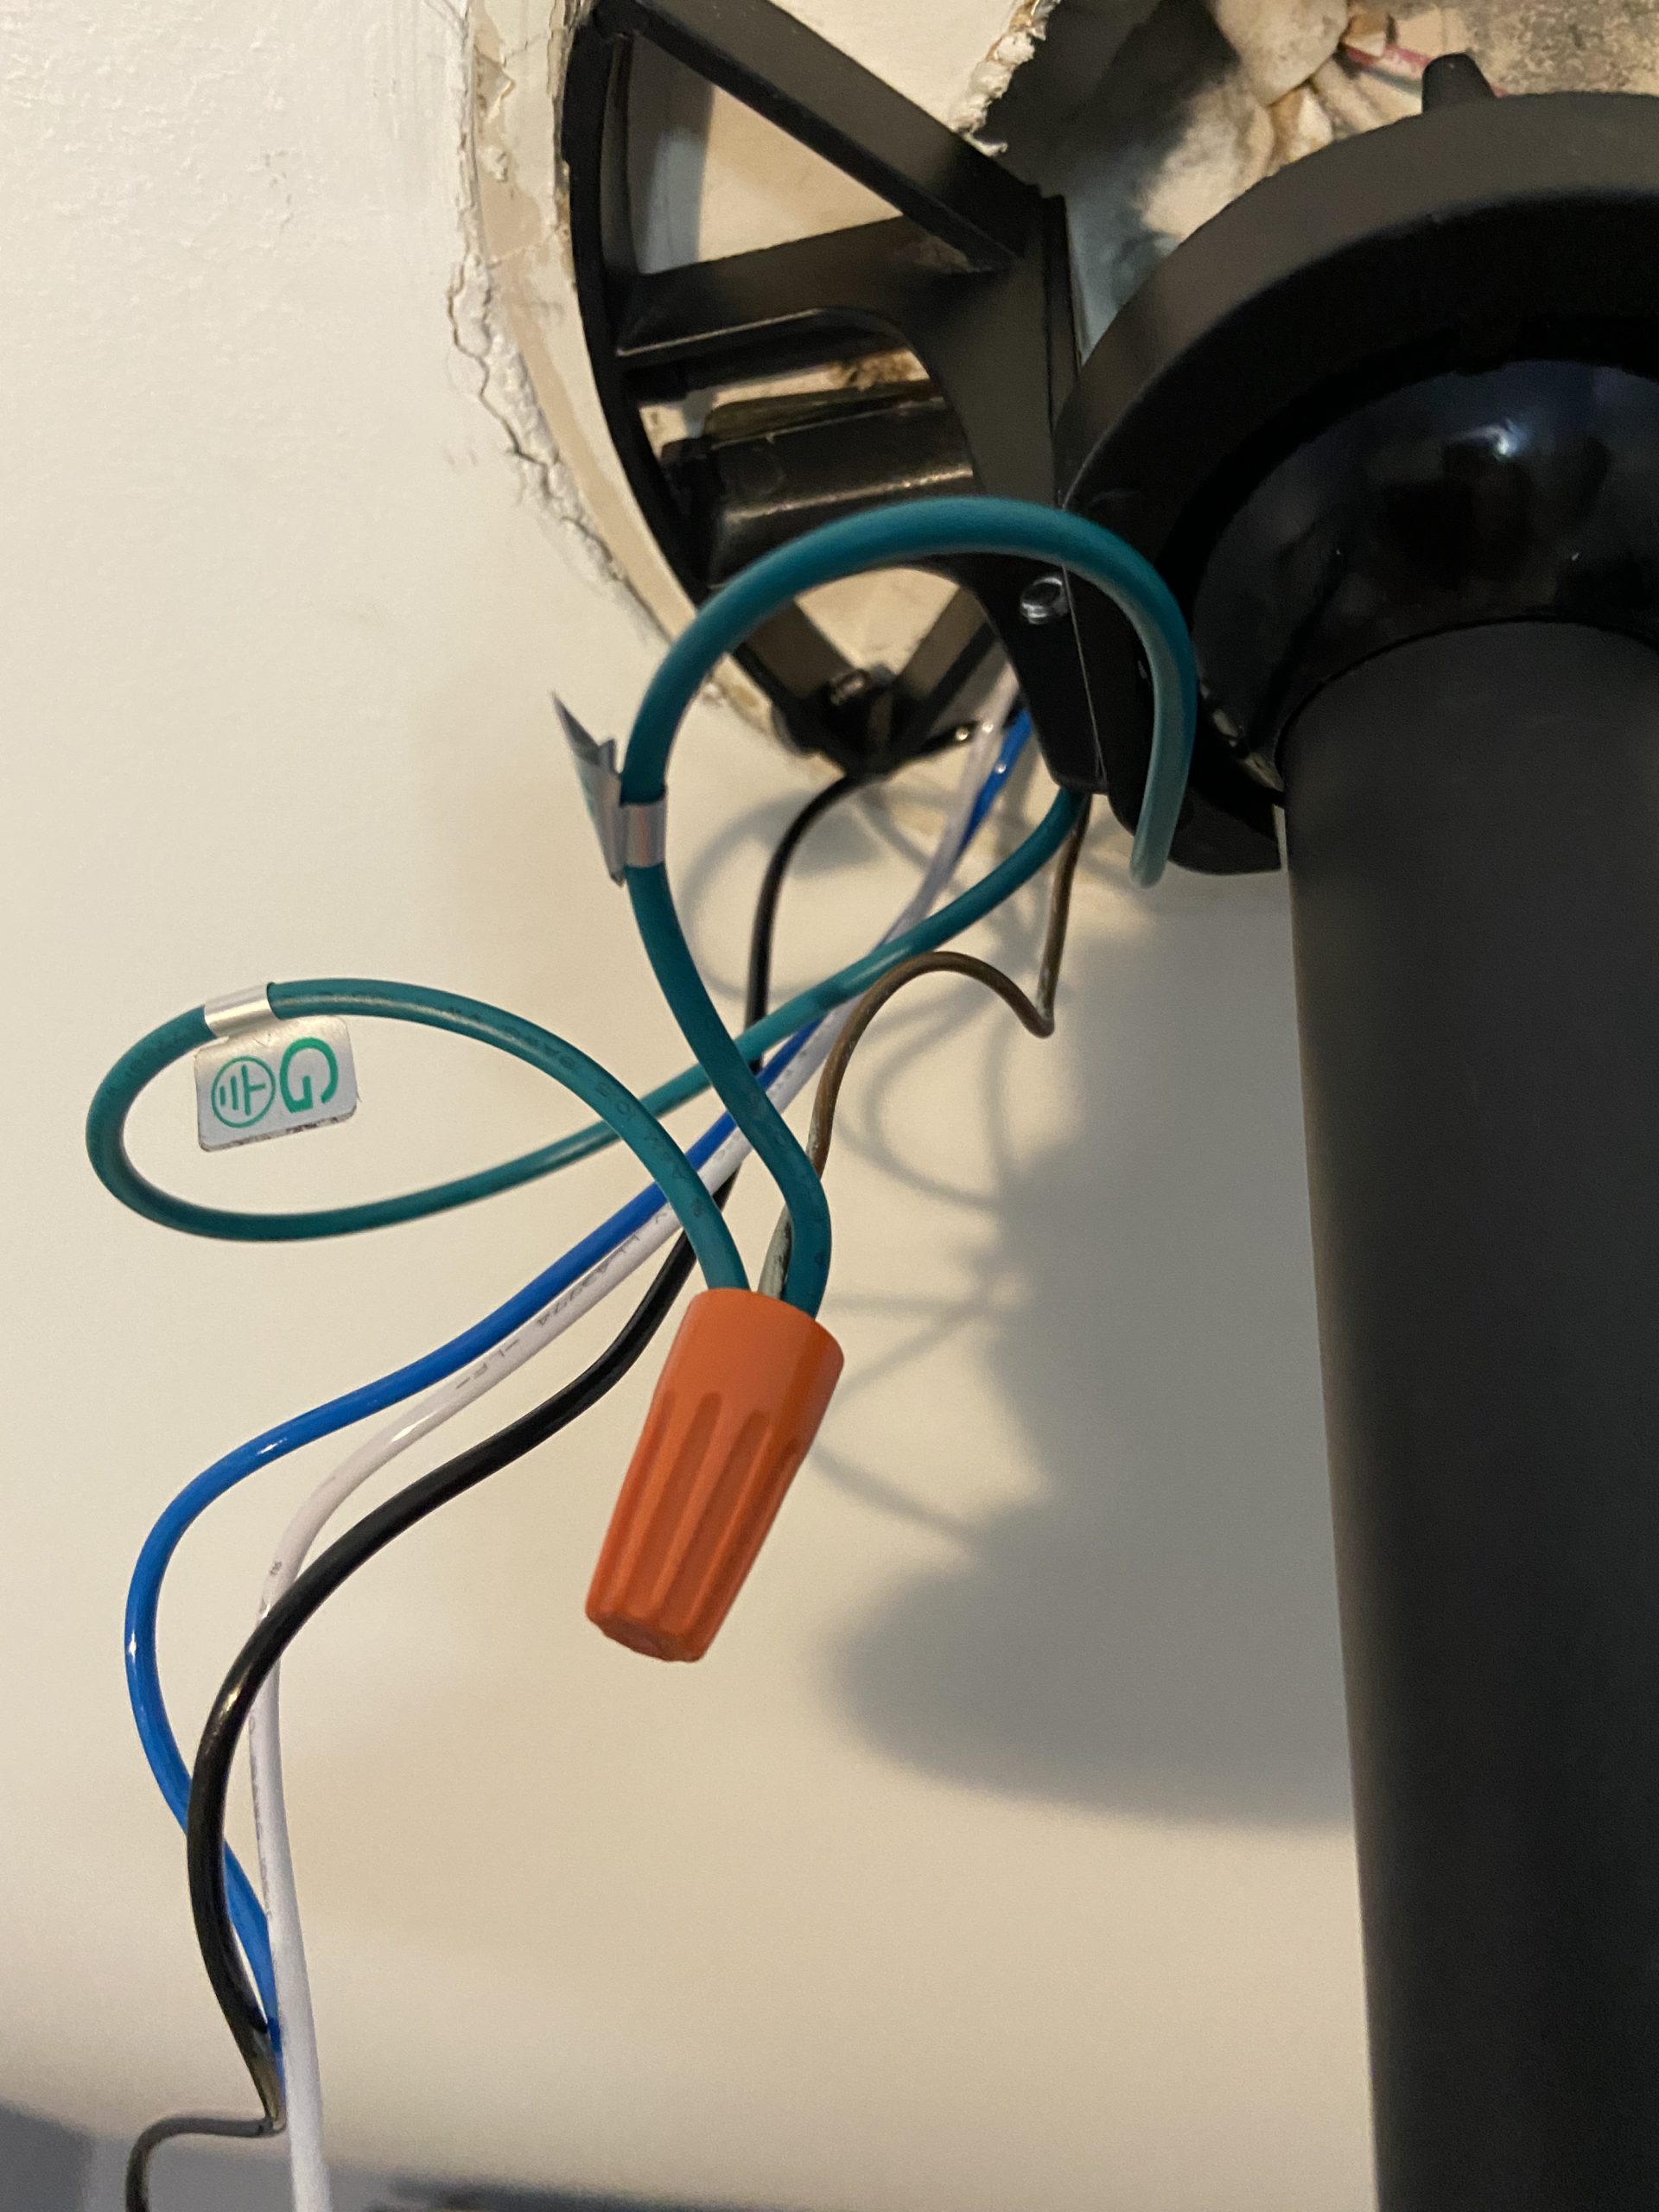
Green Wires (both coming from the receiver and the connected to the downrod) attaches to the Ground wire (Green or Bare Wire) in the outlet box.
White Wire from Fan was already attached to the Neutral Wires (White) from the receiver and the outlet box.
Now when one switch is on, the remote will control the light. The other switch will turn the fan on and off and the remote will control the fan speed, schedule etc. when the switch is in the ON position.
STEP 8: Add Fan Blades
Insert the fan blades through the slots in the motor and align the screw holes between the two. Secure the blades with three screws. Repeat this step for all blades.


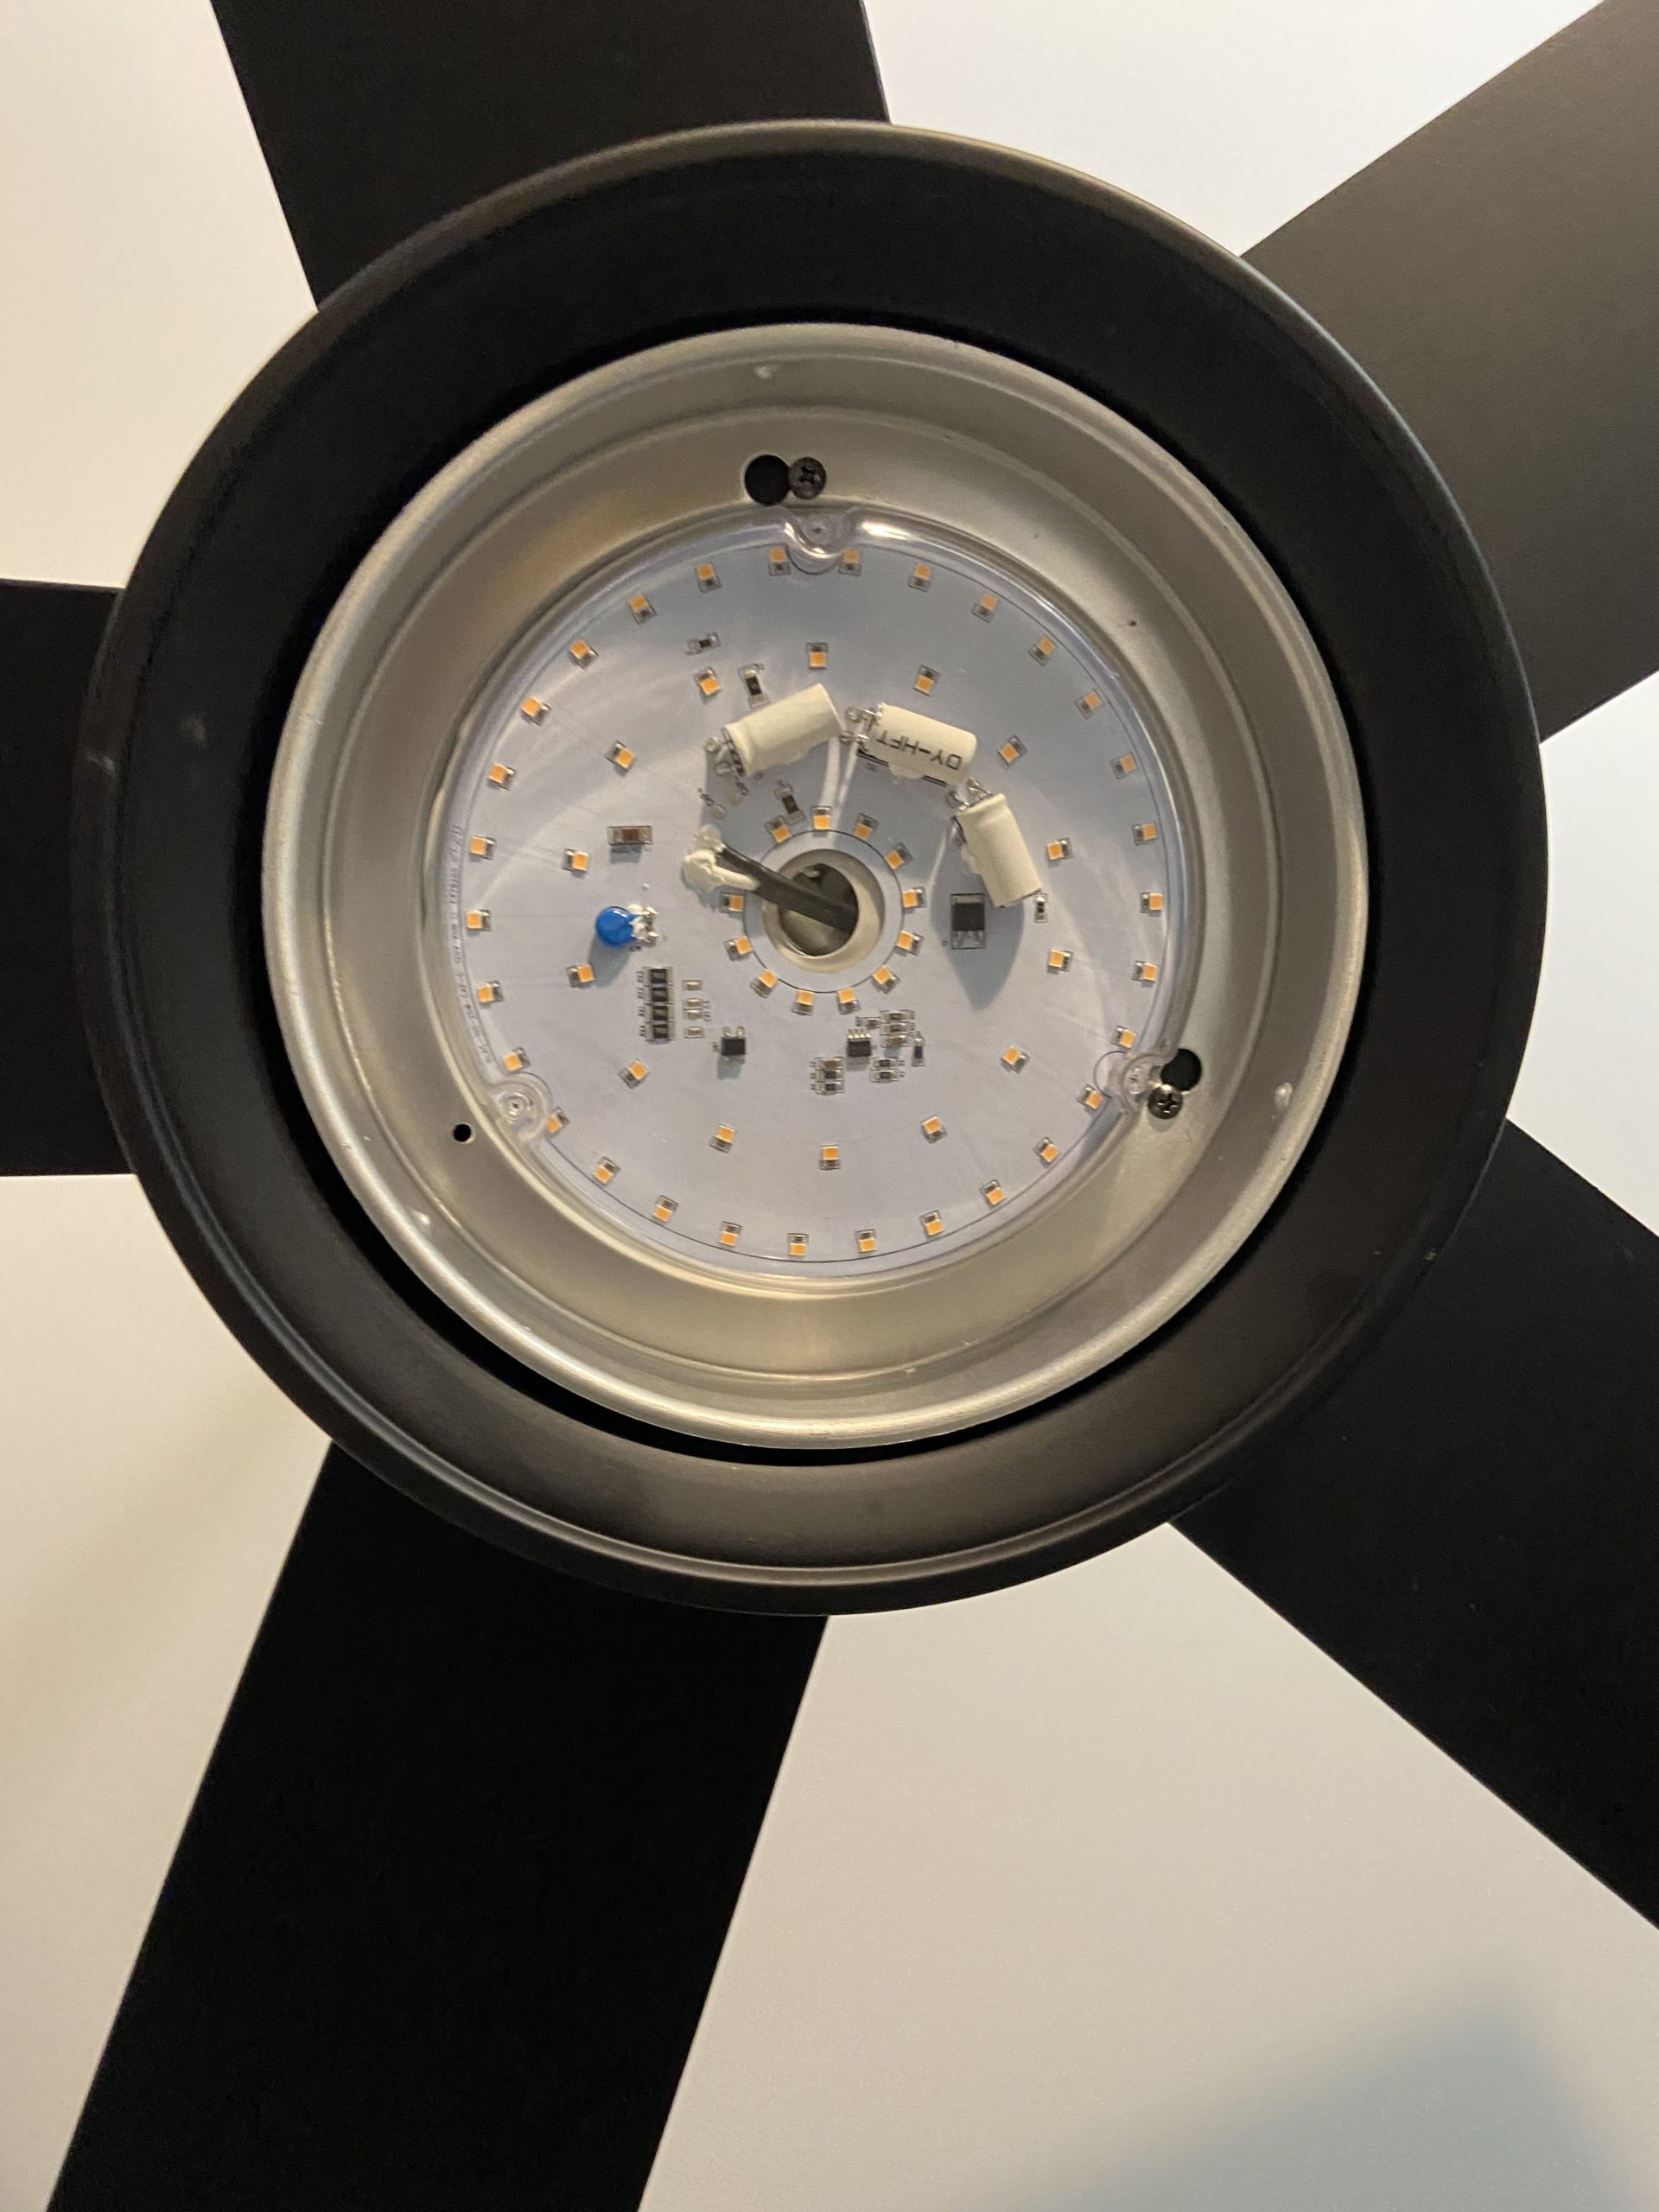
STEP 9: Add Light
Follow your instruction manual for attaching the lighting kit. My fan has a mounting ring as well as an LED light. Plug the light into the fan, then screw in the mounting ring and the light with three keyhole screws.
Carefully lift the glass up to the fan and turn clockwise until the glass is snug. Do not overtighten.

STEP 10: Test Fan with Remote
Check to make sure the connections are all working by turning the power back on and confirming the switches and remote function. If the light or the fan isn’t working, check to make sure the wire connections are secure. For any issues with the fan function or remote, check the troubleshooting section in the instruction manual.
STEP 11: Attach the Canopy to the Ceiling
Remember the canopy that we left sitting on the top of the fan back in step ? Now that you’ve confirmed the fan is functioning properly (success!!) secure the canopy over the wire mess at the ceiling. First, tuck all the wires into the ceiling box, or get them as close to the receiver as possible. Be careful not to loosen any of the wire connections during this step. Bring the canopy up to the ceiling and follow the instructions to secure the canopy to the ceiling. My fan has two mounting screws and a canopy ring that snaps over the screws for a nice, finished look.

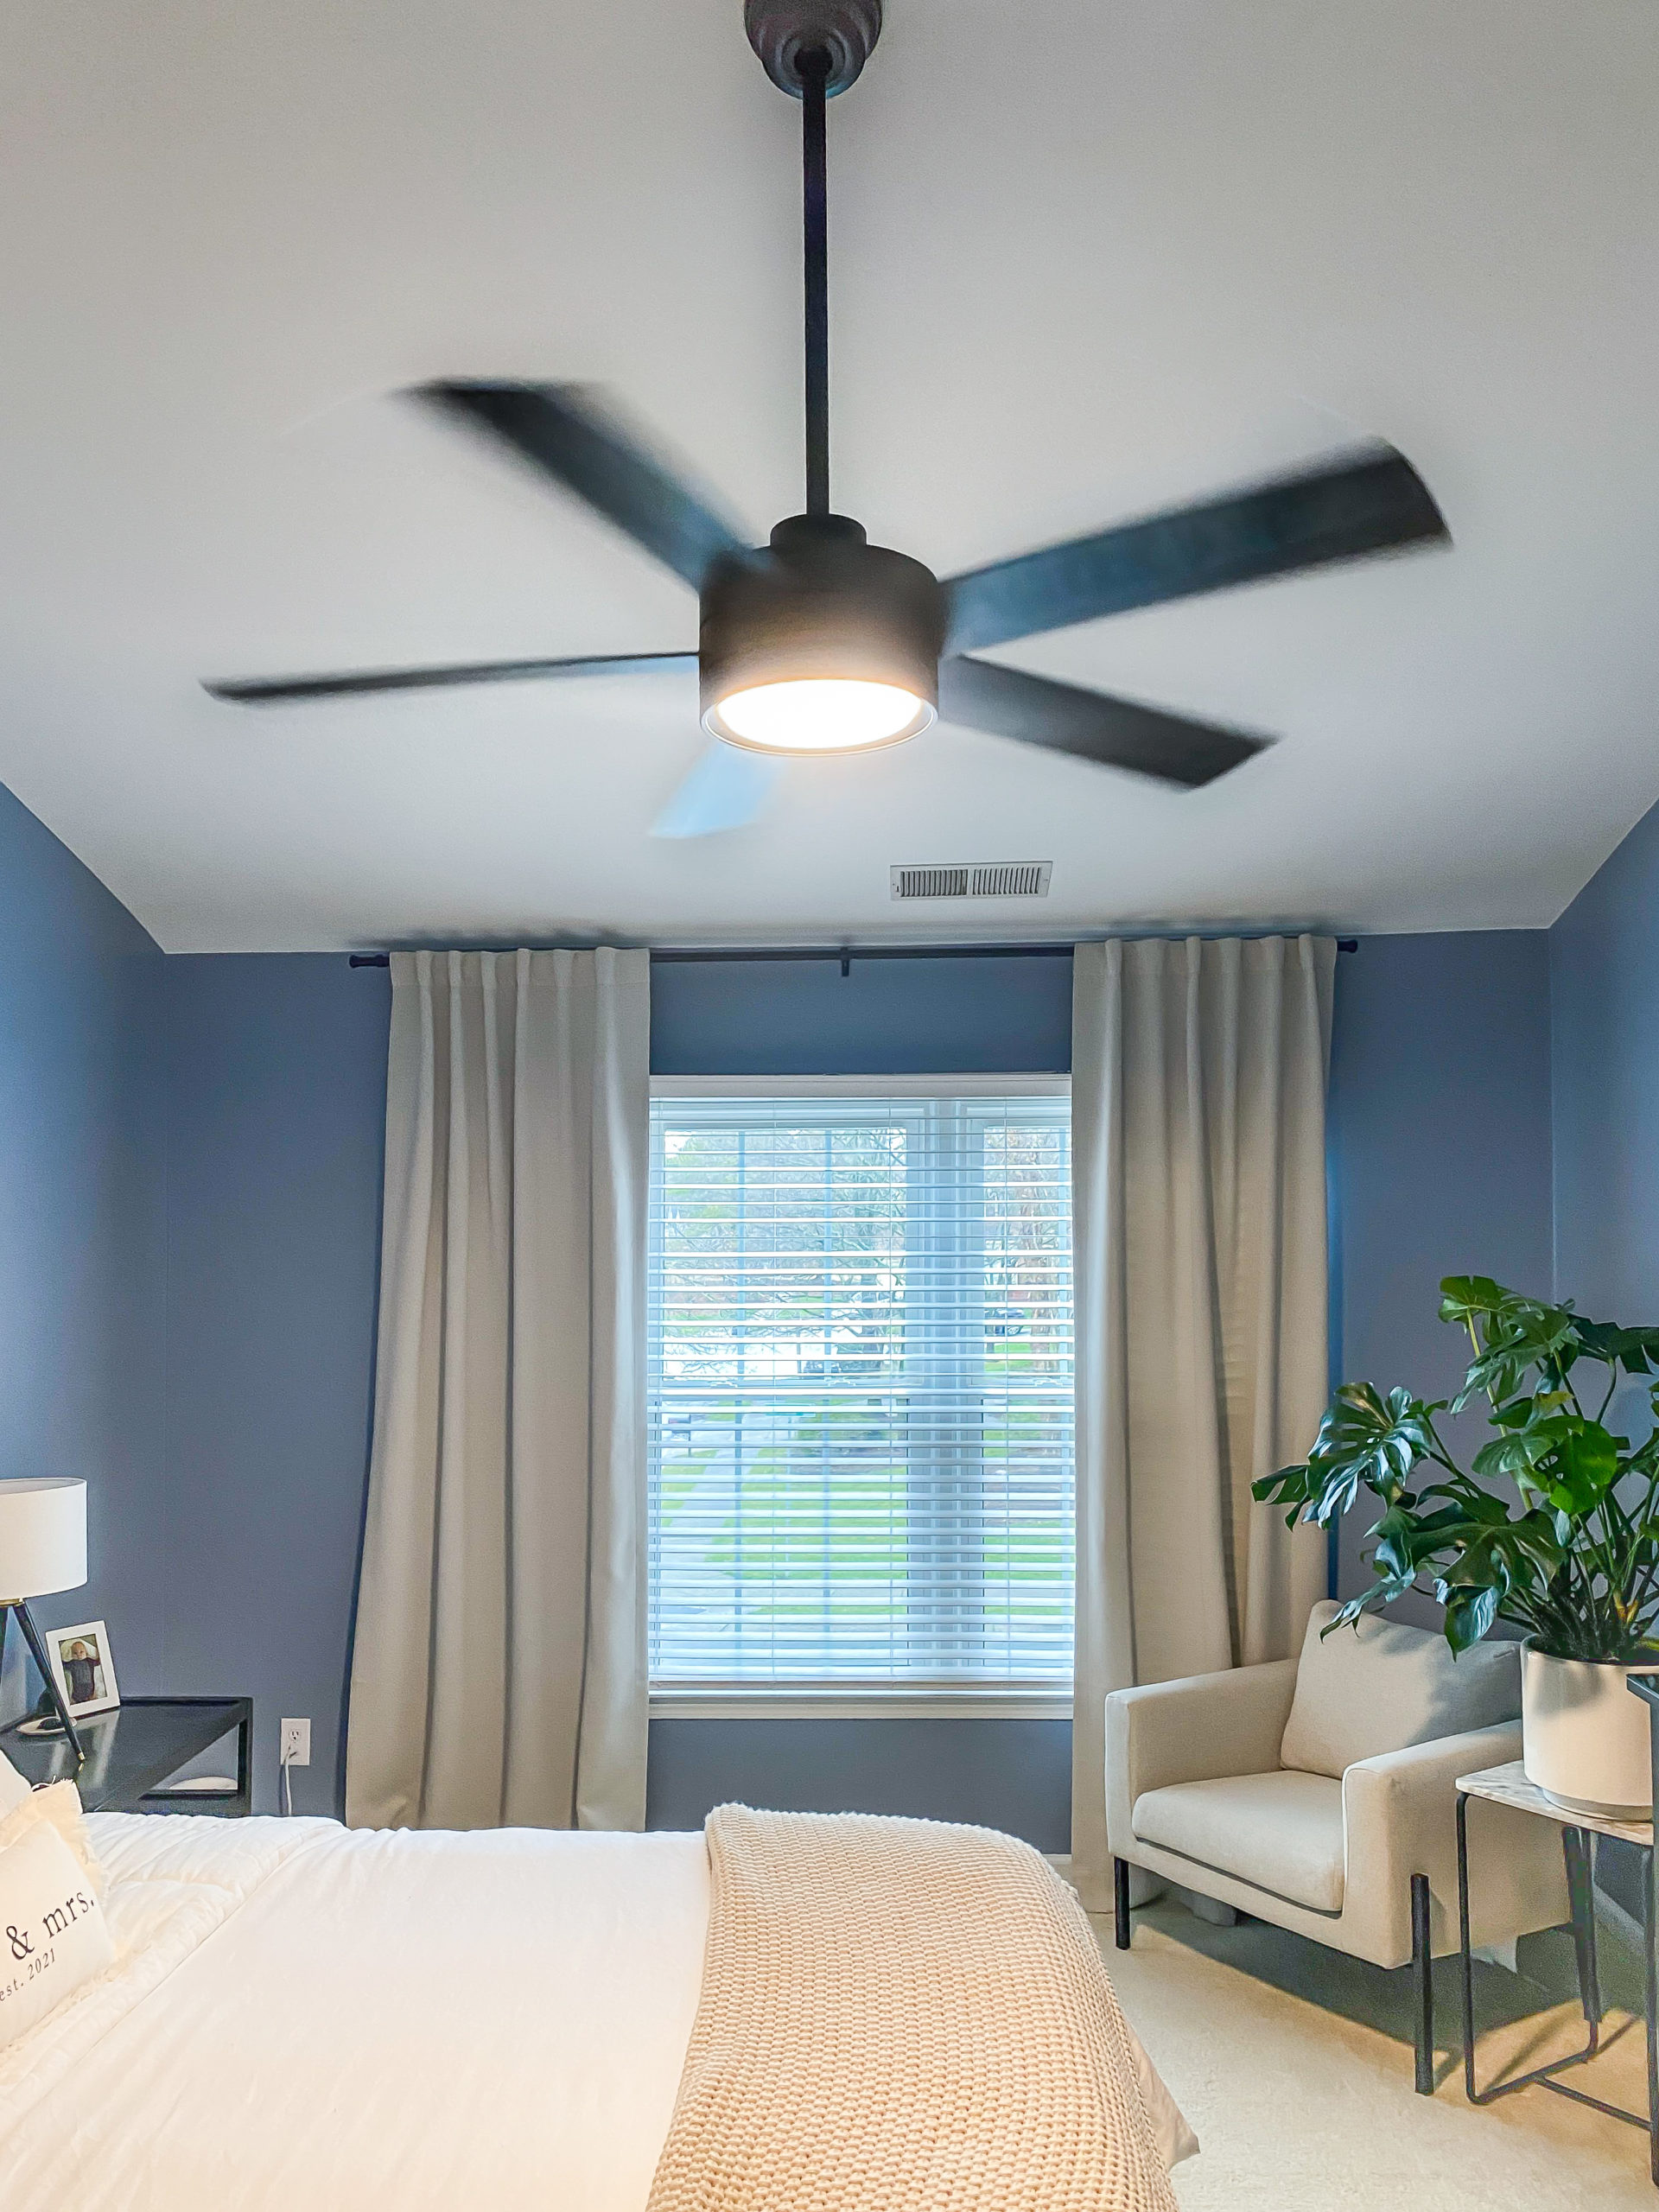
That’s it! You’re done! I bet it feels amazing to finally figure out how to install your ceiling fan to two wall switches. It feels even BETTER if this isn’t the first fan you’ve installed in your space. And REALLY good if it’s the third fan you tried to install (like me). After this, I’m either going to get going on the other three ceiling fans I want to replace in the next two weeks, or they’ll still be the old, gold and white versions 2 years from now.
Link to my fan: Baxtan 56″ Ceiling Fan (I’ve also used this hack with this, larger fan: Honeywell Ceiling Fans Xerxes, 62 Inch)
If this post was helpful or you have additional questions about your specific fan or wiring situation, let me know in the comments below! I’m not an electrician but I’ll do my best to help you!
Want to keep up with my newest projects? Come hang out on my social media accounts, below!
Thanks for this post. I too am not a big fan of fans that operate primarily from a remote, especially the light! Your wiring diagram was very helpful as we do have two wall switches and did not know how to wire a new fan with remote and transmitter so that the light could remain on a separate switch. Your wiring diagram was exactly what I needed and it works. What I may do next is replace the standard switch for the light with a dimmer switch. Thanks again.
Hi Donald!
Thanks for letting me know this post and the diagram was helpful for you! It seems that more and more fans are coming with the remote-only option and I don’t know why!! I love the dimmer option too. I did that for my living room fan (also rigged for 2 switches) and it works perfectly, I just made sure to get a dimmer meant for LED! Good luck!
-Rachel
I performed the wiring as shown. The light works fine with one switch. When I turn on the other switch, and use the remote to turn on the fan. It runs for a few seconds and stops. If I switch the fan to the red wire the fan operates but the light goes on a few seconds and then goes out. I am not sure why this is happening. Help!
Followed this but the remote doesn’t control the light. Switches turn fan and lights on and off and the remote controls the fan, but the lights do not adjust. Which I’m not sure why they would when you bypassed the controller in your diagram.
Hi Shane,
This is correct. My purpose for wiring this way is so that my wall switches control the light and fan separately. This does mean that you will lose your functionality for controlling the light from the remote.
Thanks,
Rachel
Hi I have a receiver with a red wire as well.
So white, blue and back that go into the connector that goes into the fan and then a red (AC in L) and a white (AC in N)
Any suggestions on how to wire?
Thanks
Hi!
Unfortunately, I don’t have the answer for you. I have only been successful when there are 3 wires coming from the receiver. This makes it easier to decipher which wire goes to the light vs the fan. I once had a receiver that had 6 wires coming out of it and I returned the fan for a simpler version. If you can identify the wire that is controlling JUST the light, then you can still wire it this way, but if they are all connected to the receiver, you won’t be able to find that out without cutting the wires to check. I would reco getting a different model fan if you want to wire this way.
Good luck!
Rachel
If you do this, is the light automatically on the full or brightest light setting? Just bought a Fanimation blitz and want to wire it to my dual wall switches but want the light on the brightest setting. Thank you!
Hi Justin,
I can’t say for sure, not being familiar with your specific unit but my living room fan is also wired this way and I have the light power attached to a dimmer switch (the fan light is dimmable). When I turn on the switch, it will match whatever level of brightness that the dimmer switch is set to at the time.
If your unit isn’t dimmable but just has different brightness levels, I would be cautious to wire the fan this way. If you want to try anyway, I would first wire the fan normally, make sure the brightness setting is all the way up, then following the wiring I did in this blog. This will ensure that the unit is ‘set’ to the brightest setting before you make any changes.
Thanks,
Rachel
Two questions…
1) How do you set this up when each outlet box has two different sets of wires in it? Each box contains a set of black and white wires together and a set up black white and ground wires.
2) Is it possible to wire it in a way where the remote still controls the light as well?
This was helpful. Thank you! We had an extra red wire coming from the receiver (Harbor Breeze fan) and we just capped it.
Hi Heather,
Thank you for letting me know this was helpful! Back when I was installing the fan, I had to search the internet and finally found this solution deep in a 10 year old message board. I knew I had to formally write up a tutorial on it for the next person looking for this solution. And I’m so glad you found it! Good call on capping the extra red wire, these fan models are all slightly different, you never know exactly what you’re gonna get.
-Rachel
Hey Rachel,
Thanks for the post I’ve been looking for concise breakdown of this process and wiring diagram to go along with it. I had a feeling this is how it should be done. One question though, have you ever tried to wire the fan receiver to fan specific switch with variable fan speed control? I’m thinking of trying it out with this Lutron control https://www.casetawireless.com/sites/g/files/fhphhs136/files/2021-12/369987_ENG.pdf .
Thanks again!
Hi Ryan,
Thank you for the compliments on the post! I had the same feeling you did, then knew I had to share in a post when it actually worked! I haven’t tried your situation specifically but I did wire my living room fan to two switches with he light being a variable (dimming) switch and it works perfectly. I wonder if the fan wiring/ power settings would be more specific fan to fan (with the matching settings controlled by the remote) than the Lutron control, but then again- it would make sense for this to be standard. Let me know how it works out for you! I would love to use a variable switch for this bedroom fan!
Thanks,
Rachel
Hi, I actually have the exact same fan and am having trouble getting it wired up with two switches. Your diagram shows 4 total wires on the remote module but in your pictures the module has 5, black and white ac in and white, black, blue out.
How should the white wires be connected? All in the same wire nut or ceiling to ac in then module to fan? Your diagram shows 3 whites connected together but technically there are 4 with this fan.
Hi Steve,
Sorry that this is not clear. I only combined 3 white wires with a wire nut, from the fan, the single white wire from the remote and then the neutral white from the cieling box. There is also a white wire as part of the 3 grouped wires that goes from the receiver to the fan. After I cut out the blue (light) wire in that grouping and attached it directly to the power in the ceiling, I just capped the remainder of the blue wire and left the white and black wires grouped and attached. I am not confident but I believe this is what allows me to still be able to control the fan speed from my remote, while the light and fan power are still controlled by separate switches. I hope this helps!
-Rachel
Hi, I followed your steps above and it worked! After installation, is possible to change the output settings to 2700K, 3,000K or 5,000K for the light without the remote? Before cutting the wire, I had it set to 5000k. I flipped the switched and it defaulted to 2700k. I would like it at 5000k.
Please let me know if you can help.
Hi Darren,
I don’t have experience with variable light color fans. There may be an internal switch that can change the color of the light that it defaults too or it may just default to 2700K each time it’s powered on. I would check the instructions for your specific fan model or see if there is an aftermarket wall switch that can control this for you.
Thanks,
Rachel
I followed your instructions and capped the blue wire coming from the receiver, but now the remote will not turn on/off the light. The only way to control the light is with the switch.
Why can’t you connect the receiver blue wire to the red coming from the light switch and the blue wire coming from the fan? Won’t that connect the light functionality to the receiver and then allow the remote control to also control the light and not just the fan?
I have done your hack a couple of times on my own but I just got another fan with a weird issue. Fan (Rejuvenation) is to made to run with the remote only. I did the hack for the light with no problem and the light now works with its own wall switch. But if I flip on the wall switch for the fan, all I get is a “beep”. I have to use the remote to turn the fan on; it’s like there’s no virtual memory. I wanted to use the wall switch to turn the fan on/off and leave it on the “1” speed, but it won’t work! I’m thinking I will trace the wires to the motor and wire it direct to a fan wall switch with the realization I won’t be able to change directions of fan rotation. Thoughts?
Hi Frank,
So sorry I missed your comment. Let me know what you ended up doing and if it worked! I have heard that some fans will “reset” to the off setting when the power is cut so you might have to continue to control the fan from your remote if that’s the case. Let me know if you were able to isolate the A/C motor wire though! I love so many rejuvenation fans, I bet it’s worth dealing with the remote for the design!
Thanks,
Rachel
Hi Rachel
Thanks for an amazingly helpful article!
Question: When intercepting the blue wire to the light (between receiver and fan) and connecting direct to red for independent wall switch – will this prevent my remote from changing LED temperature (color)? Or is the remote communicating directly with the LED array? (Does this command need to go through the wifi connection via the receiver?)
If so, I do not know what color I’ll end up with for the LED or if it will even work.
Hi Arnold,
Unfortunately I do not know how this set-up would affect a light with variable kelvin settings. Sorry for the trouble.
-Rachel
This was exactly what I was looking for! I searched the internet for ages and only found random, long winded posts. Your explanations, photos and diagrams where a great help. Thank you!
Hi Jaime,
It makes my day to hear this post helped someone! I searched forever on the internet as well and as soon as I got the answer, knew I had to share it!
You’re welcome!!
Rachel
Thanks for this post, it helped me fix a new house I just moved into where they had ghost switches everywhere and remotes everywhere (or missing altogether). I was able to get them all re-wired so now the fan switch turns on the fan and the dimmer switch works again (it was the one they disconnected, for obvious reasons). Next step is to replace the switches with smart switches so I can control them with alexa/google/phone. People can hunt down the remote if they want to change the speed, but I’m leaving them at a normal speed so turning on the fan switch (or via voice) will turn on the fan at the preset speed. Though, for other reading this, some fans will reset to off when they lose power, so you kinda have to leave the fan switch on and always use the remote for the fan in those situations.
Hi Brian,
Thanks for the comment and I’m so glad this post helped you! I’ve definitely gotten some comments about certain fans that reset to “off” when you cut the power to it so keeping that switch on and just using the remote works- although it’s kind of the same as not having the fan hooked up to a switch at all at that point!
For anyone reading this comment and wants a fan recommendation that this trick works for, here is the link for my exact fan pictured: Baxtan 56″ Ceiling Fan. Here is another, larger fan that I’ve used this trick on as well: Honeywell Ceiling Fans Xerxes, 62 Inch. Both work for adjusting variable brightness from your switch (if you have a dimmer switch) and have fan on/off functionality from the switch (with fan speed controlled by the remote). Both reset to the last setting when the power is cut.
Thanks for your comments Brian!
Rachel
Hi Brian
Can I ask did you manage to get the smart switch integration to work? That’s what I’m hoping to achieve but I still want the switches to work as ‘normal’ too.
Thanks!
I just finished installing a ceiling fan with two wall switches using these instructions and it was a breeze! Your step-by-step guide was super helpful and I love how you included the wiring diagrams. The only adjustment I had to make was for my specific light kit, but that was an easy fix. Thanks for sharing your expertise!
Hi Neet and Angel!
Thank you for the kind words! I’m so glad to hear when this post helps others 🙂
Hello Rachel,
Just a quick question to clarify an apparent contradiction in the instructions (https://whatbbbuilt.com/2022/02/09/ceiling-fan-two-wall-switches/); please read the two referenced statements copied below:
Step 6 (Cut “Light” Wire), first statement; “*You will lose functionality of controlling the light from the remote if you follow these steps.”
Step 7 (Making the Electrical Connections), last statement; “Now when one switch is on, the remote will control the light. The other switch will turn the fan on and off and the remote will control the fan speed, schedule etc. when the switch is in the ON position.”
Step 6 says you will lose remote control of light, but Step 7 states remote control of both light and fan is achieved when applicable wall switches are on; light on/off and fan on/off.
Is this an error in the instructions? (or, is remote control of both light and fan achieved when applicable wall switches are on).
Please advise.
Thanks Douglas
Can I still use this “hack” if the ceiling fan is a smart fan (Wi-Fi enabled)? I’m curious if the light function will be disabled when using Wi-Fi since it is disabled with the remote.
Thanks for this post! Just want to add that this will NOT work with DC fans. DC motors only work through a receiver – it’s not just for remote control, it’s also a power converter.
Also note, standard dimmer switches don’t work with DC fans.
If you want a DC fan, look for a compatible wall control unit and receiver.
Hopefully this saves someone at least half the time I spent exploring this today! 😆 Thanks again for posting. I’m still within my return window and know just what to get now!